| Author | Message | ||
Aphototaker Tinkerer Username: Aphototaker Post Number: 43 Registered: 12-2009 Rating: N/A |
Google helped a bit. And after playing around a bit with the variable resistors (pots) beside the viewfinder, I seem to have eventually figured it out. The two pots beside the viewfinder (the right hand side pots of the three) are the ones I tweaked. The meter adjusted at three settings. Zero setting is done at 1/4s at ASA 100. At this position, the needle must rest at the lower black warning mark. It should be more or less parallel with the slant of the mark (it will be pointing at around 8'o clock position). Medium light adjustment is done with the right most var. resistor (the one beside the viewfinder). Bright light adjustment is done with the next one (middle one of the three). Also, rotating the contact point of the variable resistors in the clockwise direction results in larger deflection of the needle, thus resulting in smaller aperture setting for proper exposure. So if one's FTb is over-exposing (i.e. smaller deflection of the needle, resulting in larger aperture setting) in bright light, one should rotate the middle variable resistor a bit clockwise. This would result in larger deflection, hence a setting of a smaller aperture would be required. The reference meter I used for calibration was an EOS 5 set in partial metering mode. Here is a picture to illustrate the method. 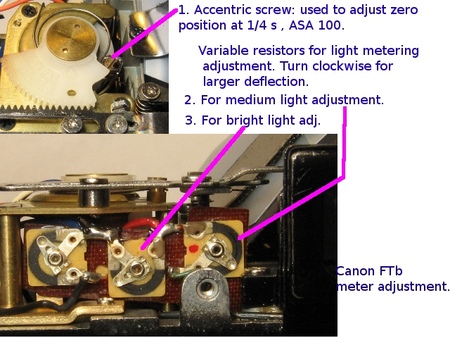 |