| Author |
Message |
    
Bruce_robbins
Tinkerer
Username: Bruce_robbins
Post Number: 23
Registered: 06-2008
Rating: N/A
Votes: 0 (Vote!) | | Posted on Tuesday, August 27, 2013 - 03:57 pm: | 


|
Hi,
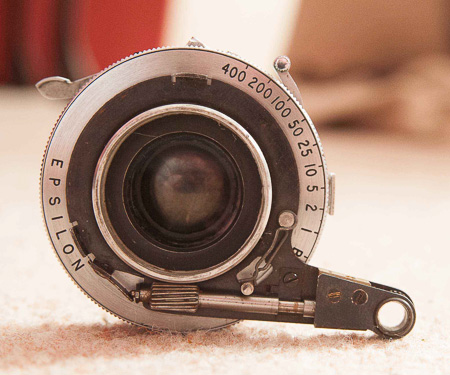
Does anyone have any experience of working on the Epsilon shutter on this camera? I've removed the lens elements front and rear and any screws that I can see but I can't figure out how to get into the "guts" of the shutter. The problem is that it's cocked but won't release. I'm hoping I might be able to release it and, fingers crossed, it will be working again. Any help would be much-appreciated. |
Davejb
Tinkerer
Username: Davejb
Post Number: 9
Registered: 04-2013
Rating: N/A
Votes: 0 (Vote!) | | Posted on Wednesday, August 28, 2013 - 12:06 pm: |
|
Have you removed the 2nd element from the front? Which lens does it have?
I've stripped the Epsilon on a Selfix 820 with Ross Xpres which may be similar. There were two screws behind the 2nd element housing that retained the front plate of the shutter.

The 2nd element was not easy to shift. I was working with the shutter unit removed from the body, and removed the housing eventually placing it face down on a sheet of rubber and unscrewing it by friction. My notes tell me I also used WD-40 and some heat! To attempt this with the shutter still on the body you would need to be VERY careful not to twist the struts etc. |
Davejb
Tinkerer
Username: Davejb
Post Number: 10
Registered: 04-2013
Rating: N/A
Votes: 0 (Vote!) | | Posted on Thursday, August 29, 2013 - 02:21 am: |
|
Looking at pictures online of the Autorange I'm not sure now how similar it will be. Is the problem the removal of the RF mechanism? |
Bruce_robbins
Tinkerer
Username: Bruce_robbins
Post Number: 24
Registered: 06-2008
Rating: N/A
Votes: 0 (Vote!) | | Posted on Thursday, August 29, 2013 - 03:05 am: |
|
Hi Dave,
Thanks for taking the time to respond. I've removed all the glass front and rear and there are no screws showing as in your pic above. It looks easy enough to remove the RF mechanism but I didn't see how that would help me and I was concerned I'd upset something that would need recalibration.
I'll take a couple of pics later today to show the stage I'm at. |
Bruce_robbins
Tinkerer
Username: Bruce_robbins
Post Number: 25
Registered: 06-2008
Rating: N/A
Votes: 0 (Vote!) | | Posted on Thursday, August 29, 2013 - 03:13 pm: |
|
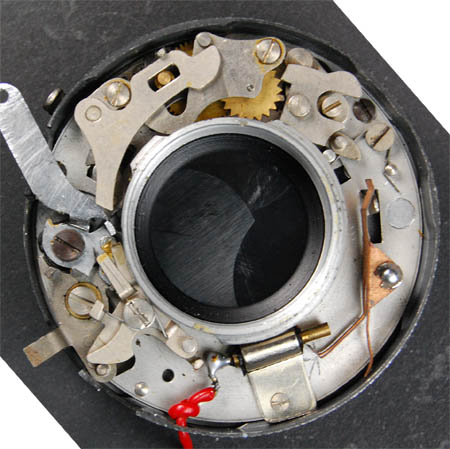
Here are a couple of pics in case anyone can help.
 |
Fidji
Tinkerer
Username: Fidji
Post Number: 61
Registered: 12-2011
Rating: N/A
Votes: 0 (Vote!) | | Posted on Thursday, August 29, 2013 - 07:14 pm: |
|
Just a couple of observations from your photos. In the first one it looks like there is a second front element covering the shutter blades, this should unscrew, but may be very tight and difficult to get a grip on. In order to get to the shutter, the speed dial will have to come off, and to do that, you will have to remove the rangefinder parts.
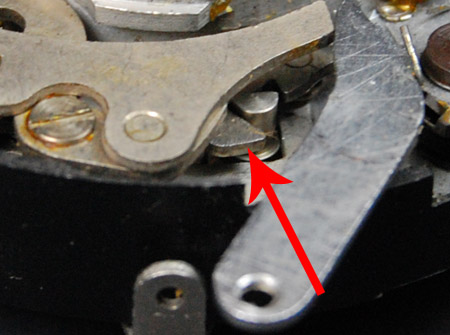
Then, in the second photo, the aperture ring has 2 small screws holding it on. Maybe, beneath that ring are more screws, although they are more likely to hold the aperture blades in place, which you do not want to disturb.
Personally, I would squirt in lighter fuel several times to flush out the dirt, before trying to dismantle an unfamiliar shutter. |
Bruce_robbins
Tinkerer
Username: Bruce_robbins
Post Number: 26
Registered: 06-2008
Rating: N/A
Votes: 0 (Vote!) | | Posted on Friday, August 30, 2013 - 04:23 am: |
|
Fidji,
I'm scared to remove the aperture ring for the very reason you stated!
The dark metal rangefinder part surrounding the focus helical doesn't want to move. I've tried turning it using a moderate amount of force - didn't want to apply too much pressure. There seems to be nothing holding it on. |
Davejb
Tinkerer
Username: Davejb
Post Number: 11
Registered: 04-2013
Rating: N/A
Votes: 0 (Vote!) | | Posted on Friday, August 30, 2013 - 01:35 pm: |
|
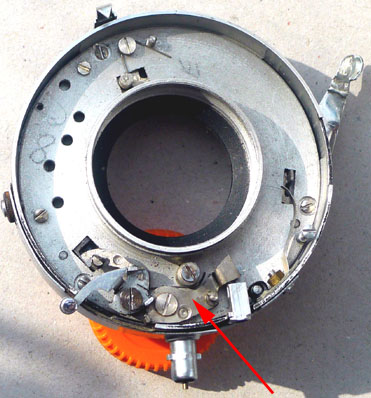
The screws visible at the back are those in the picture below at 1 o'clock and 7 0'clock, which as Fidji correctly guessed, are holding the diaphragm together.
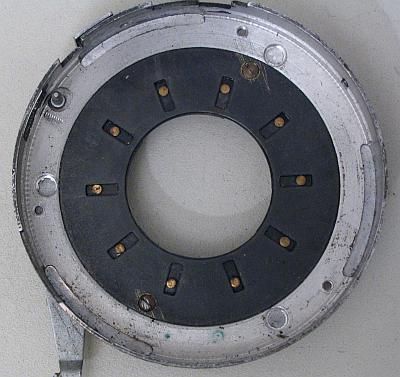
I can't be any help regarding the RF mechanism, but it would obviously need to come off, and you will have to try to mark everything so you can reassemble it as it came apart. The fix won't be as easy as you hoped: there is oil on the shutter-blades, which is probably why it is jammed, so it will need stripping down. |
Fidji
Tinkerer
Username: Fidji
Post Number: 62
Registered: 12-2011
Rating: N/A
Votes: 0 (Vote!) | | Posted on Saturday, August 31, 2013 - 03:29 am: |
|
In Davejb's picture he says the ring with the 2 screws holds his shutter together. So your ring in your picture 2 [with the scratch at 11 o'clock] must have to unscrew to open up your shutter. The rangefinder arm can stay in place, as the shutter speed ring will lift over it.
Problem is undoing this ring. I have solved a similar problem by cutting out a disc of masking tape to cover the lens glass, then putting contact adhesive on the ring surface and on the edge of a 1" piece of thick rubber tube [the outflow pipe of a washing machine], then when the adhesive dried on both. When put together the grip was great enough to unscrew.
Soaking the threads in lighter fuel the day before might help, as might a little WD40 applied with a cocktail stick. But due to the value of the camera [�1938 a few days ago on UK EBay] I would work with caution, or do as I previously suggested, flood with lighter fuel to see if the shutter releases after dissolving the dried up grease and oil. |
Davejb
Tinkerer
Username: Davejb
Post Number: 12
Registered: 04-2013
Rating: N/A
Votes: 0 (Vote!) | | Posted on Saturday, August 31, 2013 - 07:44 am: |
|
Bruce's shutter is obviously substantially different to mine (faster, and B (&T?) at the opposite end of the speed-disc), but I think the fundamentals are probably the same.
I'm sure the RF mechanism will have to come off before the speed-disc can be removed, but I'm wondering if the plate of the RF mechanism could actually be serving the same purpose as the black disc in my first picture, and holding the speed-disc on.
It looks as though the 2nd element housing stands above the RF mechanism, so you may be able to unscrew it by friction, and quite possibly it is this housing that retains the RF mechanism and may be the key to getting it apart.
Prices do seem to vary pretty wildly, but 1938GBP? That's too wild for me! Be very careful, and if in doubt, go out and buy a cheap Super Ikonta! |
Bruce_robbins
Tinkerer
Username: Bruce_robbins
Post Number: 27
Registered: 06-2008
Rating: N/A
Votes: 0 (Vote!) | | Posted on Saturday, August 31, 2013 - 03:56 pm: |
|
I've managed to get access to the shutter mechanism now. I dribbled some WD40 around the bottom edge of the focusing helical and attacked it with a rubber stopper. Sadly, I can't see anything obviously amiss with the shutter. I had thought it was cocked but it's not and it doesn't want to cock. Any ideas? 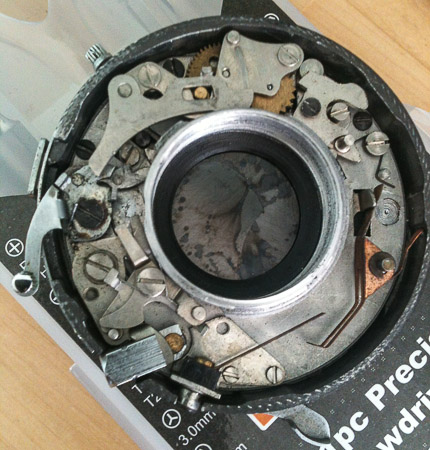  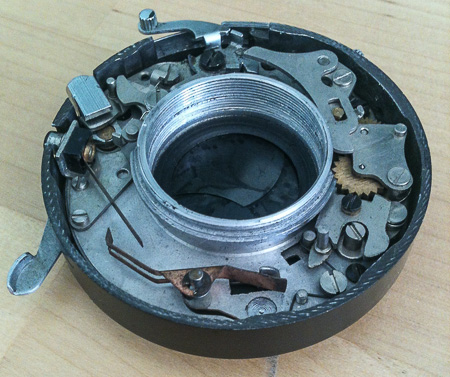  |
Br1078lum
Tinkerer
Username: Br1078lum
Post Number: 643
Registered: 11-2010
Rating: N/A
Votes: 0 (Vote!) | | Posted on Saturday, August 31, 2013 - 08:35 pm: |
|
Bruce, when you say it won't cock, can you move the cocking lever, and the other levers just won't lock? Or is the cocking lever stuck?
Sometimes, by observing the actions of all the levers one at a time, you should be able to determine the sequence that everything has to happen, and find where the missing connection is. And a small screwdriver to manipulate the levers helps to find which one locks, or unlocks the action.
I had one shutter where the catch lever under the B lever had spread over the years, and so the blocking dogs on it weren't doing their job, and the shutter would not cock. I had to disassemble the levers on the lower right in your last photo (on a Compur Rapid) to bend them back into proper shape.
You could also have a broken, or misplaced spring that is not making a certain lever return to it's ready position. Look for a loose spring tail that's not riding against anything, or small bits of broken spring tails.
PF |
Hanskerensky
Tinkerer
Username: Hanskerensky
Post Number: 272
Registered: 05-2009
Rating: N/A
Votes: 0 (Vote!) | | Posted on Sunday, September 01, 2013 - 01:01 am: |
|
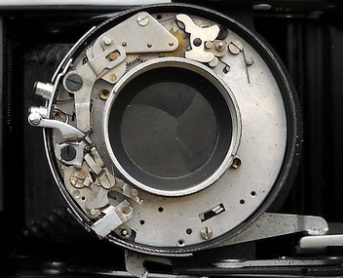
Hereby an image of the Epsilon of my MPP Microcord.
Many things are similar and it looks if your shutter is allready in the cocked state as you see that the mechanism connected to the cocking lever is in a different position.
btw Could you tell us how you managed to open the shutter ?
 |
Fidji
Tinkerer
Username: Fidji
Post Number: 63
Registered: 12-2011
Rating: N/A
Votes: 0 (Vote!) | | Posted on Sunday, September 01, 2013 - 04:50 am: |
|
I must agree with Hanskerensky, all my epsilon shutter cameras cock with the curved cocking lever moving anticlockwise, with the convex curve showing when cocked, as in your photos.
Looks like the shutter blades are stuck together. |
Bruce_robbins
Tinkerer
Username: Bruce_robbins
Post Number: 28
Registered: 06-2008
Rating: N/A
Votes: 0 (Vote!) | | Posted on Sunday, September 01, 2013 - 12:08 pm: |
|
PF,
The cocking lever is stuck. If you take a look at the second pic. If I try to move the lever to the left then the hook-shaped part in the red box, which seems attached to the lever, hits the body of the shutter and is physically prevented from moving any further. I can't imagine that's supposed to happen so there must be a way of disconnecting the hook-shaped part from the lever arm. They're not part of the same pressing but appear to work in tandem.
Hans,
The red box in the first pic shows the lever next to the flash contact that can be moved to open the shutter blades.
Fidji,
The shutter blades seem fine. They open OK using the wee lever mentioned above and I've cleaned them with lighter fluid so they're in pretty good shape.
Bit of a mystery this one...
  |
Hanskerensky
Tinkerer
Username: Hanskerensky
Post Number: 273
Registered: 05-2009
Rating: N/A
Votes: 0 (Vote!) | | Posted on Sunday, September 01, 2013 - 03:14 pm: |
|
Bruce, that lever next to the flash contact is in fact part of the shutterblades ring which is underneath the baseplate. Apparently its sole aim is to trigger the flashcontact at a certain point during the opening stroke.
The hooked shaped part must indeed be connected to the cocking lever. Its function is to grab a pin which is attached to same shutterblades ring and open the shutter. A litlle further on in the shutter cycle it should return and the shutter should then be close by spring force.
At least, that's the way it goes in most leaf shutters. However, i didn't dismantle my Epsilon that far to be a 100% sure.
Looks that you indeed have a problem with that hook-shaped part which is in a position that it normally shouldn't be in.
 |
Fidji
Tinkerer
Username: Fidji
Post Number: 64
Registered: 12-2011
Rating: N/A
Votes: 0 (Vote!) | | Posted on Sunday, September 01, 2013 - 03:49 pm: |
|
Maybe this photo will show the positions of levers with the shutter uncocked. |
Br1078lum
Tinkerer
Username: Br1078lum
Post Number: 645
Registered: 11-2010
Rating: N/A
Votes: 0 (Vote!) | | Posted on Sunday, September 01, 2013 - 09:57 pm: |
|
You can start the action, Bruce, by pressing on the B lever at the point shown by the arrow.
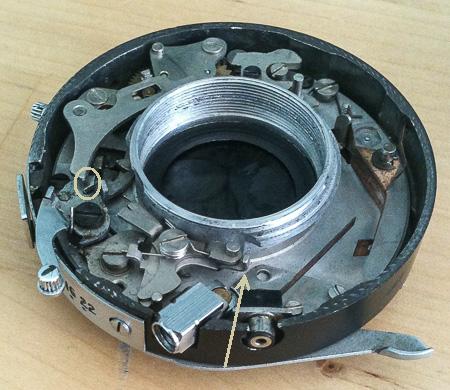
The circled part looks bent to me, and may have let the lever that Hans pointed out go past, which would throw the whole action out of sync. You'll just have to dismantle it to see if that is the issue.
PF |
Bruce_robbins
Tinkerer
Username: Bruce_robbins
Post Number: 29
Registered: 06-2008
Rating: N/A
Votes: 0 (Vote!) | | Posted on Monday, September 02, 2013 - 02:42 pm: |
|
One step forward and another back...
I loosened the dark-coloured screw beneath the circled area in PF's pic above and the troublesome part that had been preventing cocking clicked into its rightful place.
The cocking lever is now free to move - but won't catch at the end of its travel. It looks to me as if a small piece of metal has broken off part Z in my pic here. There's a tiny, hook-shaped part just to the left of the X in my photo that I think is supposed to be caught by the missing piece at 1 o'clock in relation to the letter Z.
If that's the case, that's me scuppered as I've no spare parts that could replace Z.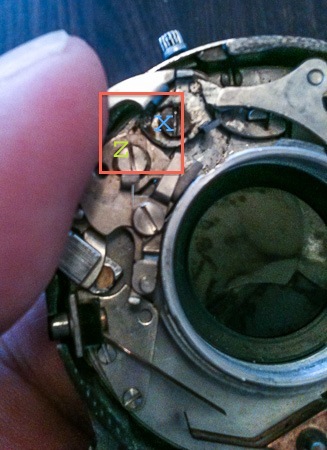 |
Br1078lum
Tinkerer
Username: Br1078lum
Post Number: 648
Registered: 11-2010
Rating: N/A
Votes: 0 (Vote!) | | Posted on Tuesday, September 03, 2013 - 08:05 am: |
|
And that's most likely what caused the other lever to be in the wrong position. Unfortunately, I don't have any of these shutters to be able to send you a part. Hope you find one soon.
PF |
Johnnyh
Tinkerer
Username: Johnnyh
Post Number: 8
Registered: 06-2009
Rating: N/A
Votes: 0 (Vote!) | | Posted on Tuesday, September 03, 2013 - 09:05 am: |
|
Is this like the part that you need, or perhaps adaptable to it ? This is from a Size 0 (much more common than your Size 00, of which I don't have any). If it helps, I could drop it in the post to you; I'm contactable by PM on Flickr. John.
http://www.flickr.com/photos/43334883@N03/sets/72157631988206591/
Aaargh, posting box won't put all the link on one line - please stitch together to follow the link! |
Bruce_robbins
Tinkerer
Username: Bruce_robbins
Post Number: 30
Registered: 06-2008
Rating: N/A
Votes: 0 (Vote!) | | Posted on Tuesday, September 03, 2013 - 01:55 pm: |
|
That's a kind offer Johnny. I'm not sure if the two parts would be interchangeable as they look a different size and shape. Can I hold it in reserve, though? What I'm going to do is epoxy a tiny screw in place of the broken off part and see how that goes. The force applied by the hooked part isn't very great and I can't see why a glued on screw wouldn't last for a while.
Many thanks to everyone who has shown an interest in this thread. It was a great community effort! |
Johnnyh
Tinkerer
Username: Johnnyh
Post Number: 9
Registered: 06-2009
Rating: N/A
Votes: 0 (Vote!) | | Posted on Tuesday, September 03, 2013 - 02:34 pm: |
|
Bruce, The part will be at your disposal if required. Good luck with the repair :-) . |