|
|
| Favorite Classics |
|
This is a variable brightness light source that is used to check meter readings, shutter speeds, aperture openings, etc.
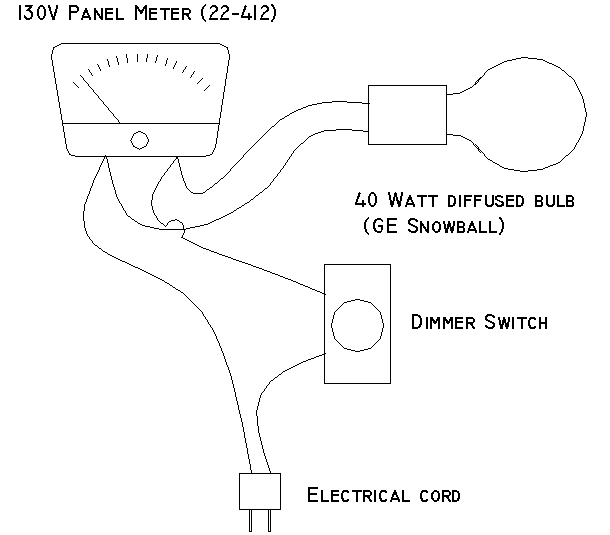
It is the most important...and most used... piece of test equipment you’ll need. Luckily it is also cheap and easy to make. Since this circuit is powered by 110V AC house current be VERY cautious in hooking up the circuit. And be even more cautious in using it. My advice is to mount all components (and wire connections) in a plastic project enclosure. A suitable enclosure can be found at Radio Shack. You can see the enclosure I use below. This enclosure is large and expensive but my future plans are to consolidate all the test equipment I have made into this one control panel. Notice currently there are only two panel meters on the right. They are the Adjustable light source meter on top and the EV tester meter on the bottom. Soon I hope to add a Shutter speed/Shutter curtain speed tester and Aperture tester on the left. I used a Radio Shack 130V AC panel meter part number 22-412 (the EV tester uses a different panel meter and is described on the EV tester page) and the control panel box is part number 270-216. The dimmer switch is a standard living room dimmer switch that can be bought at any hardware store...or Wal-Mart. The light socket and cord was salvaged out of a broken lamp (My son likes to play basketball in his bedroom.) but can also be bought at any hardware store. If you wish to make one just like mine drill holes in the right hand side of the 270-216 control panel for the light socket and the dimmer switch. The light socket location is obvious from the picture but the dimmer switch may be trying to hide. The dimmer knob can be seen sticking out about in the middle of the right side of the control panel. Mount both light and dimmer switch to console. Remove aluminum front panel and using the drawing on the meters package drill and cut clearance holes for the meter. I cut the lamps light cord about 6 inches from the socket and crimped on ring terminals to fit on the meter posts. Crimp ring terminals to the wires going from the power cord and the dimmer switch to the panel meter also. Then I drilled a hole in the back of the control panel to feed the power cord through. Knotted it to keep it from being jerked out. Then used a twist on wire connector to join the loose power cord wire to the loose dimmer switch wire. Only thing left is how to use it... Calibration is the key. Using a known good metering camera (I always set the ASA to 100) adjust the lights intensity up and down, noting the different apertures and/or shutter speeds that the camera recommends at the various voltages. It is even better to use several good metering cameras to verify the calibration. Also always have the camera the same distance from the light. Ambient light will affect the readings too so keep the room lighting constant...or just turn off the lights. Also take into effect the metering characteristics such as center-weighted, etc. Use a diffused light source. This can be either a diffused bulb like a GE Snowball or a flood light shining through a diffuser plate. The flood light/plate combo is brighter but personally I prefer the convenience of the diffused bulb. It’s cooler to work around too. A shutter speed/aperture combination is known as an EV. EV is a measurement of light intensity. Either a list of EV=voltage can be written out or the face of the meter can be modified to read in EV’s. An EV chart is very handy regardless. When testing an unknown meter, set the light to a chosen EV or voltage, remove ambient light effects, position the camera the standard distance from the light and note the camera meters shutter speed/aperture reading. Compare to an EV chart to see how accurate it is. Accurate equates to the EV read from the chart matching the EV that the light is set at. This sounds a bit cumbersome but after doing it a few times it gets to be second nature. Using the EV Tester simplifies this process. The biggest catch here is that there are three different types of meters: Silicon, CdS and Selenium. All three are sensitive to different light temperatures. So, for instance, if the light was calibrated with a Silicon meter, testing a CdS meter with the Silicon EV’s will give inaccurate readings. What I did was just make me up three EV=voltage lists.
|