|
|
| Favorite Classics |
|
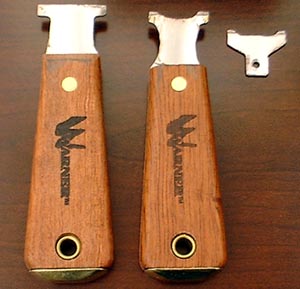
Canonet Blade Cleaning Easiest way, if you have the special tool, is to access the shutter blades from inside the film chamber by removing the rear element. Regular lens spanners are too large to fit into the rear element area. Tool dimensions are given in the repair manual section of this website. A thick bladed (.080") scraper is modified easily using a rotary tool or bench grinder.
Note: There are three rings total, the outermost ring surrounding the rear element (#1 in the photo) holds the front and rear halves of the lens together. Do not remove this LEFTHANDED ring. Just remove the (righthanded) rear element (#2 in the photo). The innermost ring (#3) is to hold the rear glass in the rear element.
Getting deep into the lens assembly to disassemble and clean the shutter and aperture blades is not advised. Granted cleaning after a complete teardown is better, some Canonets were assembled very tightly and damage can be done trying to loosen several major components. The lens element housings themselves are sometimes also very tight. And often the leatherette is nearly impossible to peel off without tearing. All in all NOT a friendly camera to tinker on. After the rear element is removed, wet a folded piece of tissue with Ronsonol (lighter fluid, naptha). Hold the tissue with locking tweezers and swab the blades gently. If the shutter is cocked and released but the blades failed to open, they may free upon contact by the tissue. Be cautious not to snag moving blades! The swabbing will generally have to be repeated several times before the blades stay free after the Ronsonol dries. Swabbing with graphite mixed into the lighter fluid may be helpful on especially difficult blades. But the free graphite is hard to remove from the blade area and may stick to optics. My preference is NOT to use graphite unless absolutely necessary. And then I usually remove the front element so the area can be blown out with canned air. Don't damage the delicate blades with excessive air pressure! Another reason to remove the front element is to have access to cleaning the aperture blades without having to get to them through an opened shutter. Holding the shutter open on B and swabbing the aperture blades is risky business. The thin, sharp shutter blades can slice the tissue then "eat" it. I know this from personal experience! Only way to get the tissue out is to completely disassemble the lens. It is normal for the aperture blades to remain at a small aperture with the shutter uncocked. During cocking the aperture should open to the set aperture. If it doesn't then the aperture blades may need to be cleaned. If the blades aren't sticking don't clean them! To remove the front element, first remove the thin silver ring screwed into the filter ring. This thin ring retains the plastic nameplate ring and the photocell aperture plate. Next unscrew the front element. Often thumbnails or light spanner pressure can remove the element assembly by turning the outer element retaining ring. But if this ring turns and the main element housing doesn't, stop...retighten the outer element ring. You are going to need another special tool. Luckily its dimensions are also given on this website. However it isn't as easy to make. The spanner slots for the housing is at the base of the housing. They can be seen through the gap between the element housing and the filter ring. Not easy too get to with anything but a special tool. Before I made my tool I tried grinding a crochet hook thin enough to fit in the gap, then using it as a drift punch. It works but leaves nasty scars. After removing the front element, clean the aperture blades as previously described for the shutter blades. |