|
|
| Favorite Classics |
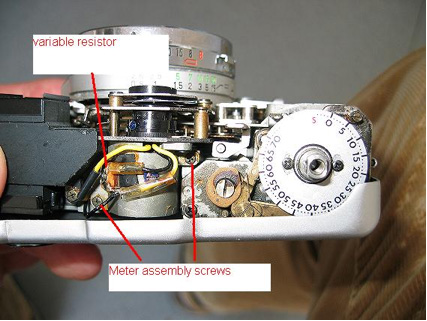
| Replacing and adjusting lightmeter assembly of Canon Demi EE17 by Winfried Buechsenschuetz I found a cheap Demi EE17 on a flea market but it turned out that the galvanometer showed discontinuity. One of the very thin wires was broken close to the coil. After several months of search on ebay I found a junker for an acceptable price. When it arrived it looked as someone had been driving his car over it --but the galvanometer worked!! Now I had to swap it: First, remove the rewind crank and the advance crank. Both is quite straightforward. Then peel back the leatherette on the front. You ?only' have to peel back the upper part - peeling back Canon leatherette is not easy without ripping it since they used a very thin stuff and a strong glue on many cameras. Now remove the screws holding the upper of the cover panel. You don't have to remove the self timer lever - removing the upper part of the cover is sufficient. The cover panel has a snug fit, maybe it takes some force to lift and to remove it. Remove the screws around the top cover (5 pcs.) and lift it. Hold down the frame counter reset pin with a small screwdriver and slip the top cover over it. Lift it on the advance crank side first, then wiggle it to the left and slip it over the flash connector. Do not loose the shutter release button and the part inside it. The meter assembly is held in place by two screws.
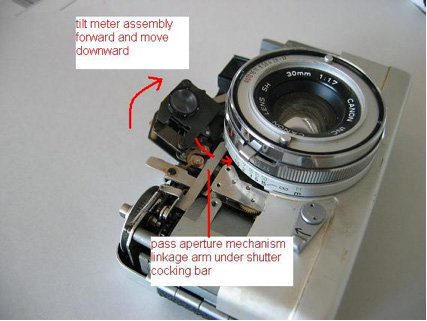
Gently lift the meter assembly after cutting or soldering off the wires (when soldering them off leave a note which is which). On the left there is a long arm which has to pass under the shutter cocking arm. After lifting the assembly a bit tilt it forward and lift it further. There is a certain position where the linkage arm passes the shutter cocking bar easily. There is another arm reaching downward from the meter assembly. This one has a cam follower which rides on a curved cam linked to the speed dial. It opens and closes an aperture in front of the meter cell. If speed is set to 1/500 the aperture is almost closed. When set to 1/8 the aperture should be fully opened.
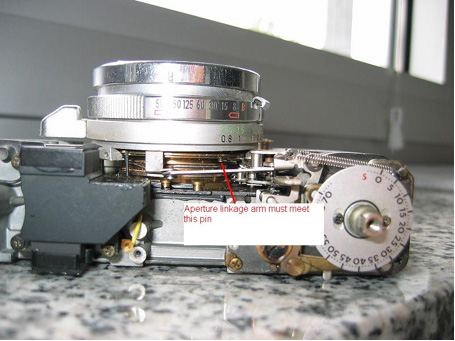
Now take the new meter assembly and insert it. It must be held tilted forward to let the aperture mechanism linkage arm pass under the shutter cocking bar. It has to meet a coupling pin hidden deep inside the lens barrel. This pin is linked to the aperture mechanism. You can tell which pin it is when you press the shutter release button. When the aperture dial is set to Auto the pin moves as you press the button downwards. If the fork end of the linkage arm is close to the pin press the shutter button to move the pin opposite the fork and slip the fork over the pin. Take care not to damage the meter needle and not to misbend the coupling arms.
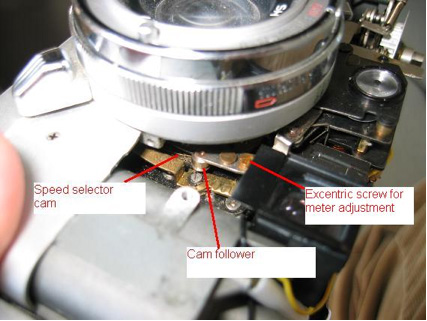
In most cases the cam follower on the right arm will not correctly ride on the cam now. Lift the meter assembly gently, set speed to 1/500 and wiggle the meter assembly until the cam follower rides on the cam properly. You can push the arm gently outwards if necessary. Don't lift the meter assembly too much in order not to loose the linkage to the aperture mechanism. Check whether the arm moves and whether the aperture in front of the meter cell opens and closes as you turn the speed dial.
Resolder all wires and check meter for accuracy. Set the little lever for filter factor compensation (the one marked ?2x, 4x") to the normal position. First, adjust it for linearity. When changing the shutter speed one stop the aperture indicator should move exactly one stop, too. Hold the camera against an evenly lit wall. The meter should read approx. f/8 at 1/60, you may change the ASA setting to reach that value. Now change shutter speeds and check movement of the indicator. Set the variable resistor such that the indicator moves just one f-stop when you move the speed dial one stop. DO NOT try to adjust the screw on the rear of the galvanometer housing. It sets the play of the bearings of the galvanometer needle. Also, DO NOT move the small fork visible under a strip of tape. This sets the zero position of the meter needle. Once the meter is adjusted for proper linearity you can set absolute accuracy by turning the excentric screw on the shutter speed linkage arm. Check the lightmeter against a well-proven handheld meter, or against an SLR with built-in lightmeter. Again, point at an evenly lit wall or similar. Pointing at contrasty objects may give results different from that of a handheld meter since the field covered by the lightmeters may be different. Turning the excentric screw clockwise will yield lower readings, turning it counter-clockwise will yield higher readings. Don't press too hard on the screw head in order not to press the cam follower off the cam. The groove of the cam roller must ride on the cam edge. After adjustment secure the screw with a droplet of paint or glue. You should check the aperture setting mechanism, too. First, set the shutter to B and the aperture dial to Auto. Then, point at a dark object so that the meter needle just reaches the f/1.7 mark in the viewfinder. Press the shutter button and hold it down (a locking cable release will be helpful), and open the rear door. Look through the lens from the front. You should not see anything of the aperture blades. In case the edges of the aperture blades are visible, turn the aperture mechanism adjustment screw and repeat the procedure until the lens is fully open when the meter shows f/1.7. In case the blade edges are NOT visible initially, first turn the adjustment screw until you see the edges and then adjust until they just disappear again. This is just a rough check and does not verify that apertures other than f/1.7 are set correctly. So we have to check at ?real life' aperture values, too. First, set the aperture to f/2.8. Keep the shutter open as described above. Place a caliper gauge across the film rails and measure the distance between the edges (not the corners) of the aperture opening. You should keep the camera at a certain distance. Then, set the aperture dial to Auto and point at something that makes the needle go to the f/2.8 mark. Keep the shutter open again, and check aperture opening with the pre-set caliper again. The aperture setting mechanism may need minor correction from the fully-open settiing. You can also try to check other aperture values, but since the physical opening will be quite small (just a few mm for f/5.6 and above), these checks are not very reliable . |