|
|
| Favorite Classics |
| Canon Demi EE17 Repair by Henry Taber I recently acquired a Canon Demi EE17 off eBay auction. I got it fairly cheap because it had problems but it looked excellent cosmetically. Would you like to look over my shoulder as I tinker with my new toy? First let’s do some inspecting... The self-timer lever and screw are missing, but I knew that before I bought it. Looking through the lens I see that the shutter is half-open. Definitely stuck! All lens dials turn. The focus dial is a bit stiff but not bad. I can see the aperture opening and closing through the stuck shutter so it seems fine. Shutter speeds click as that ring is turned. Meter doesn’t work. Hmm, no battery. Nope, still doesn’t work even with a good battery. Battery compartment is very clean though. Darn, the wind lever is stuck too. Counter window is frosted looking, can’t see the numbers. Viewfinder is bright and clear though. And it’s clean in the film chamber but seals could use replacing, especially around the viewfinder hole. Glass is pristine. Beautiful cosmetic shape. Ok, here’s the list of problems:
Let’s start with the shutter... See the black ring around the white, aperture-adjusting piece. Right on the front of the lens. Find the two slots and with your thumbnails unscrew it. Remove it and the aperture adjustment ring. Be VERY careful! Don’t lose the tiny steel ball that sets in the auto detent groove. I always do camera disassembly on a blue washcloth so any parts that fall out won’t bounce off my desk and I can instantly see it and put it somewhere safe. Next, with your fingers, unscrew the front lens element. Now, if you’ve already read the shutter cleaning article for the Demi S, you know what we are going to do. We take a tightly rolled piece of Kleenex and hold it with our locking tweezers. If the blades look dirty or oily, saturate the Kleenex in some Ronsonol and wipe the blades clean. But my blades looked clean so I was lucky. As soon as I touched the blades with the Kleenex they snapped shut. So I simply sprinkled some graphite on the closed blades and gently...very gently...massaged the graphite in. Then blew the whole area clean with a can of air. Hold the shutter open on B and aperture set to 1.7 (wide open) to blow out the rear element area. If you had to use Ronsonol, you’ll have to blow air longer, until everything is dry. Now snap the shutter a few times at various speeds. Uh-oh, everytime I cock the shutter it instantly releases. I’ve seen this problem before. The cocking lever isn’t stroking the charge mechanism far enough to catch. Darn, so much for being lucky... What causes this problem is forcing the winding lever when something is hung up, like the shutter was. The thin linkage that goes from the winding mechanism to the shutter charge mechanism bows and also the charging lever itself bends. These components are very flimsy and bend easily. Now, to get to these mechanisms, we have to get inside the camera a little ways. Don’t Panic! It isn’t that hard. First peel back the top half of both front leatherettes. Unscrew the two tiny screws that hold the top front cover and lift the cover off. Open the back and insert a screwdriver handle in the rewind fork and unscrew the rewind crank. Use a pointed lens spanner to remove the winding lever’s pinhead screw. Remove the lever and washers. Then remove the 5 screws that hold the top cover. Three are on the back and one each on the ends. Remove the top cover. The shutter button will fall out. Aren’t you glad you used a washcloth? In the scans you’ll see I fully removed the front leatherettes. This is because I knew the meter wasn’t working and I was going to have to remove the bottom cover also to get to the battery wire.
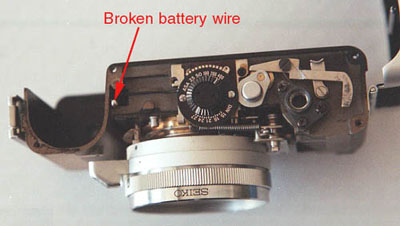
You might try getting to the charge lever area without removing the top cover if your meter is working fine. No reason to add extra work and risk scratching/damaging the camera if it can be avoided.
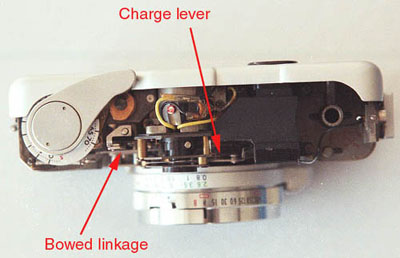
On the scan, in the location marked "charge lever" you can’t actually see the charge lever. It is under the viewfinder components in an uncharged state. But this is where it will appear as you wind the lever. To straighten, cock and hold the winding lever until just before the charge lever self releases, then wedge a thin flat screwdriver between the charge lever and the viewfinder bracket. This will be our fulcrum to straighten the charge lever so position the screwdriver as close to the lens as possible. Be certain you are wedging on the metal viewfinder bracket. Let’s don’t break anything! Then with another screwdriver pry the "bowed linkage" toward the wind lever side of the camera. In other words, in the opposite direction it normally moves while charging the shutter. Stop prying when the charge lever is bent back parallel to the lens axis. The bowed linkage will straighten at the same time. Now you should be able to cock the shutter and release it with the shutter button. Try all the speeds. The charge lever should stay in a cocked position. Ok, on to the meter... First tap the meter needle with a small screwdriver. If the needle moves freely (as mine did) the galvanometer is probably fine. Check for broken wires on the top. All my wires were good and when I flicked the galvanometer terminals with battery power, the needle jumped. (See under Demi S for a fuller explanation of this procedure) This demonstrated that no power was getting to the meter. In checking out the battery wire under the bottom cover, I discovered that due to corrosion the wire had broken. This was the only corrosion on the whole camera, about a quarter of an inch of affected wire. I trimmed off the corroded section and spliced in a short section of new wire. Try stretching your wire, yours might be a bit longer. Then solder the new wire back to the battery housing. Presto! The meter works! Time to reassemble the whole camera. But before I put the top cover back on I pried the fogged window out. Since I had no replacement, I left the window empty with nothing covering it. I’ll keep my eyes open next time I’m at a hardware store, might find some thin plastic that will work. I’m not a purist collector. My goal is to revive these beautiful old classics to a workable condition, not admire them on a shelf. To replace the light seals is easy. Just remove the old seal material and glue on the new after cutting to size and shape. Or better yet, buy the sticky backed kind. I’ve never used any but it sounds easier and less messy. When I run out of the material I presently have, I plan on trying the sticky backed type. You can find this and many other fine camera repair supplies at Fargo Enterprises. Finally the missing self timer lever... After trying a few levers from other cameras lying around my office/library/computer room/camera repair room, (kinda sounds messy doesn’t it?) I discovered that the lever and screw of a Pentax ME Super works just fine. It ain’t original, but it works. Like I said... I’m no purist. Now, go load a roll of film. And learn to use this charming little gem. |