|
|
| Favorite Classics |
|
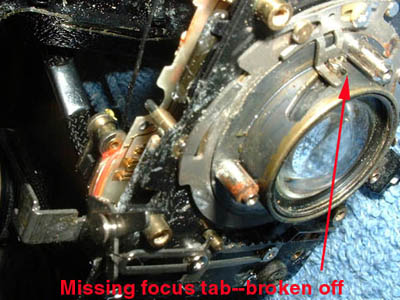
Adventures with Epoxy: Cosina focus fork repair Although in most camera tinkering projects a clean and lube will get it running again, not always. Sometimes parts are broken, usually because of a wind lever being forced. Quite often it is because of an overly enthusiastic tinkerer! I stand guilty of that in a couple cases. But not in the case of this unique little Cosina CX-2, it came to me broken. Fixing (making) parts may not be everyones cup of tea, but as one progresses in tinkering one gets braver. After all, the camera is already broken and there are no replacement parts available unless one is lucky enough for a junker to fall from the sky. Fixing/making parts usually requires expensive tools, often power tools. This can generally be broken into three different classes: totally making the part from raw material (with lathe/mill, or in a simple part, a file), silver soldering the broken parts back together (camera tinkerers form of welding), and epoxy to build up or join the broken parts. Epoxy repairs take the least experience and tools. This present Cosina project is just such an example. I chose JB Weld but there are other products that could be substituted. See the before and after photos. Actually everything that could possibly be wrong was wrong with this poor camera. But this was the only broken part. (I don't usually work on a camera this far gone, but it was cute...and I'm a sucker for cute.) It was obviously caused by the focus helix being frozen because of lack of use and the focus lever being forced. One of the focus fork tynes was cleanly broken off.
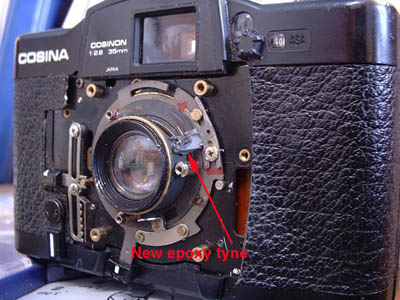
After dropping a couple drops of RemOil on the helix perimeter and letting set over night, the helix started freeing up. Several cycles later and a drop of thicker oil, it was moving freely. After the helix is free, mark the exact location of the focus fork then remove it. Red marks can be seen in the after picture. Its location sets the infinity focus, and if returned to its original location refocusing may not be necessary. Using JB Weld, build up the missing tyne area. I made a stiff paper form to shape the epoxy and to keep it from settling, similar to the forms used when pouring concrete. I always let epoxy dry twice the amount of time the tube recommends when it has to be filed or ground. Call me paranoid...
Then, with a rotary tool, I roughed in the shape. Finishing the final size and shape by hand filing. Since the JB Weld isn't as strong as the metal the original tyne was made from, the replacement tyne should be 3-4 times the originals size. Reassemble the focus fork using the location marks. Spread a thin layer of moly grease along the inside surface of both tynes. |