| Author |
Message |
    
Bomobob
Tinkerer
Username: Bomobob
Post Number: 1
Registered: 10-2007
Rating: N/A
Votes: 0 (Vote!) | | Posted on Sunday, October 14, 2007 - 05:16 pm: | 


|
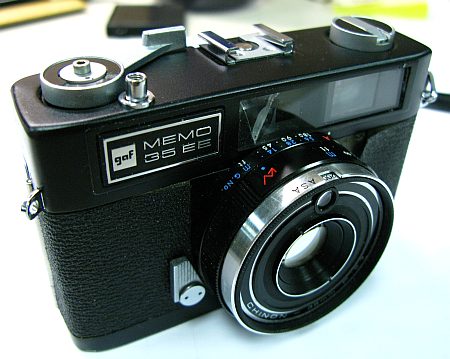
Hi,
I stumbled across a GAF Memo 35EE at a thrift store, and couldn't resist it for $3.99. The only problem is the shutter is slow to close, particularly at wide apertures. My question is, how difficult is this to fix on this camera? I've never gone into a shutter before, and in fact, I'm not even sure how to get to it on this camera. I could bring it to a very good local shop, but I'm sort of toying with doing it myself, since I'm guessing it just needs cleaning and lube on the retard escapement.
Any ideas?
Thanks.
Bob |
Wernerjb
Tinkerer
Username: Wernerjb
Post Number: 203
Registered: 07-2006
Rating: N/A
Votes: 0 (Vote!) | | Posted on Monday, October 15, 2007 - 02:39 pm: |
|
Hi, Matt Denton (among others, there are some good French sites) has some info on that (type of) camera, if you google a bit even a service manual can be had. Similar cameras ("clones") were sold in large numbers under numerous labels and names, inside they are all close to identical, some, like the Konica 35, offer more features, while others, like the Ger Porst 135 L represent the lower end of the range.
I would not consider taking it to a "good shop". I guess you could buy a dozen similar fully functional cameras for what they charge you for only looking at your camera.
This type of programme shutter plus trap needle light meter is not too difficult, in most cases the shutter (aperture and shutter blades are identical, there are just two of them) needs cleaning (oil from the helicoil, dust, deteriorated light baffles) but unfortunately this often means taking things apart, because otherwise the critical points cannot be accessed, like the rear side of the blades or the flywheel bearings. I have a whole collection of those compact 35mm cameras, they are fun to use. If you decide to go inside I can try to answer your questions, as far as that is possible from a distance.
But be warned, my fist attempts with cameras like yours years ago ended messed-up, because for a newbie these nifty little cameras, although easy, can turn out to be quite demanding, W. |
Bomobob
Tinkerer
Username: Bomobob
Post Number: 2
Registered: 10-2007
Rating: N/A
Votes: 0 (Vote!) | | Posted on Monday, October 15, 2007 - 05:13 pm: |
|
Hey, thanks for the pointers. I've found service manuals for other of my old cameras online, but not this one yet. I know it's not worth a lot, so I don't want bring it to a shop, unless he says he can do it for a couple of bucks.
So.....where do I start? One of the screws on the bottom plate has a stripped head, so I hope it's not there.
Disassemble the lens? What's step one?
Thanks
Bob |
Wernerjb
Tinkerer
Username: Wernerjb
Post Number: 204
Registered: 07-2006
Rating: N/A
Votes: 0 (Vote!) | | Posted on Tuesday, October 16, 2007 - 02:20 am: |
|
I saw that service manual at Craig Camera, but on looking again I can't find it. Instead I found this elsewhere, and I think you could try that first before dismantling anything:
http://photo.net/bboard/q-and-a-fetch-msg?msg_id=00KA7T
I would not put lighter fluid directly on the blades, but use a cotton swab moistened with it instead. If too much fluid goes down too deep this will only cause more problems perhaps taking all the grime and goo down with it as it flows to a place where you do not want it to be.
The front side of the blades can be cleaned the same way after screwing out the front half of the lens (care is necessary, they are sometimes very tight!). If lighter fluid should trickle on the lens surface you can set the camera to "B", hold the shutter open and carefully clean/wipe the lens surface dry with cotton swabs.
All other repair attempts, if for example the blades are still slow or the flywheel bearings at the heart of the shutter innards are dirty or, which is a worst case scenario, corroded due to aggressive fluid from a leaking mercury battery, usually start with a removal of the top cap.
After a careful inspection of the camera with the bottom off you can see that wheel and in easier cases clean and relube from there with a pipe cleaner (thin twisted wire cotton brushes). But this method has some disadvatages like the danger of unhooking springs.
If your camera is one of the older version models (frame counter visible in a window inside the winding lever, not beside it) the retracting spring of the film counter has to be unhooked and the wire to the flash socket has to be desoldered before you can completely lift off the top. Next step is the removal of the selftimer lever so that you can peel off of the leatherette (on both sides). Four screws at the corners of the front panel now become visible, after unsrewing them the front plate can be lifted off as a whole. It is now helpful if also the bottom plate is off, as you can see how the linkages underneath go together (important to know for reassembly). Make sure you do not unhook one tiny x-shaped spring on the back, without it the mechanism will nor work. Extra care is needed to protect the delicate needle of the lightmeter.
If you go in that far more soldering will have to be done (battery box and meter wiring). |
Bomobob
Tinkerer
Username: Bomobob
Post Number: 3
Registered: 10-2007
Rating: N/A
Votes: 0 (Vote!) | | Posted on Tuesday, October 16, 2007 - 09:48 am: |
|
Thanks for the roadmap!
The shutter "looks" clean, but I realize it doesn't take much to gum it up. I will try a wee bit of Ronsonol on the blades, to see if it makes a difference. The thing that suggests this problem is not so simple, is that on the BULB setting, the shutter does not stay open when I hold the shutter button. I don't really care if B doesn't work, but it's likely indicative of something worse.
I haven't seen any screws on the top plate, but I may not be looking hard enough. I can probably get the repair guy to do me a favour and remove the bottom screw with the stripped out head. I just cant get a grip on that one at all. The soldering bit doesn't worry me, as it's part of what I do for a living, and on a very very small scale too.
What I'm afraid of is delicate mechanical bits like hooks and springs because if they pop out, it's never obvious where they go.
I've fixed the wiring on a Yashica Electro, but I've never gotten down to shutter level on anything before.
I'll have to go over all the steps you listed above before diving in, like figuring out how to remove the self timer lever.
Or maybe I could try swishing the whole camera around in a bucket of lighter fluid and hope for the best...
Thanks,
Bob |
Jesito
Tinkerer
Username: Jesito
Post Number: 1
Registered: 10-2007
Rating: N/A
Votes: 0 (Vote!) | | Posted on Saturday, October 20, 2007 - 01:25 am: |
|
Hi!
I'm in a similar situation. I got a Chinon 35EE (the same one that the GAF), with a battery holder damaged by chemicals (the previous owner left the battery in) and the seals completely degraded.
However the shutter do work. I've also tried to set th "B" mode unsucessfully, the shutter doesn't keep open. Maybe this camera do need a battery in to be able to use the "B" mode...
Let's look for the manual.
Best regards,
Jes. |
Wernerjb
Tinkerer
Username: Wernerjb
Post Number: 207
Registered: 07-2006
Rating: N/A
Votes: 0 (Vote!) | | Posted on Saturday, October 20, 2007 - 03:36 am: |
|
Hi, Jesito, this camera's shutter default time is 1/30 sec. Depending on the movement of the needle in different light exposure time may vary from 1/30 and approx. 1/650. As the shutter is a program shutter the aperture is selected accordingly between f2.7 and approx f16. Strictly speaking there is no individual selecting of speeds or apertures at all, because these two exposure factors are interlinked at a mechanically (although electrically driven) fixed ratio ("program", hence the shutter's name). This is to say the battery makes the meter needle move, nothing else. Inside these cameras there is definitely neither a computer nor an IC or whatever. Some of these models however were marketed under the impression of being "electronic" because people have always fallen for modern admen's gimmicks accelereating the sales rates on their way up. Still today most people tend to think of electric and electronic as synonymous, which they are not.
The only way to exert a certain influence on the technical make-up of the camera is to choose a higher or lower film speed when a battery is in, but this will not change the default or top speed. "B" not working is a clear indication that the blades are not clean and/or do not open wide enough to be held in that position while the release button is being pushed. There is no metering in "B" mode. ("B" can only be used with fully opened blades anyway, no matter what the meter may say), W. |
Jesito
Tinkerer
Username: Jesito
Post Number: 2
Registered: 10-2007
Rating: N/A
Votes: 0 (Vote!) | | Posted on Monday, October 29, 2007 - 07:01 am: |
|
Thanks, Werner. You were right, after some exercising of the shutter, finally the "B" position was working. I've just finished my first film, so I'm waiting for the developping. |
Bomobob
Tinkerer
Username: Bomobob
Post Number: 6
Registered: 10-2007
Rating: N/A
Votes: 0 (Vote!) | | Posted on Tuesday, December 11, 2007 - 07:25 am: |
|
Well, here is a bit of a long follow-up to my original posts, but I would be so appreciative of any helpful suggestions.
Rather than go into unknown territory, I dropped the GAF off at a local photo store for them to send to a repair guy they say is good and not to expensive. He sent it back saying he couldn't fix it because he could no longer get parts.
So after my success on my Voigtlander this weekend, I decided I'd just have to do it myself.
The only symptom was a verrry slow shutter. In retrospect, it turns out all I would have had to do was remove the bottom plate and lube it.
But not knowing this, I did a lot more, and made more problems. I did learn a great deal about the shutter, after removing every leaf and cleaning and replacing them. That was actually very gratifying.
But here are the problems:
1) I could not completely remove the top cap because for the life of me I could not figure out how to remove the rewind knob from the shaft (photo).
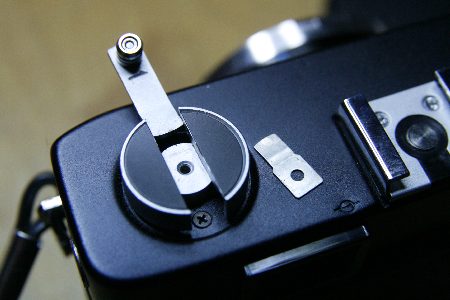
The center screw comes out, the leaf spring and crank come out, but the aluminium knob is stuck on the steel shaft and does not unscrew, does not budge. Is it just press-fit and jammed on? Very frustrating, and not at all obvious to this rookie.
2) As a result of (1), there is now a problem with the frame counter, as the spring has obviously unsprung, and now the counter does not turn, and the tension is gone from the advance lever when it's in the home position. It just flops about 30 degrees. It still cranks a full 120 degrees, and advances the film, but it just ain't right.
So until I figure out how to remove the rewind knob, I can't get a look at the counter mechanism.
3) This is a pain. In unscrewing the outer cap on the advance lever, the head broke off, leaving the threaded shaft stuck down in the shaft. (photo)
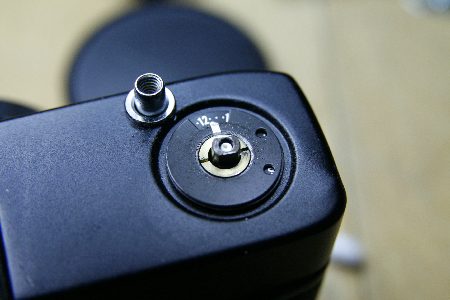
If and when I fix everything, I suppose I could expoxy it back on, but then the camera top will be sealed for life, and that's not a good thing. I could drill out the screw, but that may do more harm than good. Any suggestions?
4) And this really bugs me, because I was very careful. The RF prism is obviously out of whack now, as minimum focus now appears to be 2m instead of 1m. The prism is obviously not getting displaced the way it should anymore. Actually, I had a hard time understanding how the focusing of the lens moves the prism. There is a long shaft protruding from the rear of the lens, but it doesn't appear to move, turn, or rotate when the lens is focused. How it actually moves the prism is a mystery to me.
Well, if you've made it through all this and if it made any sense to you, I'd love to get a nudge in the right direction.
This is actually a lot of fun. Challenging, but fun |
Charlie
Tinkerer
Username: Charlie
Post Number: 119
Registered: 07-2006
Rating: N/A
Votes: 0 (Vote!) | | Posted on Tuesday, December 11, 2007 - 07:48 am: |
|
On many cameras you remove the rewind knob by opening the back, putting a screwdriver in the little fork thet engages the film and then unscrewing the knob assembly. Not necessary to remove the little screw that retained the leaf spring. (Put a film cartridge in the cavity to prevent the little forked shaft from falling down into the film cavity along with associated parts. Time consuming to try to get the little shaft back in again.) |
Bomobob
Tinkerer
Username: Bomobob
Post Number: 7
Registered: 10-2007
Rating: N/A
Votes: 0 (Vote!) | | Posted on Tuesday, December 11, 2007 - 07:58 am: |
|
Thanks, I'll give it a try. I tried to unscrew them, but didn't want to apply too much force just in case it was the wrong tactic. |
Wernerjb
Tinkerer
Username: Wernerjb
Post Number: 222
Registered: 07-2006
Rating: N/A
Votes: 0 (Vote!) | | Posted on Tuesday, December 11, 2007 - 09:20 am: |
|
In the beginning of my tinkering days I encountered very VERY similar problems. It IS frustrating, if a camera goes down the drain, but it is experience that makes the difference in the end, and this does not come the easy way.
That said, let us face your problems. #1: Charlie already advised you about the rewind knob.
#2: the frame counter in this camera is easy to understand, but a pain to install. I gues the long spiral spring has unhooked, if the top is off you will very probably understand how to get it back (also in the similar Porst 135 L the frame counter is part of the winding mechanism, you have to dismantle it every time you take the cap off). #3: shxt just happens. IIRC, the thread is RH (the "ordinary" way). Getting the screw out is not easy, but with a Dremel you could drill two 1mm holes side by side and then tackle it with a homebrew tool. I have also drilled only one hole and then soldered a length of wire to it. The heat from the soldering iron broke it loose and it was the easy to unscrew it. Which will leave you without that top screw anyway. (I guess another GAF from ebay is the only solution!?)
#4: In these cameras' RFs there is definitely no prism (like, for example in some Fujicas!), instead there are levers, "lenses" and mirrors. On focusing the lens flange moves a lever to which the RF mirror is glued, light is reflected from there through a small lens and projects the double image picture to the semi-silvered glass in the VF, and that is it; quite staightforward, easy to understand, but ... It has to be aligned vertically and horizontally, in the given order, not so easy.
Take my advice, don't ask repairpeople about spare parts. Where would they come from? Not even the manufacturers exist any longer. Good service people have long retired or are as old as the hills and definitely not interested! It does not make much sense asking younger ones, because they were not even thought of when people used GAFs and Rolleis to take pictures of each other.
There is no other way than learning it the hard way sometimes, I am afraid. So I once spoilt three Porsts before I got one going again. Not really a financial loss, just a waste of time, but I was rewarded with first hand knowlede taking this route.
If it was easy we wouldn't do it, right? |
Bomobob
Tinkerer
Username: Bomobob
Post Number: 8
Registered: 10-2007
Rating: N/A
Votes: 0 (Vote!) | | Posted on Tuesday, December 11, 2007 - 09:46 am: |
|
Hey, thanks for all the advice. There actually is a very good camera repair shop here in Montreal, but his estimate charge is $50 right up front, so a $3.99 special from a thrift store isn't really worth it. He did fix my Flexaret beautifully, and it was pretty flakey when I brought it in. He's very good. The guy they sent this GAF to is obviously not as up on old cameras, as he should have known all it needed was a few drops of oil. He didn't even open it, but just assumed he would need unavailable parts.
If I end up killing the camera, I won't lose much sleep, and it's fun learning.
I'll try dremeling the advance shaft screw and maybe I can manage to gouge a little slot into it to turn it out.
The RF mirror movement still puzzles me, but I'll have to take a closer look. The Voigtlander made perfect sense to me, as a shaft on the back of the lens rotated with the lens, pushing on an eccentric bar which pulled the little mirror box from side to side. I could see no physical movement of the shaft on this guy, but I guess I wasn't looking hard enough. In any case, if I just end up using the lens distance scale, it's not the end of the world, but I'll give it a look see. |
Wernerjb
Tinkerer
Username: Wernerjb
Post Number: 223
Registered: 07-2006
Rating: N/A
Votes: 0 (Vote!) | | Posted on Tuesday, December 11, 2007 - 12:17 pm: |
|
On some designs there is a free moving steel shaft that goes right throuh a small hole linking the lens flange and the mirror lever, this link to a Japanes repair site may be of help (2nd photo), http://kochi-med.net/moto/camera/camera_repair/c35/index.htm
W. |
Bomobob
Tinkerer
Username: Bomobob
Post Number: 10
Registered: 10-2007
Rating: N/A
Votes: 0 (Vote!) | | Posted on Tuesday, December 11, 2007 - 12:30 pm: |
|
Hmmm, thanks. That looks quite similar. The movement of the shaft from 1m to infinity must be so small that I didn't even notice it. Doesn't take much to move the mirror.
Bob |
Bomobob
Tinkerer
Username: Bomobob
Post Number: 11
Registered: 10-2007
Rating: N/A
Votes: 0 (Vote!) | | Posted on Tuesday, December 11, 2007 - 04:08 pm: |
|
Egad...HELP!!
This is the frame counter spool with its spring that looked like spaghetti when I lifted the top cap.
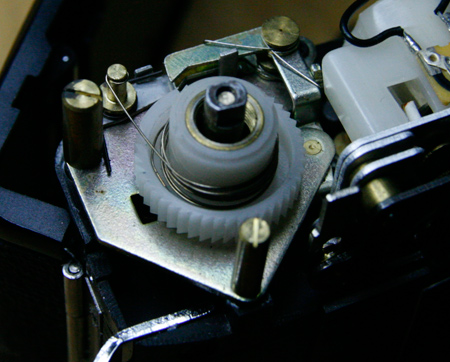
I assume I have the loose end hooked over the right post. So should this spring be rolled nicely on the nylon roller, like a new spool of thread, and then hooked onto the post? Is there a required amount of tension?
I'm going to fix this damn thing if it takes all night! |
Wernerjb
Tinkerer
Username: Wernerjb
Post Number: 224
Registered: 07-2006
Rating: N/A
Votes: 0 (Vote!) | | Posted on Wednesday, December 12, 2007 - 02:19 am: |
|
Hi Bob, it is me again. As previously said the counter has to be unhooked when you take off the cap. The serrated nylon roller stays with the cap, rolling about freely, on top of it there should be the dial (as shown in your picture before you took off the top). This is because the counter dial (not visible in yor picture, where is it?) is usually NOT removed from the nylon part. On some cameras it is simply clipped on (the roller has two tiny posts which keep the the black counter dial in its position; sometimes it is glued on to the roller. Yes, the spring needs some tension, but it looks alright in your picture, and everything else seems ok from looking at what I can see. Putting the spring's end to that post when the cap is put back to the body can be a pain, W. |
Bomobob
Tinkerer
Username: Bomobob
Post Number: 12
Registered: 10-2007
Rating: N/A
Votes: 0 (Vote!) | | Posted on Wednesday, December 12, 2007 - 08:00 am: |
|
Yes, barely visible in the photo are the two tiny posts, and the dial does indeed have two mating notches to clip it onto the roller, so I'm pretty sure the cap could be put back on now, and all the other stuff stacked onto it from the outside. I gave it a dry run, and it all makes sense.
I did figure out the tension required, thanks. All it needs is enough to make it spring back to "S" when the back is opened. Quite ingenious.
I took a closer look at the RF mirror mechanism, and sure enough, the post protruding from the back of the lens does indeed move in and out, thus moving the mirror. I'd never used the camera since I bought it, but looking closely at it from the top, there was a very pronounced inward curve of the lens mounting plate, thus pushing the mirror too much and resulting in the RF basically being uncalibrated. I'd not noticed this before. Using brute force and some unnecessarily large pliers, I straightened the plate, and the RF overlay is now very close to the real focal distance.
I drilled out most of the screw from the advance lever shaft, and today I will attempt to remove the leftover material with a tap. If that works, this baby will be almost as good as new.
All your help has been invaluable...thanks. |
Bomobob
Tinkerer
Username: Bomobob
Post Number: 13
Registered: 10-2007
Rating: N/A
Votes: 0 (Vote!) | | Posted on Thursday, December 13, 2007 - 06:43 am: |
|
Mission accomplished, but not without the great help of the people on this forum. So glad there are resources like this.
The glass is broken, but not on the RF window itself, so I can live with it. I managed to drill out the broken screw in the advance shaft, and clean it out with a 2mm tap. The new hex head doesn't match, but it works just fine.
 |
|