| Author |
Message |
    
Sadbear
Tinkerer
Username: Sadbear
Post Number: 2
Registered: 08-2007
Rating: N/A
Votes: 0 (Vote!) | | Posted on Thursday, July 31, 2008 - 05:24 pm: | 


|
I took off th upper cover of a Vitomatic IIa, but only find no screws to make the adjustment of the rangefinder.
Can anyone help? Thanks!
The following pic is borrowed from this forum.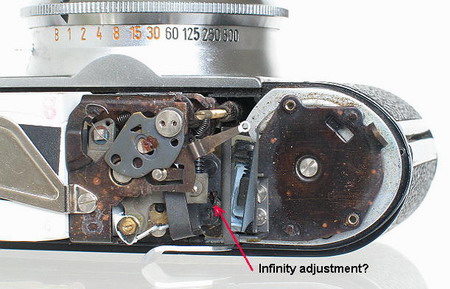 |
Markus
Tinkerer
Username: Markus
Post Number: 65
Registered: 08-2007
Rating: N/A
Votes: 0 (Vote!) | | Posted on Friday, August 01, 2008 - 07:05 am: |
|
I just finished adjusting a Vitomatic IIa. There is a screw that has a spring around it. This is the one you use for infinity adjustment. You hace to rotate it quite a bit to see an effect. You can reach its head from the front of camera and it is locked by a small set screw very close to where the end of the arrow is in the picture you posted. The infinity adjustment screw is only accessible when the lens focus is either at infinity or at the closest focussing distance (I cannot remember which).
A word of advice: do not remove the viewfinder (the glass cube wrapped in paper). It is cemented to another piece of glass to the right and it is a major pain to re-cement the two pieces and also get the vertical alignment of the rangefinder correct (I did not quite succeed, but the camera is usable, at least).
Good luck - Markus |
Sadbear
Tinkerer
Username: Sadbear
Post Number: 3
Registered: 08-2007
Rating: N/A
Votes: 0 (Vote!) | | Posted on Saturday, August 02, 2008 - 02:38 am: |
|
Thanks Markus!
I found the screw witha spring, but I cannot reach the head of it. You said it the head could be reached from the front, but I found no place to see the head. DO you take off some part of the meter? |
Markus
Tinkerer
Username: Markus
Post Number: 66
Registered: 08-2007
Rating: N/A
Votes: 0 (Vote!) | | Posted on Saturday, August 02, 2008 - 07:36 am: |
|
Ah, now I remember. You have to take the metal frame that frames the selenium sensor and the rangefinder patch off. To do that you might have to take the light meter assembly off, too (like in the picture). To do that, you just unscrew two screws (see the picture). One is a long screw that is roughly at the 5 o'clock position (when looking down at the light meter with the camera pointed forward), and the other is a short one at the 11 o'clock position. The light meter assembly just lifts off as one piece. After those pieces are off, you should have easy access from the front of the camera. |
Ethostech
Tinkerer
Username: Ethostech
Post Number: 99
Registered: 07-2006
Rating: N/A
Votes: 0 (Vote!) | | Posted on Sunday, August 03, 2008 - 06:55 am: |
|
The Vitomatic 2A rangefinder can be adjusted in both vetical and horizontal planes. The horizontal plane is that to which Markus refers. The vertical adjustor is the square-headed slotless screw as can be seen at the top left of the posted picture.
There is an unusual feature of the Vitomatic 2A rangefinder in that the window glass of the rangefinder objective is NOT a plain piece of glass but is a shallow prism. That is to say it is approx' 1.5mm thick at one end and only 1mm thick at the opposite end.
If that glass has been removed for cleaning; the prismatic factor not noticed and then put back 180 degrees wrongly, it becomes impossible to get a proper adjustment of the horizontal rangefinder plane. So if you can't get correct horizontal image coincidence, you now know where to look.
Hope this helps. |
Sadbear
Tinkerer
Username: Sadbear
Post Number: 4
Registered: 08-2007
Rating: N/A
Votes: 0 (Vote!) | | Posted on Sunday, August 03, 2008 - 08:46 pm: |
|
Thanks Markus & Ethostech!
I think that is too much for me, since I am not good at repairing.
And my Vitoamtic IIa is just little of adjustment, so I will leave it as is .
Thanks again for your kindly help! |
Ethostech
Tinkerer
Username: Ethostech
Post Number: 100
Registered: 07-2006
Rating: N/A
Votes: 0 (Vote!) | | Posted on Tuesday, August 05, 2008 - 10:42 pm: |
|
Sadbear .. if you still have the top off the camera and if the image coincidence has a horizontal plane error, you can easy adjust it.
See in your picture the grey cam which pivots about the bright metal "two pinhole" screw-cap ?
Move the cam out of the way with your fingers and you will see that the slotted screwhead of the adjustor (the one with a coil spring arround the adjustor screw) can now be accessed from the camera front.
Only VERY fine adjustments are needed. You may have to adjust several times back and forth until the coincident images are precisely on song. Set the camera focusing at Infinity first.
After each little adjustment, view an infinty image and check.
It will help if when checking the rangefinder coincidence with the camera top-plate removed, you shroud the top of the camera with your hand. This will help ensure reasonable image contrast and make your assessment easier. |