| Author |
Message |
    
Forpnx
Tinkerer
Username: Forpnx
Post Number: 1
Registered: 08-2008
Rating: N/A
Votes: 0 (Vote!) | | Posted on Friday, August 01, 2008 - 12:31 pm: | 


|
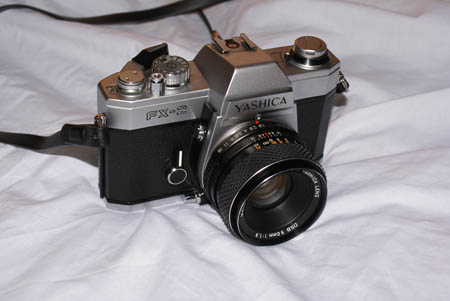
I just got a Yashica FX-2 with the kit 50mm f/1.9 for 50bucks with very minor exterior scratches, but I've noticed a few problems with it already like: broken foam seals, the lens isn't smooth and needs cleaning and lube, the aperture-preview gets stuck once every 5 pushes, there is a moving black metal plate object that seems to be in the focusing screen (*might need to take some sort of in viewfinder pic, and post it here), and the battery doesn't seem normal, it seems to be some sort of lead button type battery. If you guys could help me figure out how to fix those problems easy, that would be nice!
I want to refurbish it to perform smoothly like new and use it occasionally since I have way too many cameras already. (A-100, Minolta Maxxum 7000, DMC-FZ5, Canon Rebel GII, Canon Rebel XTi, and Canon AE-1P.)
Anyway, are there any DIYs online you guys know about or is there a repair manual for this SLR?
I specially want to know about how to make the f/1.9 50mm to work smooth again, and I want to know what's that metal plate thing that pops out inside the focusing screen.
Thanks! (I'm going to polish the FX-2 now for a photo shoot... So I could show how bad the seals are.) |
Forpnx
Tinkerer
Username: Forpnx
Post Number: 2
Registered: 08-2008
Rating: N/A
Votes: 0 (Vote!) | | Posted on Friday, August 01, 2008 - 10:27 pm: |
|
Is the FX-2 considered a classic BTW? |
Adrian
Tinkerer
Username: Adrian
Post Number: 182
Registered: 08-2006
Rating: N/A
Votes: 0 (Vote!) | | Posted on Saturday, August 02, 2008 - 04:14 am: |
|
Well, the front page says "Cameras from the 1970's and earlier, ... ...and up to the great 70's SLR's." Can't say whether the FX-2 is great, but it certainly fits as a 1970s SLR. You should get more help than people who ask about their digital point-and-shoots!
A little selective googling is your friend for info - I'm sure it won't tell you everything, but I can tell you that the battery is a 1.35V PX675. That's a mercury battery, which you can no longer get. There's a number of substitutes, none perfect, but as it only runs the lightmeter you could use a hand-held meter instead.
There's also a downloadable operating manual at Mike Butkus's Orphan Cameras site - an amazing resource for manuals generally.
Seals are easy - buy a kit from ebay seller "Interslice". I'm afraid I can't help with the rest, but good luck!
Adrian |
Forpnx
Tinkerer
Username: Forpnx
Post Number: 3
Registered: 08-2008
Rating: N/A
Votes: 0 (Vote!) | | Posted on Saturday, August 02, 2008 - 06:40 pm: |
|
I'm buying the kit on Ebay, but when I removed all the gunky foam and got to the one on the shutter mirror damper, some gunk went in the grooves and on the other side of the focus screen! I tried to clean the reachable side using some dishwashing liquid, water, and cotton buds, which actually cleaned it, but it doesn't stop there... Now, when I looked in the camera, there is a patch of water on the other side! Yup, it's chaos!
I need to get to the focusing screen ASAP! If someone has the repair manual; link, scans, pdf files, etc. please post it. Or, if someone knows how to take it apart, I would appreciate that.
Also, I have a Yashica US (YUS) 135mm f/2.8 lens with it too, but for some reason it's darker than the regular 50mm f/1.9 when I look into the viewfinder. What seems to be the problem on that lens?
Thanks! |
Mikel
Tinkerer
Username: Mikel
Post Number: 99
Registered: 07-2006
Rating: N/A
Votes: 0 (Vote!) | | Posted on Saturday, August 02, 2008 - 07:53 pm: |
|
I think I have posted some stuff on this camera and lens in the archives so it's worth a search to you. I have repaired dozens of them. They are worth fixing.
If you don't understand why an f2.8 lens looks a bit dimmer in the viewfinder than an f1.9 lens you need to get a good basic book on photography. |
Forpnx
Tinkerer
Username: Forpnx
Post Number: 4
Registered: 08-2008
Rating: N/A
Votes: 0 (Vote!) | | Posted on Saturday, August 02, 2008 - 09:39 pm: |
|
My Sony A-100 doesn't have a darker viewfinder at f/5.6, I have an f/1.7 also and they are the same. Is there something I need to know about mechanical cameras? |
Mndean
Tinkerer
Username: Mndean
Post Number: 61
Registered: 08-2007
Rating: N/A
Votes: 0 (Vote!) | | Posted on Saturday, August 02, 2008 - 10:19 pm: |
|
Yes, there is something you need to know. The basic thing is this - with a 2.8 lens you are getting roughly half (it's actually a bit less than that) of the light that a 1.9 lens delivers to the viewfinder. Here is a brightness level in f/stops, from brightest to darkest, each roughly halving the amount of light: f/1, 1.4, 2, 2.8, 4, 5.6, 8, 11, 16. Each higher number will be 50% darker than the previous lower.
Why your Sony looks the same with either lens is likely an electronic trick, boosting the sensitivity levels so you can see at the same brightness no matter what lens is used. I know very little of DSLRs, but it has to be something like that, as optics will determine what a mechanical SLR camera "sees", and there's no way to cheat the physics. Even the electronic camera can't cheat the physics, but it can fool you. |
Forpnx
Tinkerer
Username: Forpnx
Post Number: 5
Registered: 08-2008
Rating: N/A
Votes: 0 (Vote!) | | Posted on Sunday, August 03, 2008 - 12:19 am: |
|
If someone knows how to take apart the FX-2 and put it to words, I would love to read about that... The other side of the focus screen still has some liquid in there that I really need to take care of.(It makes the focusing ridiculous) |
Adrian
Tinkerer
Username: Adrian
Post Number: 183
Registered: 08-2006
Rating: N/A
Votes: 0 (Vote!) | | Posted on Sunday, August 03, 2008 - 04:07 am: |
|
You should be able to send Mikel a private message if you click on his name in one of his posts. He sounds like a good person to ask for advice. Plus, of course, use the "search" facility to see what he's already posted. Be patient, as the search facility isn't brilliant (sorry Kar and Henry, it works, but...).
And lay off the water until you are a bit more confident... Most of us probably knackered the first camera we started with, so you will be in good company if you do. But that's not an excuse for rushing!
Adrian |
Mndean
Tinkerer
Username: Mndean
Post Number: 62
Registered: 08-2007
Rating: N/A
Votes: 0 (Vote!) | | Posted on Sunday, August 03, 2008 - 08:19 am: |
|
Oh, my yes. My first attempted repair on a Hi-Matic 9 turned a minor problem into a major one. Don't be too discouraged, we all make mistakes when we start doing repairs. |
Forpnx
Tinkerer
Username: Forpnx
Post Number: 6
Registered: 08-2008
Rating: N/A
Votes: 0 (Vote!) | | Posted on Sunday, August 03, 2008 - 12:31 pm: |
|
Darn! I still haven't figured out how to open it, I think I need a special tool to remove the film advance lever so I could pop the top open and uncover the focusing screen to be cleaned. And, are there other stuff there that I should take care of while it's open, what tool do I need to unscrew the film advance lever, and is there a way to keep dust and debris off the focusing screen?
Thanks!
*BTW: I checked out mikel's threads but there seem to be no articles about the FX-2, there are info about how to open the f/1.9 kit lens and how to repair other cameras though... |
Alex
Tinkerer
Username: Alex
Post Number: 68
Registered: 07-2006
Rating: N/A
Votes: 0 (Vote!) | | Posted on Sunday, August 03, 2008 - 05:25 pm: |
|
I'm only going from memory, but I'm sure I took the top off an FX-2 to get to the pentaprism, and as I recall, it involved taking the top disk off the shutter dial to get to screws underneath, and taking off the rewind knob (standard trick of putting a wooden wedge in the rewind shaft inside the camera, and unscrewing the rewind knob on top anti-clockwise. As I recall, it wasn't all that difficult.
Inside, the pentaprism is held in place by extensible springs, a bit like luggage cords. There are some bits and bobs of foam there around what my memory is telling me may have been a battery test lamp close to the pentaprism, and the perished foam drops on to the fresnel screen from above. Cleaning this up is quite easy, though when you take out the pentaprism, make sure not to touch the optical surfaces.
I'll check my notebooks to see if I have any notes to reinforce my memory, but my recollection is that it's a relatively easy job, and given that I'm a tinkerer, not a camera repair enthusiast, that should be seen as encouragement.
I replaced the foam inside the pentaprism housing just using pieces from the Interslice kit I have. It's a simple job, and the kit is top class value for money.
Alex |
Alex
Tinkerer
Username: Alex
Post Number: 69
Registered: 07-2006
Rating: N/A
Votes: 0 (Vote!) | | Posted on Sunday, August 03, 2008 - 05:36 pm: |
|
PS: Just found my notes. It was my old FX1, not my FX2. The rewind in the FX1 also houses the battery, but it's not difficult to remove. The shutter speed knob has three small screws around the outside. The lever wind has a couple of dimples and right hand threads, with a couple of washers together with a couple of spring washers. Unfortunately my less-used kit is packed away, so I can't say at the moment how the FX2 compares to the FX1 for this operation, though in principle the job should be similar.
Alex |
Forpnx
Tinkerer
Username: Forpnx
Post Number: 7
Registered: 08-2008
Rating: N/A
Votes: 0 (Vote!) | | Posted on Sunday, August 03, 2008 - 05:43 pm: |
|
Good info there Alex, but what tool did you use to get the film advance and the shutter dial out? I can't seem to find any screws there except two tiny holes on top of them. What can I use to remove those? This step is crucial for because I really don't know what to use to remove that part, if you got info on what tool I should use, I'd love to read about that.
Thanks! |
Forpnx
Tinkerer
Username: Forpnx
Post Number: 8
Registered: 08-2008
Rating: N/A
Votes: 0 (Vote!) | | Posted on Sunday, August 03, 2008 - 07:06 pm: |
|
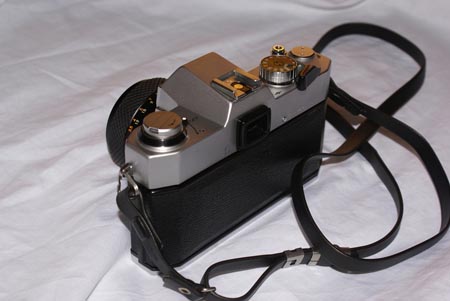
Here are 2 shots of the FX-2 using my Sony A-100.
 |
Alex
Tinkerer
Username: Alex
Post Number: 70
Registered: 07-2006
Rating: N/A
Votes: 0 (Vote!) | | Posted on Monday, August 04, 2008 - 04:23 pm: |
|
The speeds disk on the shutter dial is held on by glue, and I had to prise this off using a pin and some organic solvent. I think there were a couple of small screws underneath it. There are also three almost microscopic grub screws around the knurled grip of the shutter speed ring. I remember just using a fine jeweller's screwdriver kit for that. To get the lever wind off, notice that there are two holes on the disk on top of the lever, which I can see in your picture above. As I recall, I used a tool that's intended to open those circular springclip things. I got it from a motoring shop, and it's like a set of pliers with different attachments you fit on the end. The smallest fitted the holes on the lever wind, but I couldn't use the pliers with the attachment fitted, as it kept slipping about, so I just gripped the attachment in my fingers, located the two tips in the holes, and turned. The disk on top of the lever unscrews, to reveal a washer assembly underneath, and the whole lot just lifts off to leave a thin shaft poking out of the hole. On the FX1 there's a battery test switch on the top plate : I put some sticky tape over this so that it would not fall off inside when I took the top off. Again on the FX1, there are two screws on the rear of the top plate, and one on the front just under the Yashica name.
Incidentally, I went to a stationery shop and got packs of different sizes of those little plastic bags that seal with a finger strip along the top. When I take screws out, I put them straight in to one of those bags and seal it. Same thing with the lever wind assembly and so on. Everything that goes together goes into a plastic bag with a small piece of paper in it to say what it is and where it came from. (I've already done the thing where you sneeze involuntary and two tiny screws vanish into the ether for ever. Also, what was an obvious place to re-fit a piece back to becomes a total mystery after a mere ten minutes.)
Please let me know how you get on. |
Mikel
Tinkerer
Username: Mikel
Post Number: 100
Registered: 07-2006
Rating: N/A
Votes: 0 (Vote!) | | Posted on Monday, August 04, 2008 - 06:03 pm: |
|
Actually the screw holding down the shutter speed dial is pin faced and requires the proper spanner or just a pair of tweezers with some courage. There is no glue or prying involved.
The same thing will get the cap of the wind lever off. |
Forpnx
Tinkerer
Username: Forpnx
Post Number: 9
Registered: 08-2008
Rating: N/A
Votes: 0 (Vote!) | | Posted on Monday, August 04, 2008 - 09:50 pm: |
|
Those holes seem "needle sized", and I tried using my voltmeter contacts to get it out and I just ended up scuffing the winder top a bit because I couldn't move it. Does the tool to remove it in anyway look like an architect's compass? Can someone please give me a picture of what the tool looks like?
I actually tried to call a local camera shop and they had no idea what that tool is, they said it may be a "Yashica only" tool. Which is totally false, since you guys found a way to open it.
If I get the tool soon, which way should I turn the cap? (Left to lose, right to tight, or vice versa?) |
Alex
Tinkerer
Username: Alex
Post Number: 71
Registered: 07-2006
Rating: N/A
Votes: 0 (Vote!) | | Posted on Tuesday, August 05, 2008 - 05:08 am: |
|
Mikel must be referring to the FX2, and looking at the picture above seems to confirm what Mike says. My FX1's shutter dial cap is different, it is a simple flat disk and there were traces of adhesive underneath it. One tool I tried when taking off the lever wind from my Yashica TL-Electro-X, which is similar to the FX1/2, was a pair of fine tweezers with the tips held by the nose of an adjustable pliers. I positioned the tweezer tips in the two holes, held the tips firmly in the grip of the pliers, then turned gently whilst pressing down on the tweezers to keep the tips securely in the holes. The thread here is a normal right hand thread, and so unscrews like any bottle top.
The pliers kind of messed up the end of the tweezers from the point of view of their use in plucking eyebrows or whatever it was my wife did with them, so I had to replace them after being suitably told off, but the old tweezers are still in the camera bits box doing service. |
Canuck_curt
Tinkerer
Username: Canuck_curt
Post Number: 24
Registered: 03-2007
Rating: N/A
Votes: 0 (Vote!) | | Posted on Tuesday, August 05, 2008 - 07:24 pm: |
|
To get the top off your wind lever you can use either a paperclip, tweezers, a compass from a mathematics set, needlenose pliers filed down, spring clip pliers for auto use or even a flat piece of rubber such as a mouse pad pushed tightly against the screw head will often loosen it. |
Forpnx
Tinkerer
Username: Forpnx
Post Number: 10
Registered: 08-2008
Rating: N/A
Votes: 0 (Vote!) | | Posted on Tuesday, August 05, 2008 - 09:11 pm: |
|
OK, I got those out with the some cuticle tweezers and it was easy... I now have a problem with one little screw which is on the right side of the view finder (you could probably see it on the photo above), well that screw won't budge with the screwdriver set I have to repair cellphones and ipods. It's now a bit nicked and is still stuck, any tip on how to loosen it and get it out would be nice.
Thanks! |
Forpnx
Tinkerer
Username: Forpnx
Post Number: 11
Registered: 08-2008
Rating: N/A
Votes: 0 (Vote!) | | Posted on Wednesday, August 06, 2008 - 12:08 pm: |
|
The little screw on the right side of the viewfinder still won't budge! Any tips on how to easily loosen it? |
Adrian
Tinkerer
Username: Adrian
Post Number: 184
Registered: 08-2006
Rating: N/A
Votes: 0 (Vote!) | | Posted on Wednesday, August 06, 2008 - 02:51 pm: |
|
There are various dodges... Ideally, of course, you shouldn't munch the screwhead first but that's not always an option! I'm going to let the experts suggest anything involving penetrating oils as I don't know where you might then have to remove the oil from...
A number of people use Wiha picodrive screwdrivers, which are much better for applying grunt to a stiff screw without damaging it that your ordinary jeweller's screwdrivers,which I suspect is what you have. These come in Philips (crosshead) and flathead. There's recently been a discussion on rangefinderforum.com about JIS screwdrivers (again, try the search facility over there - though you may have to register - to find details of the supplier), which many Japanese firms used. These might be worth investing in as they will help you avoid munching screw heads.
Hope that helps! |
|