| Author |
Message |
    
Chaffinch
Tinkerer
Username: Chaffinch
Post Number: 1
Registered: 10-2008
Rating: N/A
Votes: 0 (Vote!) | | Posted on Saturday, October 18, 2008 - 07:09 pm: | 


|
I was recently given a very pretty but non-functioning Super Paxette. The previous owner had removed the screw from the top of the winder/cocking lever assembly, and "It came apart like a Jack-in-the-Box". The internal bits, a collections of tiny springs, shims etc., he carefully collected and stored in a film container.
Reassembly looks like a worrying assignment. Can anyone point me in the direction of a diagram or information relating to this challenge? |
Steve_s
Tinkerer
Username: Steve_s
Post Number: 129
Registered: 07-2006
Rating: N/A
Votes: 0 (Vote!) | | Posted on Sunday, October 19, 2008 - 05:23 am: |
|
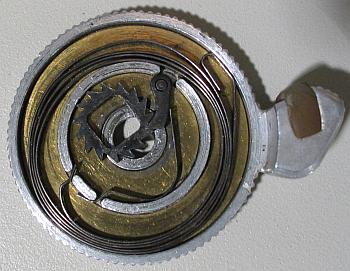
Below is a picture of how the parts fit into the lever, but it is a fiddly re-assembly! The picture is of the upper part, viewed from below. As far as I remember there is another plate (not pictured) that engages with the loop in the end of the outer (return) spring, with a tab that fits in a slot in the rangefinder housing.
It's actually not necessary to take out the top screw to dismantle the camera, but lots of people do, and live to regret it. The wind-lever assembly can be removed in one piece if it is detached from inside the film chamber, and the return spring plate unhooked (using a wire) from its slot in the rangefinder housing.
If the lower part of the mechanism is not already off the camera, it would probably be easiest if you took it off, assembled the lever on its own, and then fitted it in one piece. There is a snail-cam in the lower part of the assembly that cocks the camera, so make sure this is correctly arranged when you put the lever back.
 |
Steve_s
Tinkerer
Username: Steve_s
Post Number: 130
Registered: 07-2006
Rating: N/A
Votes: 0 (Vote!) | | Posted on Sunday, October 19, 2008 - 07:47 am: |
|
I should have mentioned that if you do want to take off the lower part of the winder mechanism you have to remove the take-up spool by removing 3 screws and a plate at the base of the camera. This gives access to the centre screw on the wind spindle. Take this out and the wind-lever assembly comes off. The screw provides the friction for the take-up clutch, so don't overtighten it on reassembly.
When you take off the plate at the base, a spring-loaded bush at the bottom of the sprocket spindle will push out from the body. Leave it where it is if it will stay there, but if it comes out be very careful not to lose the little spring inside. |
Chaffinch
Tinkerer
Username: Chaffinch
Post Number: 2
Registered: 10-2008
Rating: N/A
Votes: 0 (Vote!) | | Posted on Sunday, October 19, 2008 - 08:28 pm: |
|
Thanks Steve! It looks like hours of fun for the whole family...I'll attempt it when I'm in a masochistic frame of mind. I really appreciate your time and effort. |
Aford
Tinkerer
Username: Aford
Post Number: 46
Registered: 03-2007
Rating: N/A
Votes: 0 (Vote!) | | Posted on Wednesday, October 22, 2008 - 12:07 pm: |
|
Thanks Steve for the very helpful picture of the upper wind lever assembly. I have a Paxette model 1a that I'm working on (its of the same design as your picture). I have managed to re-assemble the wind lever assembly after a lot of cussing! but I'm now stuck. How do I fit the tab on the spring return plate into the slot in the rangefinder housing? I will try to explain.
After fiddling the square end of the assembly into the small gear and the tail of the anti-reverse spring into its slot and the cocking lever into the snail-cam, the tab of the spring return plate is now on the wrong side of the wind-on lever. Somehow the return spring needs to be wound up slighly so that tab is in the correct position to engage with the slot in the rangefinder housing. Any suggestions as to how this is done?
BTW a dollop of grease on the pawl and ratchet wheel, same on the return spring, helps to keep things in place when assembling. Also cocking the shutter makes it easier to engage the cocking lever with the snail-cam, hope this helps.
Thanks and regards - Alf |
Steve_s
Tinkerer
Username: Steve_s
Post Number: 131
Registered: 07-2006
Rating: N/A
Votes: 0 (Vote!) | | Posted on Thursday, October 23, 2008 - 05:20 am: |
|
With the assembled lever off the camera, Alf, the tab will be as far anti-clockwise as it can go - right up to the clockwise side of the thumb-lever.
Assembly should be just a matter of turning the tab clockwise through about 270º against the spring as you fit the assembly to the camera. Once the lever is in place the tab should spring back into its slot. Let us know if it doesn't work! |
Aford
Tinkerer
Username: Aford
Post Number: 47
Registered: 03-2007
Rating: N/A
Votes: 0 (Vote!) | | Posted on Thursday, October 23, 2008 - 03:51 pm: |
|
Thanks Steve, I'll try again, but I find it difficult to hold the tab and engage the anti-reverse spring and gear. I thought there might be an easy way to hold the tab against the spring force. Alf |