| Author |
Message |
    
Aphototaker
Tinkerer
Username: Aphototaker
Post Number: 117
Registered: 12-2009
Rating: N/A
Votes: 0 (Vote!) | | Posted on Friday, March 05, 2010 - 06:59 am: | 


|
I have taken the front of the lens off. Got the shutter working by naphtha. Next up is focusing distance and the light meter.
I am reading the archives for how to make a makeshift collimator and I am going to try that now.
But the meter is not responding. Since I have the CdS housing ring off, I have connected at 15 K Ohm resistor to the two wires (blue and black) that go to the sensor. This resistance should show some deflection, the resistance of the CdS seems to vary with light and the 15 K value falls within that range.
Battery check gives the deflection though. What else should I check to see why the meter is not responding to light?
Thanks. |
Donnie_strickland
Tinkerer
Username: Donnie_strickland
Post Number: 85
Registered: 09-2006
Rating: N/A
Votes: 0 (Vote!) | | Posted on Friday, March 05, 2010 - 07:39 am: |
|
Try this:
https://kyp.hauslendale.com/classics/forum/messages/6901/3146.html |
Aphototaker
Tinkerer
Username: Aphototaker
Post Number: 118
Registered: 12-2009
Rating: N/A
Votes: 0 (Vote!) | | Posted on Friday, March 05, 2010 - 08:09 am: |
|
Thanks. Read the thread and checked various things.
Recap:
1. The CdS changes resistance as it responds to light.
2. The battery check works, needle deflection happens. This also shows the galvanometer is working.
3. Batter compartment has no corrosion.
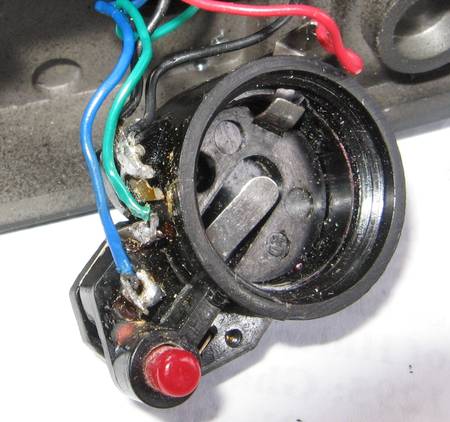
4. I am not sure how I should check the wires though. I have shown the battery compartment in the photo attached. Should all blue wires in the camera give me continuity?
5. What is the purpose of joint with black wires? It appears as though the contact to which these are soldered is not connecting to anything?
The camera was opened before, from the looks of it. I attached the photo also to confirm that this is how the connections should be.
Thanks. |
Donnie_strickland
Tinkerer
Username: Donnie_strickland
Post Number: 86
Registered: 09-2006
Rating: N/A
Votes: 0 (Vote!) | | Posted on Friday, March 05, 2010 - 08:55 am: |
|
It looks as though the black wires could be the source of the problem. Certainly if they are not connected to something, they should be.
I no longer have my S2, so I can't open it up to check. Perhaps another forum member could handle that task? |
Aphototaker
Tinkerer
Username: Aphototaker
Post Number: 119
Registered: 12-2009
Rating: N/A
Votes: 0 (Vote!) | | Posted on Friday, March 05, 2010 - 09:02 am: |
|
Maybe they are ground, i.e. connected to the chassis? Can't be sure without a circuit diagram. Is there a Konica S2's service or repair manual anywhere on the web?
BTW, this black wire gives continuity with the black wire on the meter and the one that goes to the photo cell.
Red wire also gives continuity with the red near the meter. As does the green.
So it appears that the wires themselves are okay. But a connection is broken someplace in the metering circuit (battery check circuit works okay). |
Harryrag
Tinkerer
Username: Harryrag
Post Number: 187
Registered: 05-2008
Rating: N/A
Votes: 0 (Vote!) | | Posted on Friday, March 05, 2010 - 10:24 am: |
|
Donnie's link above says it all, read it through again and especially consider former top member Winfried's advice in his last post.
Usually the metal parts in the S2's battery box look unharmed, but despite this outgasing or leaking mercury batteries have left their traces on the metal surfaces which become like coated, resoldering wires is then very problematic, and that surface coating is often non-conductive. The soldering joints around the battery container look everyting but pristine in your photo in that respect.
One black wire goes from the LDR (electric eye, CdS cell, etc) to the battery box and is, as a separate wire, connected to the meter; the blue wire connects the battery box to the other end of the LDR. Red means camera body (battery plus), and so automatically connected to one end the meter block. The black wire mentioned above and the green wire are connected to the meter/ the variable resistor there. If the wires themselves as you write are ok, the disconnection can only be in the battery box, which is kind of notorious for that, or in the meter itself (very fragile retracting springs, and/or moving-coil). |
Aphototaker
Tinkerer
Username: Aphototaker
Post Number: 120
Registered: 12-2009
Rating: N/A
Votes: 0 (Vote!) | | Posted on Friday, March 05, 2010 - 10:59 am: |
|
Donnie and Harryrag, you are exactly right. I had the battery compartment opened and disassembled. The problem was the little embossed dot on the metal strip for the blue wire to the bottom strip (-ve of battery). That little dot had corrosion on it. Scrapping it off and reassembling it made the meter work. Thanks!
Harryray, thanks for pointing out that camera body is actually + of the battery. I was betting on green or black. With the information you have given me, I am going to draw the circuit for my records.
However, the needle doesn't change deflection as I change the shutter speed. Is this normal? |
Aphototaker
Tinkerer
Username: Aphototaker
Post Number: 121
Registered: 12-2009
Rating: N/A
Votes: 0 (Vote!) | | Posted on Friday, March 05, 2010 - 11:17 am: |
|
And here is a photo of the corroded contact I described in my previous post.
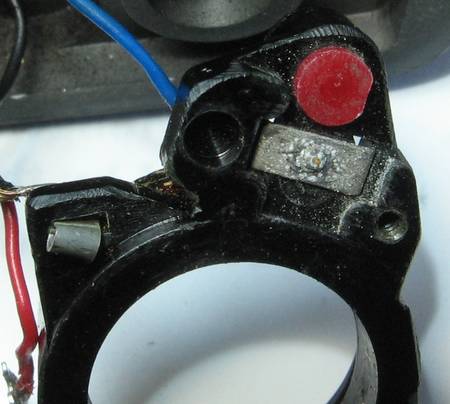
Now the problem remains that the change in shutter speed and the ISO of film has no effect on the meter needle. |
Aphototaker
Tinkerer
Username: Aphototaker
Post Number: 122
Registered: 12-2009
Rating: N/A
Votes: 0 (Vote!) | | Posted on Friday, March 05, 2010 - 11:36 am: |
|
Sorry, my bad. It appears to be working.
Perhaps I was missing something earlier, not sure. But all of a sudden, the meter is responding to varying light, carrying shutter speed and varying the ISO speed.
Now, I am using the hearing aid battery #675 in this. The meter appears to be off by around 1.25 stops in bright light but appears to be okay in medium light. Is this expected? Where are the adjustment for the meter should I want to tweak them?
Meanwhile, I am going to measure the shutter speeds and see how it goes.
|
Tomisimpern
Tinkerer
Username: Tomisimpern
Post Number: 1
Registered: 05-2010
Rating: N/A
Votes: 0 (Vote!) | | Posted on Monday, May 17, 2010 - 06:19 am: |
|
Hi all, I have a follow-up question on the (incredibly useful) topic above.
My issue is that the blue & black CdS cell wires have sheared off inside the lens assembly. I have the front element out, and the whole lens assembly away from the body (lens board unscrewed), but I can't see any play in these 2 wires as they come out of the shutter assembly. Gently play on the wires from the batt holder end gives no movement at all, and I can't see how to thread 2 new wires through such a tiny gap. Anyone ever done this ?  |
Nickon51
Tinkerer
Username: Nickon51
Post Number: 130
Registered: 05-2008
Rating: N/A
Votes: 0 (Vote!) | | Posted on Wednesday, May 19, 2010 - 05:57 am: |
|
G'Day Tony.
The wires come from inside the shutter through the hole to the outside then down through another hole to the next lecel down. After that they turn and follow the ouside for about an eighth of a turn then down through the base. You will not be able to thread the wires through without dismantling further. The included photos should give you an idea of the routing.
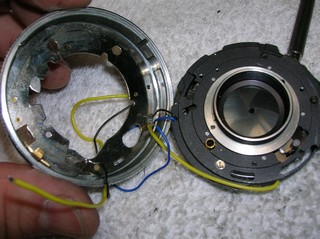 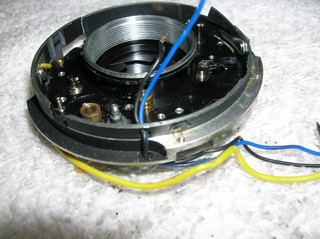
However the cause of the sheared wires is the fact that the two pins that stop the the upper outer barrel from rotating have been sheared off.
Here is where they should be.
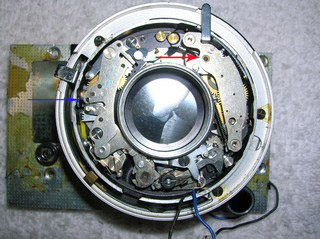
The one next to the blue arrow is riveted to the top plate of the timer, and the one next to the red arrow is riveted to the baseplate of the shutter.
Cheers
Greg |
Tomisimpern
Tinkerer
Username: Tomisimpern
Post Number: 2
Registered: 05-2010
Rating: N/A
Votes: 0 (Vote!) | | Posted on Wednesday, May 19, 2010 - 06:57 am: |
|
Ah, yes, I can see them now, and you are absolutely right Greg, they are sheared. My bad luck, looks like I may stick to manual on this one, unless I can graft a new post on (don't fancy gluing the upper barrel in place really).
Many thanks for taking the time to help out.
best regards, Tony |