    
Mareklew
Tinkerer
Username: Mareklew
Post Number: 23
Registered: 03-2010
Rating: N/A
Votes: 0 (Vote!) | | Posted on Friday, April 02, 2010 - 09:20 am: | 


|
A few notes about Rolleicord, which I just had a chance to repair (you know, e**y "CLA & overhaul done" means "had a look in the bag, there was a camera in it").
1) Front panel: all levers stay on, leatherette is in two pieces joining at the flash socket, needs to be pulled over the double exposure (un)lock and self timer levers.
2) You need to remove the lens "housing" (the central part of front outer shell) before removing the outer frame of front panel.
3) You need to remove the knurled part of shutter cock/release lever
4) if you definitely need to remove the lens board, TAKE NOTE OF THE SHIMS UNDERNEATH.
5) There's a coupling lever screwed to the lens board on top-right corner, it only moves a frame over the focusing screen, so if it's slightly off nothing bad happens, you just have imperfect parallax correction, but focusing is still OK -> mark its position and match upon reassembly and Bob's your uncle.
6) Film advance knob is NOT supposed to be able to move backwards AT ALL. However it is not a clicky-ratchet lock that's supposed to prevent it, but rather a rolling-pin one-way clutch on the advance knob axis. To fix advance knob going both ways you don't need to disassemble the camera (!), all you need is:
- remove the leatherette ring from film advance knob centre.
- Remove the obvious large screw from the center and pull the knob off.
- Remove all the shims that were underneath, save them.
- You will see five screws: 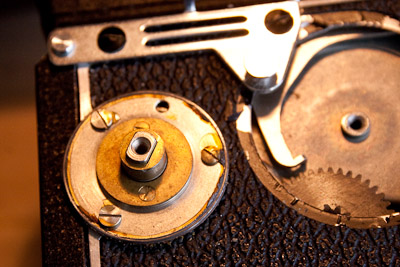
- Remove the two brass countersunk ones that are close to the axle.
- carefully lift the brass disc. You will find there two slots with two pins and two V-shaped springs. Pins should be parallel to the central shaft and springs should press them against that shaft. If they just dislocated, replace them and you're done. If they are glued up with old grease etc, remove the three outer screws and carefully pull the shaft out. The rightmost screw in the previous photo holds a lever in the film advance assy in place, if it jumps out of place you have to remove camera's side wall, so be careful. The shaft will lift together with the disc with slots. Wash it all in lighter fluid and reassemble without lubing, else the one-way will slip.
- To remove camera's side wall you need to remove film counter, strap hook and FOUR screws underneath the leatherette (note: repair manual indicates only three screws' positions).
- Without side wall the camera looks like this:
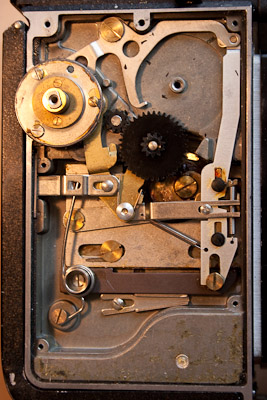
You can see where the four screws fixing the side wall were.
- If the camera advances fine to first frame, but locks there and you CAN'T re-cock shutter, then the two teethed discs that come out with the counter module are stuck together
- If the camera locks film advance, but you CAN re-cock shutter even though double-exposure lock is engaged, you failed to align coupling fork and coupling pin underneath lens board when re-assembling.
- You can take the shutter out without removing lens board (unlike Yashica): you need to remove the tube shielding the rear lens element (through the film chamber), unsolder the flash socket (set focus to minmum distance for that) and you are good to go. No levers are attached underneath the lens board.
that's it, rest I could find in the repair manual posted on this site, and more I didn't do (e.g. focus adjustment).
Marek |