| Author |
Message |
    
Mareklew
Tinkerer
Username: Mareklew
Post Number: 25
Registered: 03-2010
Rating: N/A
Votes: 0 (Vote!) | | Posted on Saturday, April 03, 2010 - 08:26 am: | 


|
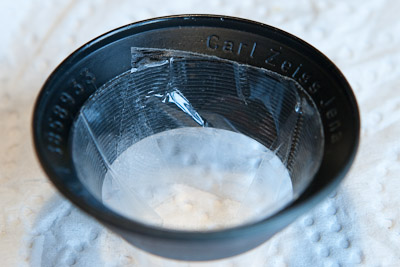
Recently I was left baffled, when after thoroughly cleaning a beautiful silver Carl Zeiss Tessar I found the lettering from the front ring gone. Apparently, the paint dissolved in cigarette lighter fluid. Well, the ring was smeared with some marker-kind of paint in the first place, that's why it went to solvent bath, but it left me with a challenge of redoing the original lettering.
This is how it can be done at home:
Step 1 - Tools
- Humbrol enamel for plastic models. #130 for white lettering, #174 for red. Don't use acrylics, as they are hard to remove once dried.
- Lighter fluid. If you substituted paint in the previous point, use a solvent that will eat your paint.
- A few toothpicks
- A few soft, thin tissues, e.g. facial de-makeup tissues.
- a piece of wood with a straight edge wider than your lettering's height and narrower than the faceplate they are engraved in. You can use e.g. ice-cream stick, or even a piece of thick cardboard cut to size.
- Some masking tape, or, for lack thereof, some scotch office tape
Step 2: preparation
- if you can, remove the part with engraved lettering from the rest of an assy - be it a lens, a camera or anything else.

- if it's a lens nameplate, and you couldn't remove it from the lens, put a rich padding of tissue on top of the lens and pack it + stick it in with scotch tape. If paint runs into your lens, you are screwed.
- Use lighter fluid to degrease the engravings.
- Mask surface around the engraving. For a lens ring, be sure to mask any threads and light baffles, as paint will be hard to remove from them.
Step 3: action!
- Use a toothpick to thoroughly stir your paint, then remove any excess of paint from it and use the tip to apply the paint to clean engravings. Don't worry, you can't do it without getting the paint all around, so just apply enough to fill the letterings and not run down your faceplate in drops.

- fold a piece of thin tissue across edge of your piece of wood or cardboard. Use as little tissue, as necessary. Sweep the excess of paint away. You will need several changes of the sweeping tissue, don't be tempted to use several layers of it: you need it to take the paint from the surface, but not from the engravings. If you apply thick tissue, it will "press" into the engravings and suck the paint away. Don't try to remove all the smears, it's not possible, just remove any excess you can.
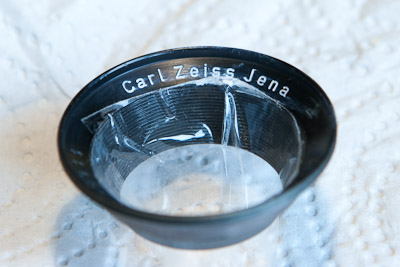
- if part of your lettering is in another color, repeat first two steps with a different paint. Be sure not to smear it over the already done letters. If you need to remove paint from a single part of engraving, use a q-tip moistened with lighter fluid.
- if you removed paint from the engravings, repeat the last two steps. If you smeared it all over, got it into filter threads and it looks like s**t, dunk it into lighter fluid, clean thoroughly and restart from step 1. Else, let the paint set.
- moisten a piece of tissue with solvent. Just a very little bit, it has to be so little, that you can't squeeze any out. Wipe smears from the faceplate away. It's a bit like developing film: if you keep doing it, you will end with the faceplate all black again. But there's more paint in the engravings, than in the smears on top, so with all likelihood you will remove the smears and engravings will still have paint in them.
- Voila! you are done:
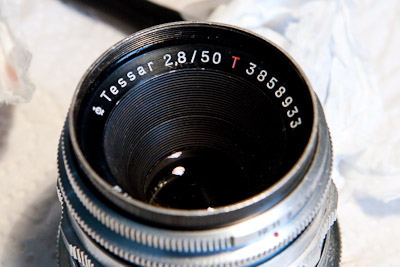
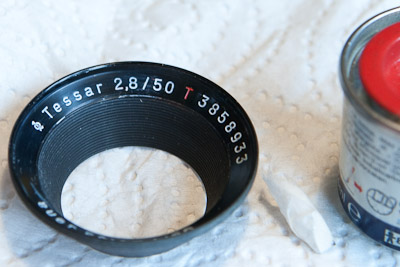
You may notice, that my lens has a lot of scuff marks - unfortunately it has been abused in previous life and so the lettering isn't perfect either - to remove all the paint from scratches and none from the lettering was above my patience.
Enjoy,
Marek |
Ron_g
Tinkerer
Username: Ron_g
Post Number: 13
Registered: 07-2009
Rating: N/A
Votes: 0 (Vote!) | | Posted on Saturday, April 03, 2010 - 11:55 am: |
|
Excellent work.That attention to detail is what separates some of us from the true craftsman.My hat is off to you.Ron G |
Mareklew
Tinkerer
Username: Mareklew
Post Number: 28
Registered: 03-2010
Rating: N/A
Votes: 0 (Vote!) | | Posted on Saturday, April 03, 2010 - 01:05 pm: |
|
Thanks  |
Elwrongo
Tinkerer
Username: Elwrongo
Post Number: 61
Registered: 05-2008
Rating: N/A
Votes: 0 (Vote!) | | Posted on Sunday, April 04, 2010 - 12:20 am: |
|
Good work, I've been wondering about how to approach this for some time. I thought of paint pens etc from car shops. The "say no to acrylic" tip is a good one. What about just cleaning lettering that is just filled with dirt and grease? I generally just keep at it with Windex and q tips until it cleans up. Sometimes a small amount of bleach on the white lettering works too. |
Mareklew
Tinkerer
Username: Mareklew
Post Number: 29
Registered: 03-2010
Rating: N/A
Votes: 0 (Vote!) | | Posted on Sunday, April 04, 2010 - 02:49 am: |
|
Elwrongo: in the "Cheap thrills" thread there was a good tip too: use "Lacquer stick" - solid paint that's made specially for this use. Available at http://www.micro-tools.de and http://www.micro-tools.com, but I have never used one like that.
For cleaning lettering that has some dirt in it there was also a suggestion to use a solvent-moisted q-tip, it will wipe a tiny amount of paint off together with the embedded dirt. This could be used if windex etc don't help.
Marek |
Paul_ron
Tinkerer
Username: Paul_ron
Post Number: 211
Registered: 07-2006
Rating: N/A
Votes: 0 (Vote!) | | Posted on Sunday, April 04, 2010 - 10:34 pm: |
|
Beautiful job, well done. |
Mndean
Tinkerer
Username: Mndean
Post Number: 217
Registered: 08-2007
Rating: N/A
Votes: 0 (Vote!) | | Posted on Monday, April 05, 2010 - 08:53 am: |
|
Mareklew,
Wonderful job! I used to paint models (airbrush and hand) and learned many tricks and how a steady hand would get excellent results. You seem to have done an admirable fix without the years of experience I had to have to be good at it. My first lesson was Hobby Shops Are Your Friend. Humbrol paints, small tools, and anything needed for a restoration can be found at a decent one. |
Mareklew
Tinkerer
Username: Mareklew
Post Number: 39
Registered: 03-2010
Rating: N/A
Votes: 0 (Vote!) | | Posted on Monday, April 05, 2010 - 10:08 am: |
|
Mndean, I also used to paint models, albeit rather simple ones, as a kid still. I never really got the hang of it and gave it up before I left school.
But it was what brought me to the idea of using Humbrol enamels - I knew they were good paints, easy to work with and clean up after. I also think, that things you played with once as a kid are easier to learn later as an adult.
This fix really does need no experience - I am the best proof - mainly thanks to the fact, that metal does not react with paint or solvent. You can really give it a try and if you don't like the result, clean up and restart. If the engraving is deep enough its really easy. I don't think I could ever repaint lettering that wasn't engraved.
Greets,
Marek |
Elwrongo
Tinkerer
Username: Elwrongo
Post Number: 64
Registered: 05-2008
Rating: N/A
Votes: 0 (Vote!) | | Posted on Monday, April 12, 2010 - 09:27 pm: |
|
Thanks for the great tutorial Mareklew, I've been baffled by this problem for a while. I tried your method and it works great. I also now have a stock of Humbrol paints and may find myself unable to resst buying a Hurricane Mark 1 model. |
Adrian
Tinkerer
Username: Adrian
Post Number: 300
Registered: 08-2006
Rating: N/A
Votes: 0 (Vote!) | | Posted on Tuesday, April 13, 2010 - 07:14 am: |
|
Nice work, Marek!
Humbrol Matt Black (number 33) is also a good non-reflective black for touching up the insides of your camera. I used it on a Retinette to cover the scratches I'd made trying to unscrew the rear lens element, left it to dry, and when I picked it up next to check whether I needed another coat it matched so well I couldn't see where the old paint stopped and the new started! |
|