| Author |
Message |
    
Koonuy
Tinkerer
Username: Koonuy
Post Number: 1
Registered: 05-2010
Rating: N/A
Votes: 0 (Vote!) | | Posted on Saturday, May 15, 2010 - 11:30 am: | 


|
I've been troubleshooting my camera that
i recently acquired and the only problem (that
i can ascertain so far) is that though the
battery light goes on when checked, the camera
only fires at one speed (1/500 i believe).
It was working ok for a little while and then
it'd stop and fire at that speed. i've checked
the POD and also the wiring on the top and
bottom of the camera. I'm trying to check the
shutter wiring but am stuck at removing the black ring that the silver ring was screwed to. i've attached images of the ring in question and also the others that i've removed thus far.
I've checked matt's and yashica-guy's site and have also emailed them in hopes of a response, but any help on any of my problems would be appreciated. i'm afraid im becoming a yashica person and would like to fulfill that... eventually. thanks.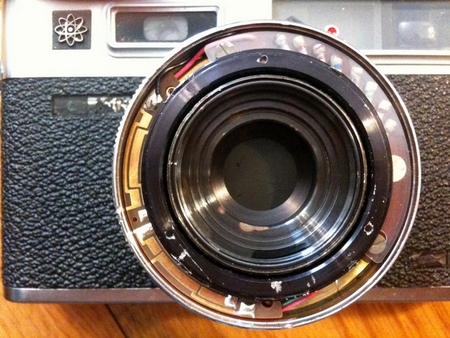 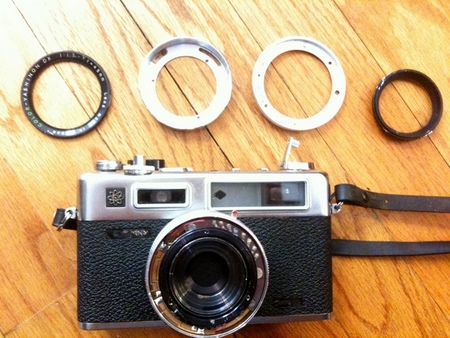 |
Djamorpheus
Tinkerer
Username: Djamorpheus
Post Number: 45
Registered: 10-2009
Rating: N/A
Votes: 0 (Vote!) | | Posted on Saturday, May 15, 2010 - 04:39 pm: |
|
had the same problem, basically the black ring can only be removed when the inside black part is. The way to remove it is to drill two small holes on two sides and using a spanner wrench to screw it out. or, you can use a film canister top if it has rubber on the underside, or anything which has the same diameter and apply pressure and unscrew. |
Koonuy
Tinkerer
Username: Koonuy
Post Number: 2
Registered: 05-2010
Rating: N/A
Votes: 0 (Vote!) | | Posted on Saturday, May 15, 2010 - 05:04 pm: |
|
I just want to make sure were on the same page. I'm trying to get the black ring that was attached to the outer silver ring (NOT the one with the B Auto flash marking) with three screws, the one with the three screw holes. Is that what you're talking about too? |
Koonuy
Tinkerer
Username: Koonuy
Post Number: 3
Registered: 05-2010
Rating: N/A
Votes: 0 (Vote!) | | Posted on Saturday, May 15, 2010 - 08:28 pm: |
|
Figured it out! You were right but no drilling required. After the rear element was removed I got the inner black ring off with a lacrosse ball and elbow grease. After that, three screws later and I was able to get to the wiring. Thanks! |