| Author |
Message |
    
Zakkattack
Tinkerer
Username: Zakkattack
Post Number: 13
Registered: 11-2010
Rating: N/A
Votes: 0 (Vote!) | | Posted on Monday, December 06, 2010 - 04:10 pm: | 


|
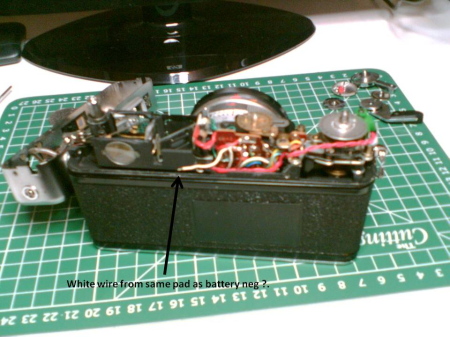
Help please. My Electro GS had an intermitant fault. I discovered it was the white wire from the neg battery terminal, however this has been fixed and is not the problem now. When I removed the top another white wire was hanging loose. It is attached to the same solder pad on the small cct board as is the neg battery wire but where does it attach to. I've checked to see if I can see an obvious point but nothing. The attached pic is from my crappy mobile but it might help to find an answer.
Any suggestions please.
Zakk
 |
Br1078lum
Tinkerer
Username: Br1078lum
Post Number: 7
Registered: 11-2010
Rating: N/A
Votes: 0 (Vote!) | | Posted on Monday, December 06, 2010 - 08:08 pm: |
|
Zack,
Sorry I didn't read your post correctly, as I just spent an hour taking and processing photos of the battery wire.
This wire loops under the battery check button, then through a short length of clear protective tubing to the front of the camera.
Next, looking from the front, it passes through a part of the rangefinder framing, then turns towards the bottom of the camera, just to the right of the lens mount.
It comes out and connects to the small circuit board in the bottom next to the battery well. While looking at the camera with the lens pointing up, it connects at the lower right corner of the circuit board.
Hope this helps.
PF |
Br1078lum
Tinkerer
Username: Br1078lum
Post Number: 8
Registered: 11-2010
Rating: N/A
Votes: 0 (Vote!) | | Posted on Monday, December 06, 2010 - 08:14 pm: |
|
<a href="http://www.flickr.com/photos/7699588@N07/5239484637/"><img></a> |
Monopix
Tinkerer
Username: Monopix
Post Number: 174
Registered: 11-2008
Rating: N/A
Votes: 0 (Vote!) | | Posted on Tuesday, December 07, 2010 - 01:51 am: |
|
I don't have one infront of me to check but the wire doesn't look long enough to reach down to the battery check PCB in the bottom of the camera. From memory, this is the wire to the battery check button (which often breaks off) but that would mean this is the battery positive not the negative. That probably doesn't help much... |
Zakkattack
Tinkerer
Username: Zakkattack
Post Number: 14
Registered: 11-2010
Rating: N/A
Votes: 0 (Vote!) | | Posted on Tuesday, December 07, 2010 - 01:34 pm: |
|
Thanks all,
I think Monopix might be correct as the wire is not long enough to reach the bottom pcb. I'll check all options though.
Thanks again.
Zakk |
Zakkattack
Tinkerer
Username: Zakkattack
Post Number: 15
Registered: 11-2010
Rating: N/A
Votes: 0 (Vote!) | | Posted on Tuesday, December 07, 2010 - 02:46 pm: |
|
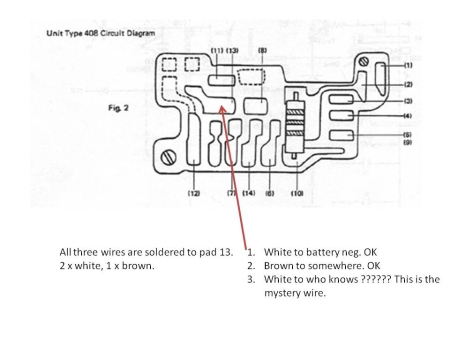
OK, Checked both the white wire to the cct board by the battery cell and the white going to the battery check button. Both there and OK. This white wire I believe is attached to pad 13 on the main cct board ref 408 but where it goes from there is a mystery. Can anyone else shed any light on this. The wire is 30mm long.
 |
Br1078lum
Tinkerer
Username: Br1078lum
Post Number: 9
Registered: 11-2010
Rating: N/A
Votes: 0 (Vote!) | | Posted on Tuesday, December 07, 2010 - 06:30 pm: |
|
Zack,
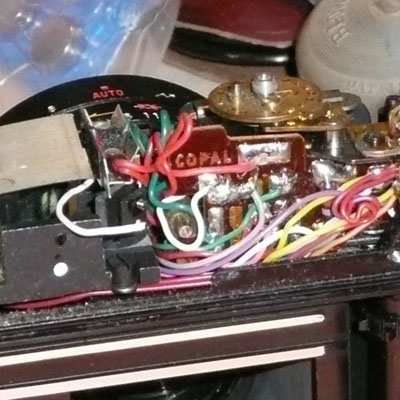
The board diagram you show is a Type 408. The broken wire is part of the battery check circuit, and connects to the upper terminal of the Battery Check Switch. I had to pull the red and green wires out of the way to see this, as they are wadded up on top of the switch. I didn't realise it was two wires until I pulled out the wiring diagram. The other wire from the lower terminal of the switch is the one I was describing earlier, that goes to the Checker Assembly in the bottom of the camera (the little square board next to the battery well). It is a very fine solid wire from the upper terminal of the battery check switch that it is connected to, and there will probably be need of some disassembly of the mounting for the 408 board to access this area.
Good luck.
PF
ps:The problem I have found using these reprinted repair manuals, is there seems to be a lack of clarity, such as no color code for the wiring, and sometimes no explanation of what you are looking at. I suspect that there are portions missing. |
Br1078lum
Tinkerer
Username: Br1078lum
Post Number: 10
Registered: 11-2010
Rating: N/A
Votes: 0 (Vote!) | | Posted on Tuesday, December 07, 2010 - 06:36 pm: |
|
Zack,
Just read Monopix's post again, and it is on the negative side of the battery circuit. If you have a wiring diagram, it is the lower right corner of Figure 5, as you hold the page in landscape mode. I just took a couple of shots of mine, and will post them as soon as I can figure out how. Haven't had much luck yet.
PF |
Br1078lum
Tinkerer
Username: Br1078lum
Post Number: 11
Registered: 11-2010
Rating: N/A
Votes: 0 (Vote!) | | Posted on Tuesday, December 07, 2010 - 07:04 pm: |
|
  |
Br1078lum
Tinkerer
Username: Br1078lum
Post Number: 12
Registered: 11-2010
Rating: N/A
Votes: 0 (Vote!) | | Posted on Tuesday, December 07, 2010 - 07:15 pm: |
|
Zack,
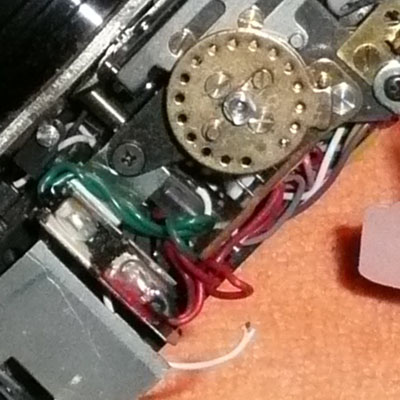
As you can see, the white wire from the 408 board loops under the Battery Check Switch in the first photo, then in the second photo you see it attached to the upper terminal of the battery Check Switch. Very tight quarters, and you may have to remove the 408 board to get at it. Might be easier to remove the ASA Setting Mechanism. Use a very small iron, and Silver Solder. And yes, that is my battery negative wire hanging out there. It is a nice shade of verdegris on the inside, and is slated for replacement.
Hope this clears everything up.
PF |
Zakkattack
Tinkerer
Username: Zakkattack
Post Number: 16
Registered: 11-2010
Rating: N/A
Votes: 0 (Vote!) | | Posted on Thursday, December 09, 2010 - 09:33 am: |
|
PF,
Thankyou very very much, you area legend in your own lifetime.
It's very kind of you to take the trouble.
Cheers
Zakk |
Br1078lum
Tinkerer
Username: Br1078lum
Post Number: 13
Registered: 11-2010
Rating: N/A
Votes: 0 (Vote!) | | Posted on Saturday, December 11, 2010 - 08:38 am: |
|
Zakk,
Doing camera repairs on the fly can be a frustrating experience I have found. In my former job, I was used to having all the documentation I needed to be able to repair whatever item I was working on, or at least something similar to it. But starting out new on fixing cameras, one can use all the help you can get, so I'm pleased to offer any assistance I can.
Good luck with getting your GS back together.
PF |
Zakkattack
Tinkerer
Username: Zakkattack
Post Number: 17
Registered: 11-2010
Rating: N/A
Votes: 0 (Vote!) | | Posted on Friday, December 17, 2010 - 05:37 am: |
|
Thanks to those that responded. I eventually traced the fault to a shorted / grounded CDS wire. Over/Under lights now coupled well with the aperture settings.
I've cleaned the RF glass, calibrated for infinity by collimation and RF at 1M.
All I have to do now is replace the light seals and it's all done.
Seasons Greetings to All.
Zakk |