| Author |
Message |
    
Flobster
Tinkerer
Username: Flobster
Post Number: 1
Registered: 02-2011
Rating: N/A
Votes: 0 (Vote!) | | Posted on Sunday, February 27, 2011 - 05:48 am: | 


|
Hi all
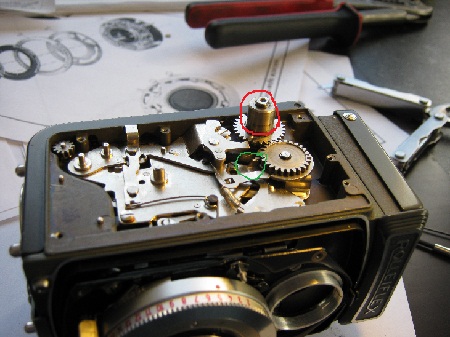
I have an old Rollei 4x4 that doesn't work. I think I have found the problem with it. The little arm (green circle) that controls the "clutch" is broken. It just hangs on by a little bit of metal and bends just by touching it.
My first problem is getting to it. How do I remove the winding/cocking knob (red circle)I tried pulling it but it doesn't budge.
Second how do I fix the arm, brazing, welding, a glob of JB Weld? I don't think I have the tools to weld something that small.
Hope someone with more camera repair experience than me can help me out.
  |
Flobster
Tinkerer
Username: Flobster
Post Number: 2
Registered: 02-2011
Rating: N/A
Votes: 0 (Vote!) | | Posted on Sunday, February 27, 2011 - 01:07 pm: |
|
I realized that I can remove the cocking mechanism without removing the part in the rec circle.
The problem I have now is that the part in the green circle is riveted to the mechanism. Does anyone have an idea of where to get tiny rivets (looks like approx. M1.5). preferably in the UK. |
Silversurfer
Tinkerer
Username: Silversurfer
Post Number: 31
Registered: 08-2009
Rating: N/A
Votes: 0 (Vote!) | | Posted on Sunday, February 27, 2011 - 04:12 pm: |
|
Don't know much about Rollies but I know how to repair tiny metal things. Forget glues, epoxy works well on large surface areas of contact, but no use on litle bits that have to do some 'pushing'.
Welding (gas) will blow it away before you even get a rod near it, same for brazing too much heat. I have had success using silversolder and a little butane gas torch. You need a tiny amount of solder placed on the metal, some flux mixed with water to a paste, this 'sticks' the solder in place and then 'sneak up' with the torch flame so as not to blow the solder away. If you get it right the solder will just melt into the broken part and it is really strong, much stronger than soft solder. If you live in the UK I may be able to send you a tiny amount of silver/flux.....in you want to try it!
silversurfer |
Flobster
Tinkerer
Username: Flobster
Post Number: 3
Registered: 02-2011
Rating: N/A
Votes: 0 (Vote!) | | Posted on Monday, February 28, 2011 - 10:45 am: |
|
Thanks for the info silversurfer. That is a big help. I called a friend who is a goldsmith he told me that I could use what he called extra easy silver solder which contain 67% silver, is that what you was thinking of.
He suggested that I use a 50-55% silver solder without cadmium as it melts 50-100 degrees lower, without significant loss in strength.
As for replacing the rivet I drove out, I'll have to be creative. It is a tiny little thing. I may try to solder it back on with the same solder, tap a thread and use a little bolt and Loctite 263 or maybe get a tiny lathe. I'm sure that would come in handy often (expensive though). |
Silversurfer
Tinkerer
Username: Silversurfer
Post Number: 32
Registered: 08-2009
Rating: N/A
Votes: 0 (Vote!) | | Posted on Monday, February 28, 2011 - 02:23 pm: |
|
Hi, Flobster, the solder i use is basic silversolder used by intrument repair's, lower temp. type would prob. be ok. the metal needs to be bright metal clean/abraded to give a good key. Flux is vital, or it won't work.
A good idea would to get your friend to do it for you. Tiny rivets can be made out of welding wire, carefully peening one end over slightly and if poss. just lightly hammer other end when fitted. A lathe is a bit adventurous unless you know how to use it, In the UK there used to be a tiny lathe called the Unimat, you may find one on ebay, best of luck silversurfer |
Rlc
Tinkerer
Username: Rlc
Post Number: 131
Registered: 07-2006
Rating: N/A
Votes: 0 (Vote!) | | Posted on Monday, February 28, 2011 - 05:18 pm: |
|
I'm fascinated by this thread. Silversurfer's advice is excellent. Your goldsmith friend's advice is also excellent. I hope that would enlist your goldsmith friends expertice with this venture. I use EZ flow low melting temp. silver solder on such projects where excess temps would be a problem.
As for your rivet, a lathe would be nice but very expensive. I use my jewelers lathe quite often for such projects but you could use a dremel tool or flexible shaft handpiece and a fine tooth jewelers file to fashion a rivit from soft copper wire or silver wire. Then peen the ends to form the rivit.
Good luck and keep us posted.
RLC |
Glenn
Tinkerer
Username: Glenn
Post Number: 903
Registered: 07-2006
Rating: N/A
Votes: 0 (Vote!) | | Posted on Tuesday, March 01, 2011 - 06:37 pm: |
|
Small rivets are very simple to make - all you need is a small length of brass, copper or mild steel rod the diameter of the required rivet, a piece of 1/2 inch scrap steel and a drill bit the diameter of the rivet.
Drill a hole through the scrap steel that is the diameter of the required rivet and then place a piece of the metal rod into the hole - the length of the piece of rod should be such that it protrudes about 3/32" above the steel plate. Place the 'assembly' on a steel surface, ie back of vice and gently form the rivet head with a small ball pein hammer. Knock the formed rivet out of the steel and cut to required length.
If you really want to do a proper job, form a rivet snap from an old nail punch by just forming a vee shaped hole in the end by just 'spotting' with a drill that is twice the diameter of the rivet shank. This tool will then form a conical headed rivet when hammered over the protruding rod. To really go to town one can place the embryo snap with the drilled vee hole over a ball bearing that is the same diameter as the intended rivet head, a sharp blow with a large hammer will make a semi-spherical hole that will produce nice round headed rivets. If one is going to make/form a lot of steel rivets, then it is a good idea to use a piece of silver steel for the snap so that the end can be harden and tempered after forming the indentation for the head. |
Flobster
Tinkerer
Username: Flobster
Post Number: 4
Registered: 02-2011
Rating: N/A
Votes: 0 (Vote!) | | Posted on Wednesday, March 02, 2011 - 04:04 am: |
|
I a complete novice when it comes to metal working so all this information is priceless to me.
It is not a regular rivet. It allows the arm to move. It looks approx like the drawing below. The arm is free to move on the top part and the bottom is riveted to the assembly.

My friend is going to try to help with the soldering, but it will be a couple of weeks before I see him. He does think that it might be easier to make a new part. |
Flobster
Tinkerer
Username: Flobster
Post Number: 5
Registered: 02-2011
Rating: N/A
Votes: 0 (Vote!) | | Posted on Wednesday, March 02, 2011 - 04:13 am: |
|
Another thing. I dropped a tiny screw on the floor and spend half an looking for it. I was just thinking if there is a general rule to what kind of thread there is on these bolts. Some of them looks metric, some looks like something else. |