| Author |
Message |
    
Berndtotto
Tinkerer
Username: Berndtotto
Post Number: 1
Registered: 03-2011
Rating: N/A
Votes: 0 (Vote!) | | Posted on Thursday, March 24, 2011 - 12:05 am: | 


|
I just purchased a Canonet ( first 1961 model with selenium meter ) and noticed, that the "focus assistance tool" does not work correctly ( there usually is a small screen within the screen, where two pictures needs to become matched for setting the focus ).
Shooting a first testfilm, I noticed, that several pictures have been out of focus, even I am sure, that I used the camera right. After that, I compared the distance measurements of the Canonet with a normal digital camera ( using a manual prime lens ) and indeed, there are differences. The two pictures of the Canonet do not even match perfectly at infinity, which should be the case.
Any experiences with that problem ? Is it easy to fix ... and if, how ? I don't think, there is anything broken, it might be just needed to be newly adjusted ? Is that possible ?
Looking forward for any help. Thanks a lot !!! |
Waynemel
Tinkerer
Username: Waynemel
Post Number: 42
Registered: 08-2009
Rating: N/A
Votes: 0 (Vote!) | | Posted on Thursday, March 24, 2011 - 07:43 am: |
|
What you are refering to is called the rangefinder, and it sounds like it needs adjustment. This is accomplished usually by adjustment screws, one to adjust the image vertically and the other horizontally. I am not familiar with this camera, so you may have to remove the top plate to gain access to the adjustment screws. Sometimes there are access holes in the top plate to make the adjustment easier.
You should first make sure that the lens is properly focusing to infinity. This procedure is described in the Articles and Test equipment section of this site.
The process is called collimation. |
Berndtotto
Tinkerer
Username: Berndtotto
Post Number: 2
Registered: 03-2011
Rating: N/A
Votes: 0 (Vote!) | | Posted on Friday, March 25, 2011 - 06:32 am: |
|
Thanks Waynemel !!! I think, the lens should focus properly to infinity. The test pictures, I took, have been sharp at infinity too.
But as I said, the "ghost image" in the rangefinder can not become matched at infinity ... and it never matches vertically. I also compared the distance readings on the Canonet and the readings on a manual lens, mounted on a DSLR, perfectly focused on the same object ... and they don't match as well.
I removed the top plate as suggested ... but frankly speaking, I have no clue, which screw needs to become moved for adjustment :-(( I took a few pictures of how everything looks, if the top plate is removed.
http://www.flickr.com/photos/30634008@N08/sets/72157626346092800/
Can anybody help me ? |
Waynemel
Tinkerer
Username: Waynemel
Post Number: 43
Registered: 08-2009
Rating: N/A
Votes: 0 (Vote!) | | Posted on Friday, March 25, 2011 - 08:47 am: |
|
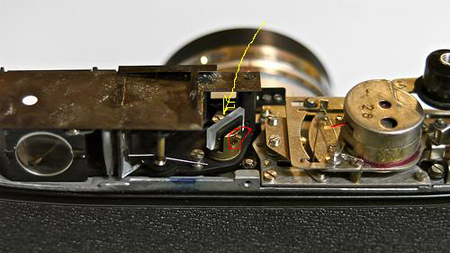
It looks like:
The yellow arrow points to the screw that adjusts the horizontal alignment. The red circle is for adjusting the vertical.
You will have to use some nail polish remover on the screw that has been sealed with laquer.
Set your lens to infinity and focus on a distant object (lamppost, moon) and adjust the rangefinder to match. |
Waynemel
Tinkerer
Username: Waynemel
Post Number: 44
Registered: 08-2009
Rating: N/A
Votes: 0 (Vote!) | | Posted on Friday, March 25, 2011 - 08:49 am: |
|
Just to add, you may want to check the other mirrors to make sure they are not badly misaligned or loose.
Also, work slowly. Very small adjustments to these screws make large changes in the double image. |
|