| Author |
Message |
    
Waynemel
Tinkerer
Username: Waynemel
Post Number: 48
Registered: 08-2009
Rating: N/A
Votes: 0 (Vote!) | | Posted on Wednesday, April 20, 2011 - 07:00 pm: | 


|
My Canonet seems to hang open when the shutter speed is set to 1/8th. The shutter will close only when the film advance lever is operated. It will also occasionally fire at what seems to be 1/15th.
This is an intermittant problem.
All other shutter speeds are great, as is the self timer.
I have opened up the front of the lens to gain better access to the shutter and I have flushed it as much as I can, but it still seems to work only sporadically.
Has anyone had experience with a problem like this? |
Rick_oleson
Tinkerer
Username: Rick_oleson
Post Number: 1132
Registered: 07-2006
Rating: N/A
Votes: 0 (Vote!) | | Posted on Thursday, April 21, 2011 - 08:58 pm: |
|
Access to the inside of the shutter of the Canonet is VERY difficult; the only saving grace has been that it is very seldom necessary. Unfortunately this sounds like one of those rare cases. I've never gone inside a GIII shutter, though I've done enough disassembly to get it out of the camera and persuade myself that it wasn't worth going farther. Although I don't usually do it, this might be a case where it makes sense to remove the shutter from the camera, take the glass out and flood clean it. |
Waynemel
Tinkerer
Username: Waynemel
Post Number: 49
Registered: 08-2009
Rating: N/A
Votes: 0 (Vote!) | | Posted on Friday, April 22, 2011 - 07:10 am: |
|
Thanks Rick.
I have diagnosed the problem a little further.
When the shutter speed ring is turned from a slow speed (1/4 or B) to the 1/8 position, the shutter operates as it should.
When ring is turned from a higher speed (1/15th or higher) to the 1/8th position, it fires at 1/15th or occasionally stays open.
I guess I will have to disassembly more to try to do a more complete cleaning. |
Waynemel
Tinkerer
Username: Waynemel
Post Number: 51
Registered: 08-2009
Rating: N/A
Votes: 0 (Vote!) | | Posted on Wednesday, April 27, 2011 - 05:52 pm: |
|
So I have flooded the shutter as much as possible without complete disassembly. The problem still persists.
Is it possible to gain access to the slow speed escapement from the front of the camera? Do I have to remove the shutter assembly from the camera first? Is it held in place by the larger threaded ring inside the film chamber or do I have to peel back the leatherette and work from the front?
I have the exploded view diagrams, but I'm havimg a little trouble deciphering them. |
Old_school
Tinkerer
Username: Old_school
Post Number: 15
Registered: 04-2011
Rating: N/A
Votes: 0 (Vote!) | | Posted on Thursday, April 28, 2011 - 05:27 am: |
|
OK! IF you look at page2, ring 27-8639 holds all the front goodies through to the cds lens cell. Follow through to Pg 5 & there is your front section. Plate Y13-5300 needs to be lifted to get to Y13-5298 the shutter speed selector cam plate. If you can get to this point note the indexing detent lever spring Y13-5299 & it's position as it will leave you pondering where it came from. The assy. you need to gain access to is Y13-5269 held in by the two screws indicated & note the shims under the unit, remove it. This is your governor assy., flush it in a light solvent, take a hair dryer to it. Just so it is warm to the touch as to remove any moisture, & lightly lube the pivots on the bottom & top. Assemble in reverse order, don't you like when they tell you that. The assy. Y13-5274 is the self timer. While I have everyone's attention on this page, note the complexity of this shutter. The section Y13-5248 should be your flash sync., It looks like the main plate is number T13-5270 ?, Y13-5242 is the shutter blade activation ring. This ring is usually spot lubed with a light grease or impregnated with a Teflon (R), or molly, there is a lot of force being exerted on this ring. Anyway, this is where some of the oils separate from that migrate onto the shutter & aperture blades. Note the SIX blades on the shutter ( at the 11:30 position there is one upper & on under) also a partial at the 4:00 o'clock position. Now farther into the unit, under plate Y13-5231, live the aperture blades, & there ring Y13-5229. The shutter blades & aperture blades need to be bone dry. If you flush the shutter with a solvent it will strip the grease out of the top plate & it will reside down under. So FYI, do what you like as it is your equipment. This is very similar to the Konica series arrangement. The copal shutters are very nice to work on, heaven help you on a Citizen shutter as they are not as modular,similar on the Compur modular & the Prontor intergrated. I do not know if any of this is going to help, but there it is in a nut shell, sort of speak. |
Waynemel
Tinkerer
Username: Waynemel
Post Number: 52
Registered: 08-2009
Rating: N/A
Votes: 0 (Vote!) | | Posted on Thursday, April 28, 2011 - 06:00 am: |
|
I looks like I have to access the shutter from behind to remove Y13-5300. How do I remove the shutter assembly from the body/"lens board"? Is this held in place by 27-8643-010 (page 2)? |
Old_school
Tinkerer
Username: Old_school
Post Number: 17
Registered: 04-2011
Rating: N/A
Votes: 0 (Vote!) | | Posted on Thursday, April 28, 2011 - 11:22 am: |
|
Do you want to have a go at this? I hope you are a patient person.
This would require removing the front board assy. like removing the mirror box assy. of an slr. Remove the upper & lower covers, peel off the leatherette, & unsolder the wires going to the whole front shutter assy. You will have to be careful of the meter movement & the aperture clamping system. page 1 is a nice view as too what is there to remove it.
On the tools2 page they give the dimensions for the spanners to remove the lens assy., front & rear, & the shutter unit, is at the bottom of the page. I was looking at more of removing the ring 27-8639 & going through the front if at all possible.
You might be able to pull this off, your call. Let me know what angle of attack your thinking of at this time. |
Waynemel
Tinkerer
Username: Waynemel
Post Number: 53
Registered: 08-2009
Rating: N/A
Votes: 0 (Vote!) | | Posted on Thursday, April 28, 2011 - 11:40 am: |
|
I already have the front of the assembly off, and can't see any way to get further into the shutter. That's why I asked.
Is it possible to remove the lens and shutter assembly without removing the entire front board assembly? (I've already done that with this camera, to replace the corroded wire from the battery chamber.) I was hoping I could get to the back side of Y13-5300 without completely disassembling in camera. |
Old_school
Tinkerer
Username: Old_school
Post Number: 18
Registered: 04-2011
Rating: N/A
Votes: 0 (Vote!) | | Posted on Thursday, April 28, 2011 - 12:11 pm: |
|
Wayne: I don't think so, looking at the pp 4 you will see the wires for the circuit boards. Look also at the wiring diagram on pp10 as they are well documented, the variable resistors, cds cell, etc.
Hey, I wish this stuff was as accessible like thirty years back as the documentation is great to have on hand. There also may be a light shield, it looks like 13-9199, pp2 that maybe hiding the spanner ring. |
Old_school
Tinkerer
Username: Old_school
Post Number: 19
Registered: 04-2011
Rating: N/A
Votes: 0 (Vote!) | | Posted on Thursday, April 28, 2011 - 12:30 pm: |
|
Do the screw Y13-5310 & Y13-5307 hold the front assy. onto the shutter? Check that out. Wish I had one open to direct you, but it has been years. So, the exploded views are the only guide I have, & any prior knowledge of this style system. Every time one shows up on the goodwill auction it sells like it were gold. Then add the shipping charges...I don't understand the Goodwill site & the people biding. |
Waynemel
Tinkerer
Username: Waynemel
Post Number: 54
Registered: 08-2009
Rating: N/A
Votes: 0 (Vote!) | | Posted on Thursday, April 28, 2011 - 03:11 pm: |
|
The spanner ring at the rear of the lens assembly is accessible,(not blocked by the light shield), but I don't know if it is the only thing holding the lens barrel and assembly onto the camera. I also have a feeling it might be a reversed thread.
Y13-5310 and Y13-5307 look like they hold the front portion of the shutter in place. I think these are what I need to gain access to in order to open up the slow speed escapement. |
Old_school
Tinkerer
Username: Old_school
Post Number: 20
Registered: 04-2011
Rating: N/A
Votes: 0 (Vote!) | | Posted on Thursday, April 28, 2011 - 08:17 pm: |
|
Wayne: send me an e photo of the front of that camera, so I can get an idea as to what or where things are & try to coach from there. [email protected] |
Waynemel
Tinkerer
Username: Waynemel
Post Number: 55
Registered: 08-2009
Rating: N/A
Votes: 0 (Vote!) | | Posted on Thursday, April 28, 2011 - 08:17 pm: |
|
OK, I've gone in.
The rear spanner ring does hold the lens barrel onto the front board. It is a reverse thread.
There are wires that make getting to the back of the shutter difficult, so I desoldered all that I could, but I could not reach one black wire. In removing the screws that hold the read plate on the shutter, this wire broke! So, I will have to do a more complete teardown anyway in order to re-wire. The rear lens group also has to be removed in order to get the shutter apart. This proved to be quite difficult as it was very tight.
I am now cleaning the shutter components before I re-assemble and then repair the broken wire.
Geez...I thought this camera was repaired and working a long time ago! |
Old_school
Tinkerer
Username: Old_school
Post Number: 21
Registered: 04-2011
Rating: N/A
Votes: 0 (Vote!) | | Posted on Thursday, April 28, 2011 - 08:36 pm: |
|
Hey! Been looking at the drawing, blown up mega, & thinking ( I always say to cut it out as it just gets me in trouble). There is something that I did not see & on pp2 of the shutter assy. on the outside of the center barrel that the lens goes into, is a ? brass or silver colored ring or giant "C" clip. I think that is the hold up for your progress into the rest of the front. You will have to remove it with a No. 7 tweezers or pin & walk it up & around.
Let me know if this is it. |
Waynemel
Tinkerer
Username: Waynemel
Post Number: 56
Registered: 08-2009
Rating: N/A
Votes: 0 (Vote!) | | Posted on Friday, April 29, 2011 - 05:20 pm: |
|
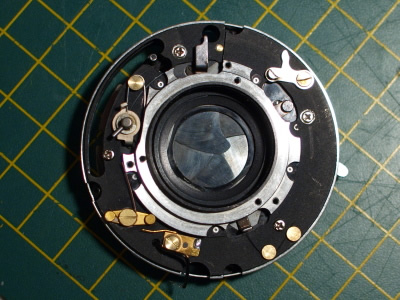
I have attached some photos.
The first one is of the shutter assembly from the front. This is as far as one can get from the front of the assembly. I'm not sure of what ring or "C" clip you are referring to, but there is actually a lever that must be removed from the rear that would absolutely prevent any further digging into the shutter. (it is already removed in this photo)
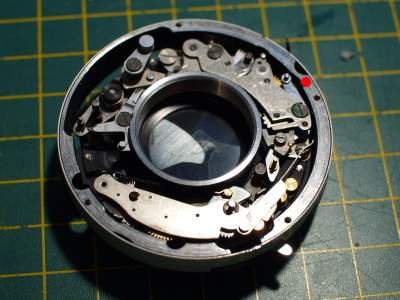
The second photo is from the rear.
I have cleaned and lubed the escapement, but it still sticks on 1/8th sec. I believe the problem is related to the lever that is located to the left of the red dot on the photo. When I charge the shutter and set it to 1/8th (with the shutter speed ring on, of course), it will often stick open when fired. When I touch this lever, it will close.
Any ideas?
 |
Old_school
Tinkerer
Username: Old_school
Post Number: 24
Registered: 04-2011
Rating: N/A
Votes: 0 (Vote!) | | Posted on Monday, May 02, 2011 - 04:56 am: |
|
Are the blades clean? & did you remove the governor or just lube the top pivots? Two screws hold the assy. on the plate, one by the pallet to the right of it just below the red dot. The other is up & to the left of the red dot. but the gear segment may have to be moved out of the way to access it. Not the screw on the top, that holds the assy. together. Then, lift it out rinse in a solvent like Naphtha, blow excess off with a squeeze ball (ear syringe) then lightly heat with a hair dryer to remove any moisture. Inspect the strike area of the levers that do the work & smooth if needed. Lube the pivots on both sides, & check for smooth operation. A spot of oil on the pallet will transfer over to the star wheel. Reinstall the governor, test under operation. Now if you still need adjustment, the two screws that hold the unit in loosen them a tad slide the assy. toward the center, secure the assy., & try it again. If still no luck, the other option is to take the shutter selector ring & note which cam operates the speed your having the problem with & remove from the shutter, the selector ring. Swedge that cam below the step, & try that. As I don't think you want to try & bend the followers on the governor assy. You should do a cleaning of the self timer at this point too as it is probably dry also & if it is not hanging up now it will later. It looks to be held in by an E clip at about the 5 o'clock postion in the photo.
I hope you are not too confused I am trying my best.
By the way the only thing I have ever seen clean a leaf shutter or aperture assy., is a COBEEN (? SP) sprayer system & they have been banned by the EPA. They used a solvent & heated air in a closed spray booth. Not for the average repair shop, in industrial use for instrument shops & the like. So us poor folks had to do a completer dismantling & reassembling. Ultrasonics don't work either as they just leave a residual of deposits. |
Old_school
Tinkerer
Username: Old_school
Post Number: 25
Registered: 04-2011
Rating: N/A
Votes: 0 (Vote!) | | Posted on Monday, May 02, 2011 - 05:11 am: |
|
Oops' just pulled up the parts view & the other screw is the Y13-5272 & Y13-5273 to remve the assy. Notice there is a shims also under the assy. But, the E clip looks good Y13-5275.
Good job so far I'll give you a thumbs up!
If you notice Y13-5242, the activation ring,the two tabs that come through the plate. These usually get a spot of grease on the top side, just a spot. |
Waynemel
Tinkerer
Username: Waynemel
Post Number: 57
Registered: 08-2009
Rating: N/A
Votes: 0 (Vote!) | | Posted on Monday, May 02, 2011 - 05:31 am: |
|
I removed the governor and cleaned thoroughly and lubed pivots on both sides. I operates smoothly. I re-installed the governor and operated the shutter. It was better, but still hung occasionally. I noticed that the slow speeds (1/8 and 1/4)seemed to be too slow, so I made a very minor adjustment of the star wheel (increased the gap on the arm). It now fires correctly every time!
The shutter assembly is back together, the broken wire has been replaced (shutter end), but now I have to re-install the shutter and lens assembly. The camera is almost completely dismantled at this point. Tonight I will try to fish the new wire through and re-assemble. |
Old_school
Tinkerer
Username: Old_school
Post Number: 26
Registered: 04-2011
Rating: N/A
Votes: 0 (Vote!) | | Posted on Monday, May 02, 2011 - 09:06 pm: |
|
Sounds good!
I am not sure if my comments helped or hindered, but did give some input. As the Brits would say, "Good Show Old Boy!" |
Waynemel
Tinkerer
Username: Waynemel
Post Number: 58
Registered: 08-2009
Rating: N/A
Votes: 0 (Vote!) | | Posted on Tuesday, May 03, 2011 - 07:51 pm: |
|
The camera is back together and working properly!
Thanks for your help.
On to the next project! |