| Author |
Message |
    
Bjbrown
Tinkerer
Username: Bjbrown
Post Number: 1
Registered: 06-2011
Rating: N/A
Votes: 0 (Vote!) | | Posted on Monday, June 06, 2011 - 03:53 pm: | 


|
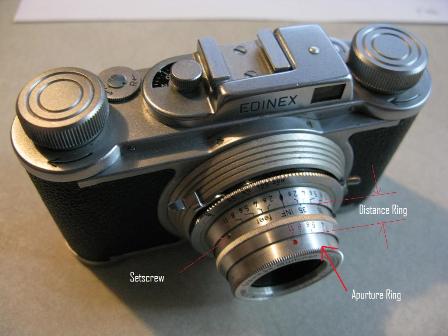
I just purchased a little Wirgin Edinex 35mm rangefinder. What an excellent little package and everything works! Everything, that is, but the distance/focus ring. It seems to be simply frozen in the infinity position and won't move at all. There are three tiny setscrews on that ring that when loosened, release the ring from the mechanism underneath. But, it doesn't acually allow access to the adjusting mechanism itself. I tried removing the lens, but don't see how it comes off. Before I damage it (I'd love to run a roll of film through this camera), I thought I'd ask this group if anyone has a repair manual or thoughts on how to unfreeze the focus mechanism. Anybody? |
Scott
Tinkerer
Username: Scott
Post Number: 142
Registered: 07-2006
Rating: N/A
Votes: 0 (Vote!) | | Posted on Monday, June 06, 2011 - 06:11 pm: |
|
This is a fairly simple camera, and this problem is usually a simple repair, though it can take time and patience.
The camera has a 3-element lens. The rear and middle elements should not move, and should stay screwed snugly into the shutter housing. Only the front element should move. In normal operation, it screws in and out of the middle element casing while focusing. The problem is that your front element is stuck in the middle element casing. The solution is to separate the front and middle lens casings from each other, clean those threads and put in new grease to make focusing smooth.
What I would do is to remove the distance ring, then get some rubber (like rubber gloves) to grip the front brass casing and unscrew it from the shutter in the normal counter-clockwise direction. Most likely, the front and middle elements will come out still stuck together. Try to unscrew/separate them from each other using rubber to grip. Don't use pliers, or metal tools. If you can't get them apart this way, cover them in a small container of denatured alcohol for a couple of days and then try again. |
Bjbrown
Tinkerer
Username: Bjbrown
Post Number: 2
Registered: 06-2011
Rating: N/A
Votes: 0 (Vote!) | | Posted on Monday, June 06, 2011 - 08:20 pm: |
|
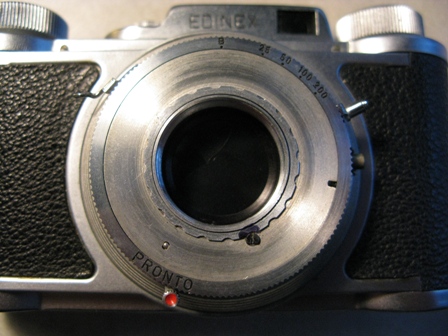
Scott, thanks so much for the suggestions. I'm attaching a photo of the camera - hopefully it'll work. As you'll see, the first element of the lens assembly is the aperture ring on the very front. This is followed by the distance ring. The distance ring is held in place with three tiny setscrews, but when loosened, only allow the distance ring to rotate, but not be removed. So, when you suggest using the rubber to remove the front element, are you saying to loosen the distance ring and using the rubber against the aperture ring, turn counter-clockwise to remove?
 |
Scott
Tinkerer
Username: Scott
Post Number: 143
Registered: 07-2006
Rating: N/A
Votes: 0 (Vote!) | | Posted on Monday, June 06, 2011 - 08:47 pm: |
|
Sorry- looking at the photo, I see that it is not the same as the Edinex I had some years back. However, I think the optical design is the same-- a 3-element, front-cell-focusing lens.
Don't put any force on the aperture setting ring.
When you shift the loose distance ring front to back, does that expose any more setscrews? If so, loosen (don't remove) them enough to take off the aperture ring. Is there a notched, threaded ring holding something on at the front?
You will know when you are down to the actual lens casings, because they are brass. Those outer marked rings you can see now are aluminium, I think.
Your distance setting should be re-calibrated anyway when you re-assemble the camera, but do make notes or sketches of how things come apart relative to each other. |
Bjbrown
Tinkerer
Username: Bjbrown
Post Number: 3
Registered: 06-2011
Rating: N/A
Votes: 0 (Vote!) | | Posted on Tuesday, June 07, 2011 - 10:25 am: |
|
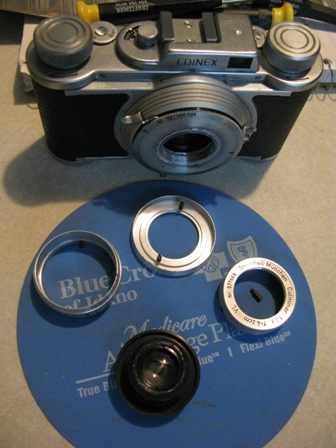
Scott, turns out, I had a rubber mat to use in unscrewing the lens assembly. After a nerve-jarring twist, it came out, the whole assembly in one piece. Now, I have the cosmetic adjusting rings off and the lens element assemblies together in one frozen piece. Now, to your recommendation of applying the alcohol. Should I soak the entire assembly in alcohol, or just apply around the threads with a brush or something? Is there a preferred fluid for cleaning the lens elements themselves without damaging any coatings?
 |
Scott
Tinkerer
Username: Scott
Post Number: 145
Registered: 07-2006
Rating: N/A
Votes: 0 (Vote!) | | Posted on Tuesday, June 07, 2011 - 12:17 pm: |
|
So, your middle and front element casings came out stuck together? You just have to try various ways of separating them. Main thing is to resist the urge to use vise-grips, channel-locks, etc. The brass is too soft.
First step is to get them apart. Then remove the glass lens elements from the lens casings, clean the old grease, corrosion, and crud off the brass parts, then clean and replace the glass, then put new grease on the focus threads.
I have been able to solve this problem in most cases, but not all. One of the things it can depend upon is what type of grease was used. Not all solvents work on all sorts of grease. Some I tried soaking in naptha first, but no result. Then what eventually worked for me was the strongest alcohol I could find, which is pink and sold for industrial cleaning purposes in both Taiwan and Sweden. I'm not sure what the equivalent is in North America. Maybe denatured alcohol is good. Or pure ethyl alcohol if you can find it. With a needle or a wire-brush, remove as much crud as you can off of the threads, then submerge the stuck parts for a couple of days or a week or more.
Another thing that has worked for me in some cases is to heat the parts in an oven to about 250 degrees F, then while they are still hot, grasp them with gloves or towels and unscrew them. That's faster, so try that first. Keep it at 250 degrees for at least 15 minutes, to heat it evenly and to soften the grease well. That shouldn't damage any coatings, and those may not even be coated lenses. Solvents such as alcohol and naptha won't damage lenses or coatings. |
Bjbrown
Tinkerer
Username: Bjbrown
Post Number: 4
Registered: 06-2011
Rating: N/A
Votes: 0 (Vote!) | | Posted on Tuesday, June 07, 2011 - 05:17 pm: |
|
OK, I've tried the oven method and the lens assembly just won't come apart. I now have it soaking in isopropyl alcohol and will leave it in there for a couple days and see what happens. If that doesn't work, I'll try the oven again - maybe longer.
Question: Once I do get the assembly apart and cleaned, what is a good lube to use? What do the manufacturers use on fine threads like this? |
Scott
Tinkerer
Username: Scott
Post Number: 146
Registered: 07-2006
Rating: N/A
Votes: 0 (Vote!) | | Posted on Tuesday, June 07, 2011 - 05:54 pm: |
|
I think the heat method works only if you grasp it while it is still as hot as possible. I suppose a heat gun might also work.
Isopropyl alcohol might work, but I'm guessing it is too weak to do anything, or that it contains too much water. Certain kinds of paint thinner might work, too.
As for grease, I always use a clear silicone-based grease such as most hardware, auto parts, or bicycle shops have in a tube. A relatively viscous grease is best, and it takes only a very small amount. |
Bjbrown
Tinkerer
Username: Bjbrown
Post Number: 5
Registered: 06-2011
Rating: N/A
Votes: 0 (Vote!) | | Posted on Wednesday, June 08, 2011 - 08:44 pm: |
|
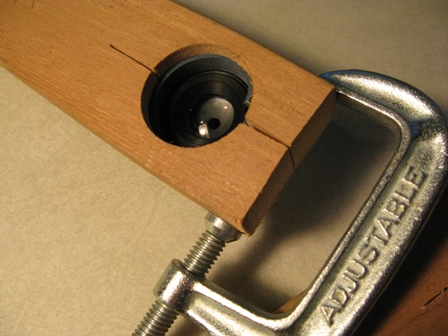
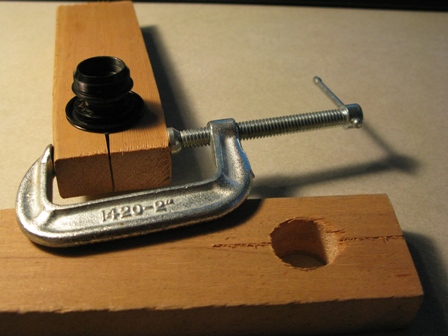
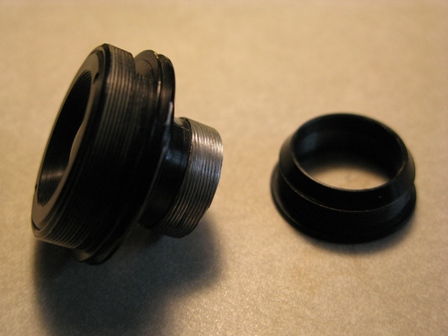
Scott, I really appreciate the help. I think I have the lens assembly apart at last. Like I said, I tried heating it in the oven per your suggestion and later tried soaking in alcohol. Neither gave me any joy. So, heeding the admonition to NOT resort to vise-grips, I went out to the shop and made a couple of simple tools from scrap wood and a thick rubber band. In the photos below, you can see that I just bored two holes of the near-appropriate size (one was slightly too small, the other just oversized). I screwed the small part of the assembly right into the wood by spreading the slot gently with a chisel. The other, larger hole was partly filled with a thick rubber band. Clamp them on, twist and voi-la! At first, I couldn't believe it worked so quickly. Absolutely NO damage to the threads. Now, I just clean things up, lube and re-assemble.
Thanks so much for your help!
 |
Scott
Tinkerer
Username: Scott
Post Number: 147
Registered: 07-2006
Rating: N/A
Votes: 0 (Vote!) | | Posted on Wednesday, June 08, 2011 - 09:54 pm: |
|
Looks like the perfect tool for the job-- the wood is soft enough not to squash the threads, and you got plenty of leverage!
I think the actual lens elements are probably held in with notched and threaded rings. I usually try to get them out to clean everything thoroughly, but it's not absolutely necessary.
On some of the cheaper designs, you can't get the glass out of the casings at all, because the lens elements are pressed into the casings with a brass collar.
You'll want to re-calibrate the focus by checking it at the film plane. I do it by setting up a target at some marked distance, like six feet. |
Bjbrown
Tinkerer
Username: Bjbrown
Post Number: 6
Registered: 06-2011
Rating: N/A
Votes: 0 (Vote!) | | Posted on Thursday, June 09, 2011 - 12:25 pm: |
|
Thanks Scott. Now that I have the lens assembly apart and the distance threads perfectly cleaned, I just need to apply the lube. I believe there are only two lenses in this assembly and are both housed in the main body. The distance is adjusted by swiveling the lens body within the threaded part that attaches to the camera. The iris is contained in the lens body between the lens elements. The lenses are held in with threaded rings - shouldn't be hard to remove. I've decided to go one step further and try to lube the iris mechanism as it's a bit sticky. Any recommendations on a lube to use? Is anything indicated to lube between the iris leaves, or do they remain dry? Is WD40 of any use at all in these systems?
 |
Bjbrown
Tinkerer
Username: Bjbrown
Post Number: 7
Registered: 06-2011
Rating: N/A
Votes: 0 (Vote!) | | Posted on Thursday, June 09, 2011 - 12:27 pm: |
|
Lastly, you mentioned calibrating the distance scale at the focal plane. Could you provide a little more info on how you do that? |
Scott
Tinkerer
Username: Scott
Post Number: 148
Registered: 07-2006
Rating: N/A
Votes: 0 (Vote!) | | Posted on Thursday, June 09, 2011 - 03:09 pm: |
|
STOP!!!!!!
Never let any kind of oil or lubricant get anywhere near the aperture or shutter blades (or actuating rings, which you don't even see until you dismantle the unit). The increased surface tension would negate any lubricating effect, and it would probably render the camera useless until it could be completely dismantled and cleaned. The blades, etc. are made to work properly as long as they are very clean and dry. There may be places where a smear of light grease could make the aperture action a little smoother, but you'd have to take the whole unit apart to get to those places. On the other hand, that shutter is actually not so complicated, so that would be a good way to learn.
I sometimes drip a few drops of naptha directly onto shutter or aperture blades to clean them, but naptha evaporates almost completely.
I think your camera has what is generally called a three-element front-cell focusing lens (also called a triplet or a Cooke triplet). One element is behind the shutter, two in front. Both the rear and middle element casings can just be screwed down snugly into the shutter, and it doesn't matter which thread entrance you use. Be careful to get the middle element back into the casing with the same side facing front, or you won't be able to focus.
If you are going to re-set the focus setting, then it also doesn't matter which thread entrance you use for the front element casing.
I prefer to optimize focus at closer distances. If your subjects are always at 30 feet or more, then you might want to optimize focus at infinity. Choose a distance marked on the ring (I like 6' or two meters), then put the camera film plane exactly that distance away from a TV or computer screen, electric beer sign, or some other 2-dimensional luminous surface. Attach a piece of hard plexiglas with rough side down on the film plane with rubber bands, keep the shutter open with a cable release, and check the image with a loupe while focusing on the TV screen, etc. When you get a sharp image, make a reference mark on the lens casing with a sharpie or a needle file, or else note that a certain letter or number is at 12 o'clock, for instance. Tighten the distance ring with the right distance marking at the reference point on the camera. That's it.
You can do the same thing (at any distance setting) by using an SLR as a reference. Others here may be able to give you tips on that method. |
Bjbrown
Tinkerer
Username: Bjbrown
Post Number: 8
Registered: 06-2011
Rating: N/A
Votes: 0 (Vote!) | | Posted on Thursday, June 09, 2011 - 04:28 pm: |
|
OK Scott, good points. I think the aperture mechanism works just fine as is - maybe a little sticky (the lever, not the leaves from what I can tell), so I'll leave it completely alone and put it back together. I'll pick up some of the silicone-based grease you mentioned for the distance threads and leave it at that.
Now, the only OTHER thing that I'd be interested in tackling is the delay shutter release mechanism. It works, but you have to encourage it with your finger or it won't complete the cycle. You can see it in the pic right below the shutter assembly under the PRONTO text. I can only assume it's got the same nasty dried grease gumming it up that affected the distance threads and needs cleaning and re-lubing. Now that I see how to get the lens assembly off the camera, it should be easy to get to it any time I want and frankly, it's not something I intend to use much. I'm just interested in seeing how the Wirgin Bros. devised that feature mechanically.
Again, thanks for your help - very instructive and I've had fun!
-Bob
 |
Scott
Tinkerer
Username: Scott
Post Number: 149
Registered: 07-2006
Rating: N/A
Votes: 0 (Vote!) | | Posted on Thursday, June 09, 2011 - 06:18 pm: |
|
In my experience, what usually gets those delayed-release mechanisms working is to take off the shutter cover, and drip a few drops of naptha onto the tiny gears and then work the mech. through a few complete cycles. That's the least invasive way.
But if you just like to take stuff apart, those delay mech. come out as a complete unit, and you can get out your watchmaking tools, wear a loupe and take the mech. apart.
You'll see some good photos and tips if you google: "dan mitchell" prontor shutter
Although each of those German and Japanese leaf shutter models are slightly different in some ways, most of them look pretty similar on the inside.
Actually, any thicker sort of grease will work for the focus threads, even wheel bearing grease. Important thing is not to use too much, because you don't want any of it to end up anywhere else in the camera on a hot day, for example. Just enough to give you smooth action. |
Bjbrown
Tinkerer
Username: Bjbrown
Post Number: 9
Registered: 06-2011
Rating: N/A
Votes: 0 (Vote!) | | Posted on Friday, June 10, 2011 - 10:26 am: |
|
Once again, Scott - right you are! A couple drops of Naptha and work the delayed-release mechanism a few times and bingo! Works like a charm. I've got the whole thing back together now and a roll of test film in to see how it goes. Once I have some actual results, I'll post status again here. Thanks again for all the help.
-Bob |
|