| Author |
Message |
    
Tonys
Tinkerer
Username: Tonys
Post Number: 1
Registered: 06-2011
Rating: N/A
Votes: 0 (Vote!) | | Posted on Friday, June 17, 2011 - 09:15 pm: | 


|
Greetings - my first post to the forums after The Google led me here for a solution to my problems.
I just came into possession of a Fujinon V2 35mm rangefinder with a 45mm f/1.8 lens but it has several issues that need addressed. The camera is in great cosmetic shape and the lens looks exceptionally clear for a near-50 year old camera. It seems a touch yellow - does anyone know if Fuji used thorium oxide in these lenses? I can set it on a UV source to clear it, but would rather not if there's no thorium in it.
I think I have a plan, but of course hope that if anyone has suggestions or corrections those could be provided.
1. The shutter is stuck. I am awaiting point- and slot-spanner wrenches from Amazon and they should be here on Monday. If I understand correctly, the point-spanner will allow the removal of the front elements and the slot spanner the rear elements. This allows complete access to the shutter for a little cleaning with lighter fluid and cotton swabs. Should the aperture be cleaned as well? It does not stop down when I turn the aperture ring on the lens (at least, it's not visible from the front or rear of the camera). I will also clean the elements while I have them out.
2. The rangefinder needs adjustment, both horizontal and vertical. The horizontal looks easy - there's an adjustment screw under the hot shoe. I understand the focus should be set at infinity and then the adjustment is made? The vertical adjustment appears to require removal of the top of the camera. There are 5 screws, plus the winding knob has two holes that suggest the point-spanner will be needed. Is this correct? Any wires under the top that I should be aware of?
3. The light seals have deteriorated. Any recommendations of USA places to purchase replacement seals, or is this something that can be done with weather stripping? I'm also not sure how far around they need to go since much of the original seals are completely gone so I have no reference points.
4. I cannot ascertain if the meter is working. I put in a good 1.35V zinc air Wein cell (checked with my Canon F-1n) and the needle moves a bit when I press the shutter button slightly, but it doesn't seem to be consistent in its movements. Any tips on checking this to see if it's functional?
5. The shutter button does not seem to return to its full upright position. Could this be because the shutter blades are stuck? It also is what activates the meter - press half-way and the meter comes on; the rest of the way should trip the shutter.
Thanks very much for any information or corrections that any of you can provide. I'm both excited and nervous about this. I really want it to work - it's my very first rangefinder. I plan to photo document, maybe even video document, this process for posting on the web, just in case anyone else with a V2 or similar camera could use the information. |
Neuberger
Tinkerer
Username: Neuberger
Post Number: 46
Registered: 01-2010
Rating: N/A
Votes: 0 (Vote!) | | Posted on Saturday, June 18, 2011 - 02:33 am: |
|
Hi, Tony, there is not much in the archives, but that is all this forum has to offer with respect to the V2, so try a search there; some of the links in the posts there will very probably no longer work. |
Reborn7
Tinkerer
Username: Reborn7
Post Number: 46
Registered: 11-2007
Rating: N/A
Votes: 0 (Vote!) | | Posted on Saturday, June 18, 2011 - 04:41 am: |
|
2. removal of the top is easy, there are two wires that connect to the front CDS meter coming from the bottom, no problem with those.
4. I had a non working meter and removed the CDS from the body and checked it on my Olympus 35DC. It turned out to be O.K.
Now I will have to dig into the V2 to replace corroded wires |
Tonys
Tinkerer
Username: Tonys
Post Number: 2
Registered: 06-2011
Rating: N/A
Votes: 0 (Vote!) | | Posted on Saturday, June 18, 2011 - 07:36 am: |
|
Neurberger - the archive was quite helpful (which is what led me to joining the forum), but my inexperience and insecurity about working on it led me to these specific questions. My plan is largely based upon those other posts; this forum seems to be a gathering place of the most knowledgeable people!
Reborn - thanks for the tip on the wires; I'll be sure to keep an eye out for them. Hopefully the meter is fine and I can get the needle issue sorted out without disassembly of the camera. |
Denny
Tinkerer
Username: Denny
Post Number: 70
Registered: 08-2009
Rating: N/A
Votes: 0 (Vote!) | | Posted on Saturday, June 18, 2011 - 03:55 pm: |
|
3. As far as light seals, this is pretty much the go to guy,
https://kyp.hauslendale.com/classics/sealreplacement.html
I don't see you camera specifically listed, but an email to him would probably get you started. I have bought 3 of his kits and his instructions are worth the price of the kit alone.
Good luck. |
Neuberger
Tinkerer
Username: Neuberger
Post Number: 47
Registered: 01-2010
Rating: N/A
Votes: 0 (Vote!) | | Posted on Sunday, June 19, 2011 - 04:54 am: |
|
Most meters in vintage Fujicas are fine, electronicwise. The faults they develop over time is their bearings become too tight, so the meter needle won't swing freely. Unfortunately the meter in the V2 is deep down inside the camera. This is to say any serious work on it requires a somewhat complete knockdown of the camera.
Reborn stated the removal of the top was easy, maybe it is, but it is not as easy as with other cameras of the same vintage, and this is because Fujicas (V2, Compact Deluxe) are completely differently constructed, take for example Fuji's thumb wheel focusing. This is especially tricky to reinstall. Ask Reborn how he/she managed to get everything back together and whether this was done in an instant or two.
My advice is practise on some junkers first if this is your first repair project before only dreaming of opening the V2. On the other hand, however, if - like many others before you - have been bitten by the bug, then get going. Unfortunately I cannot give you a full tutorial through the whole operation for the reason that my free time is rather limited at present.
Maybe this helps a bit: there are some useful pictures & tips (use google's language tool) here: http://homepage1.nifty.com/fukucame/restorelink.htm ,scroll down to the articles about the V2.
I consider the shutter/aperture/meter problems to have some priority.
The shutter button activates a linkage system (similar to that in Olympus rangefinders), triggering the shutter plus moving the aperture/meter arms and the "red flag" for slow speeds; again the camera has to be opened up for closer inspection. |
Reborn7
Tinkerer
Username: Reborn7
Post Number: 47
Registered: 11-2007
Rating: N/A
Votes: 0 (Vote!) | | Posted on Monday, June 20, 2011 - 06:14 am: |
|
"My advice is practise on some junkers first if this is your first repair project before only dreaming of opening the V2."
I completely agree with this statement, the V2 is complex, definitely not for beginners.
This is one of the reasons why I intend to use the camera in manual mode only.
I'm lucky to have a working shutter !!!
As for the focusing wheel, a lot of patience is needed ... I mean put it aside if you get nervous. |
Tonys
Tinkerer
Username: Tonys
Post Number: 3
Registered: 06-2011
Rating: N/A
Votes: 0 (Vote!) | | Posted on Monday, June 20, 2011 - 06:29 am: |
|
I'll be happy if I can just get the shutter working and the rangefinder adjusted. |
Neuberger
Tinkerer
Username: Neuberger
Post Number: 48
Registered: 01-2010
Rating: N/A
Votes: 0 (Vote!) | | Posted on Tuesday, June 21, 2011 - 05:50 am: |
|
You can reach the shutter from the front like you describe it in your first post, but cleaning is not as easy as it seems. Can the shutter be cocked with a swing of the advance lever? Can the shutter be released and if so, do the blades show any movement? I am asking because you say that the shutter button "does not seem to return to its full upright position". If you look in from the film chamber, are the aperture blades closing a) in auto when pressing the button? b) in manual mode when turning the aperture dial? |
Tonys
Tinkerer
Username: Tonys
Post Number: 4
Registered: 06-2011
Rating: N/A
Votes: 0 (Vote!) | | Posted on Tuesday, June 21, 2011 - 07:05 am: |
|
Nueuberger, I have managed to get the shutter to function and it appears as though all shutter speeds are timing correctly. However, the aperture blades do not move and are stuck wide-open. I also managed to get the top off (rather easily, fortunately) and see several screws around the mirror.

#2 adjusts the horizontal, but I am not sure which adjusts the vertical. Currently, the "ghost image" in the rangefinder window is above the real image, so I assume one of these other screws controls that?
Thanks,
Tony |
Neuberger
Tinkerer
Username: Neuberger
Post Number: 49
Registered: 01-2010
Rating: N/A
Votes: 0 (Vote!) | | Posted on Tuesday, June 21, 2011 - 08:11 am: |
|
Try #1 after softening the lacquer wit a wee bit (!) of acetone, that one gives the mirror the correct vertical tilt; usually only minor correction is necessary.
For your aperture problem study this link's info http://kanscamera.sakura.ne.jp/hp7/html/p93.html.
The small spring you can see is of vital importance. Often it is unhooked or gone. I guess the aperture blades are also gummed up and need cleaning. Unfortunately they are quite close (behind, seen from the front) to the shutter blades, so any cleaning will take influence on both sets of blades, the whole operation is time consuming and one can never be sure if any positive result is long lasting. |
Tonys
Tinkerer
Username: Tonys
Post Number: 5
Registered: 06-2011
Rating: N/A
Votes: 0 (Vote!) | | Posted on Tuesday, June 21, 2011 - 11:11 am: |
|
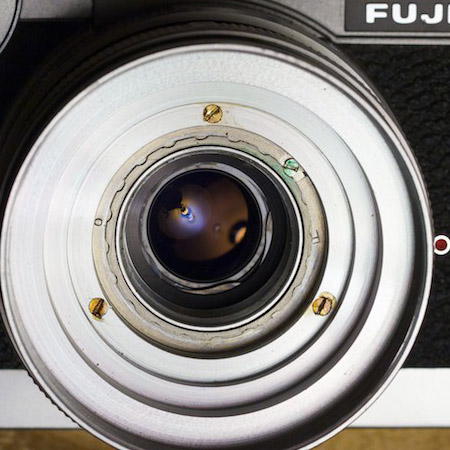
OK, I'll give the RF adjustment a go tonight. I'll also pass the Japanese web site through Google Translator to see if that helps any. I assume the 3 brass(?) screws hold the front lens assembly in place, but what does the green screw do?
Thanks!
 |
Tonys
Tinkerer
Username: Tonys
Post Number: 6
Registered: 06-2011
Rating: N/A
Votes: 0 (Vote!) | | Posted on Tuesday, June 21, 2011 - 11:31 am: |
|
On the RF alignment, does the vertical have to be done at infinity? My plan is to adjust the vertical, then do the horizontal - is that correct? |
Neuberger
Tinkerer
Username: Neuberger
Post Number: 50
Registered: 01-2010
Rating: N/A
Votes: 0 (Vote!) | | Posted on Tuesday, June 21, 2011 - 12:29 pm: |
|
The green screw is not a screw in the literal sense of the word, it is just a riveted part that can be moved half a turn so that you can loosen the wavy nut which keeps the shutter front plate in place. Before you proceed, study this first: http://www.daniel.mitchell.name/cameras/index.php?page=seikosha. This shutter is not exactly the one of the V2, but it gives you an idea of what there is underneath that front plate.
After removing the brass screws and the front ring you have access to the shutter, if you like. Don't forget the tinkerer's first rule, do not fix it if isn't broken; putting the front plate back is not easy!
Both your assumptions about aligning the RF are correct, infinity, vertical first. |
Neuberger
Tinkerer
Username: Neuberger
Post Number: 51
Registered: 01-2010
Rating: N/A
Votes: 0 (Vote!) | | Posted on Tuesday, June 21, 2011 - 02:13 pm: |
|
Tony, after taking a second l o n g e r look at your photo: you say you have "managed to get the shutter to function", but both blade sets, aperture and shutter blades, are still wide open!? In the camera's present state cleaning the blades from the front is easily possible, you could try wetting the edges of the blades visible on the rim of the opening with a cotton swab and lighter fluid and/or ticking them with a toothpick to make them close. This is not a replacement measure for cleaning, but it helps you decide what your next steps towards a fully functional camera will be. |
Tonys
Tinkerer
Username: Tonys
Post Number: 7
Registered: 06-2011
Rating: N/A
Votes: 0 (Vote!) | | Posted on Tuesday, June 21, 2011 - 06:01 pm: |
|
Wow, that shutter disassembly look really complicated. I'll have to study up before I decide if I want to undertake it.
The shutter works fine. In the photo I have it open using the bulb setting with a locked cable release. If I set it for 1" it stays open for 1". 1/2", 1/4", 1/8" all seem to be right on, so I assume the rest are working just fine, too. Could it be the aperture blades are stuck in the open position because of dried oils? Would lubing them help? Or do I need to disassemble the shutter to take a look at it? |
Neuberger
Tinkerer
Username: Neuberger
Post Number: 52
Registered: 01-2010
Rating: N/A
Votes: 0 (Vote!) | | Posted on Wednesday, June 22, 2011 - 06:55 am: |
|
Lubing them is counterproductive, it is in fact dried oil and grime that usually stop them from opening/closing if they are caught in the full open position.
Wetting them with lighter fluid often helps, but the fluid will travel elsewhere, that is what I was thinking of when I said that any cleaning of either the shutter or the aperture usually has some influence on neighbouring parts. |
Neuberger
Tinkerer
Username: Neuberger
Post Number: 53
Registered: 01-2010
Rating: N/A
Votes: 0 (Vote!) | | Posted on Wednesday, June 22, 2011 - 10:29 am: |
|
addendum: no the shutter does not have to be disassembled |