| Author |
Message |
    
Chodgson45
Tinkerer
Username: Chodgson45
Post Number: 1
Registered: 07-2011
Rating: N/A
Votes: 0 (Vote!) | | Posted on Sunday, July 17, 2011 - 06:42 pm: | 


|
Howdy guys, first post for a lurker. I have a Ikonta 521/2 with a klio shutter that is partially disassembled and I have no diagram to put it back together. It is not the same as this shutter http://pheugo.com/cameras/index.php?page=klio .
I will post pictures when I get home from work of said state of the camera. Any assembly diagrams or pictures of thethe lens would be greatly helpful! I just want this camera to work and I've been blocking and email for about four hours. You are my last hope!
Corey |
    
Chodgson45
Tinkerer
Username: Chodgson45
Post Number: 2
Registered: 07-2011
Rating: N/A
Votes: 0 (Vote!) | | Posted on Sunday, July 17, 2011 - 09:36 pm: | 


|
http://i272.photobucket.com/albums/jj191/KingTigerII/Mobile%20Uploads/2011-07-17 _01-44-00_726.jpg
http://i272.photobucket.com/albums/jj191/KingTigerII/Mobile%20Uploads/2011-07-17 _01-43-51_803.jpg
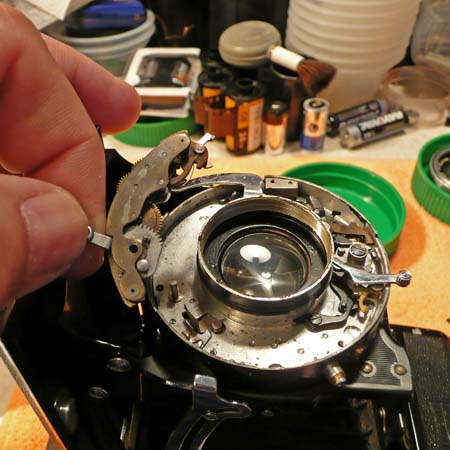
There we go. I was on my cell phone earlier. I had taken pictures of the shutter before I disassembled it to fix a sticky timer, however my phone did not save them so I have nothing to work off of. The bulk of the problem is finding where two springs are located (Also the configuration of the gears). The two separate piles of parts correspond with the two areas void of parts on the left and right of the shutter.
Any help that could be given would be much appreciated. I also contacted Rick Oleson and he has no schematics for this shutter, but gave me three diagrams that were semi helpful....I just cannot understand how the thing is assembled.
Thanks,
Corey |
    
Br1078lum
Tinkerer
Username: Br1078lum
Post Number: 113
Registered: 11-2010
Rating: N/A
Votes: 0 (Vote!) | | Posted on Monday, July 18, 2011 - 07:53 pm: | 


|
I've got a camera around here somewhere with a Klio shutter. As soon as I can find it, I'll do a partial teardown on it and take some photos for you. You'll have to give me a day or two.
First thing you should not have done was to dismantle the timing mechanism. It usually will come out as a whole (see the big screw at the top in your second photo) for cleaning. Best thing to do is soak it in some alcohol, and spin the gears by hand to work all the gunk out of the teeth. About the only time you would need to do a complete teardown like that is if there is a broken spring, or rusted/corroded parts (which may be why you did it in the first place).
I'll get to work on photos for you, but I don't plan on tearing it down. They will be of the assembled unit so you can see how it goes back together. Oh, and take notes next time.
PF |
    
Chodgson45
Tinkerer
Username: Chodgson45
Post Number: 3
Registered: 07-2011
Rating: N/A
Votes: 0 (Vote!) | | Posted on Monday, July 18, 2011 - 11:02 pm: | 


|
Thanks, Yeah I'm learning the hard way lol. I got the gears and levers together, I just need to figure out where the two springs go.
Once those are in place - I'm home free! |
    
Br1078lum
Tinkerer
Username: Br1078lum
Post Number: 115
Registered: 11-2010
Rating: N/A
Votes: 0 (Vote!) | | Posted on Tuesday, July 19, 2011 - 11:32 am: | 


|
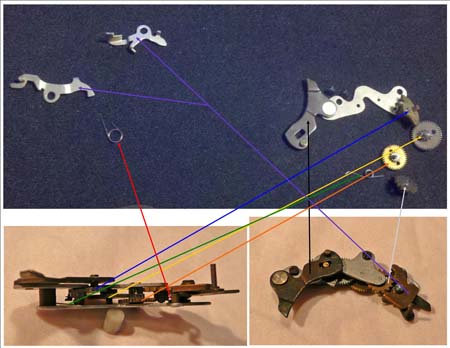
You'll have to tear it down again to put the springs in. If you look at it from the side that faces the shutter, the smaller spring will be on the left, and the larger one is on the right. Photo below:

The catch pawl arrangement is different on mine, but the gears are the same.
The self timer on mine is mounted on a pin, with the tensioning spring holding everything in place. Take the spring off the posts, and the timer lifts out.

Just imerse it in some alcohol, work the gears back and forth, and it should free things up nicely.
Good luck on getting it all back together.
PF |
    
Br1078lum
Tinkerer
Username: Br1078lum
Post Number: 116
Registered: 11-2010
Rating: N/A
Votes: 0 (Vote!) | | Posted on Tuesday, July 19, 2011 - 11:34 am: | 


|
Let me rework that first photo, as it isn't large enough to make out the details.
PF |
    
Br1078lum
Tinkerer
Username: Br1078lum
Post Number: 117
Registered: 11-2010
Rating: N/A
Votes: 0 (Vote!) | | Posted on Tuesday, July 19, 2011 - 12:03 pm: | 


|
Lets see what this looks like:

That's the best I can do for now without a whole lot of rework.
PF |
    
Chodgson45
Tinkerer
Username: Chodgson45
Post Number: 4
Registered: 07-2011
Rating: N/A
Votes: 0 (Vote!) | | Posted on Tuesday, July 19, 2011 - 10:52 pm: | 


|
Well thanks to you, I am at almost done! Shutter is fixed, the self timer is actually broken (the teeth on the gear are smashed in and jammed, not affecting the actual use of the camera so I'm not complaining...I still have my Retina II 142  ) )
Just need to place the Bulb spring. My action is different than yours but you helped me so much with the placement of the spring for the shutter.
I am in your debt...and promise to take notes and 5 sets of pictures next time ;)
-Corey |
    
Br1078lum
Tinkerer
Username: Br1078lum
Post Number: 118
Registered: 11-2010
Rating: N/A
Votes: 0 (Vote!) | | Posted on Wednesday, July 20, 2011 - 07:08 pm: | 


|
I've found that there are many variations of the same shutter no matter the manufacturer. But there is enough simularity between them that a little bit of intuitive thinking goes a long way. I was surprised that the self timer in mine is not screwed down at some point. But that made it so much easier to get out. And since I had those two items out, I decided to go ahead with the rest of the lens teardown, since I have to defungus the elements.
Someone must have tried to get your self-timer back to the start by forcing the gears. It's too bad, but like you said, it won't affect the overall operation of the camera. Just take the tension spring out (but don't loose it, it may come in handy down the road).
Glad to have been some assistance, Corey. We've all got to learn somwhere, sometime.
PF |