| Author |
Message |
    
Nico
Tinkerer
Username: Nico
Post Number: 41
Registered: 07-2010
Rating: N/A
Votes: 0 (Vote!) | | Posted on Tuesday, July 19, 2011 - 03:21 pm: | 


|
Hi! I'm trying to repair a very strange problem with the meter needle: It seems to stick very randomly in the way up and down. When you set the switch in the "check" position, it swings up but sometimes doesn't reach the mark, and other times it does. So when it stops you may shake the camera a little and it moves and stops in another position. When you release the check, it goes down but it may not reach the bottom.
The same behavior applies when I switch the meter on. You take a reading, then you shake it a bit, point the same thing and it shows a different reading. Then, when no light, it doesn't come down easily again.
It seemed to me like it had some dirt, humidity or something causing friction there, so I took the cover off, cleaned some parts and dried it with a hair-dryer but that didn't seem to work.
It doesn't appear to have corrosion in the switch contacts either.
Besides that, I want to tell you something as it maybe has something to do with it. Two years ago (last time the camera has been used) I was on a trip and lose the battery cover, so I had to use it applying sunny 16 for about 2 weeks 
The meter was working fine until then.
After these years, I wanted to use it again, I found a replacement for the battery cover and bought a new battery.
Then I realized about this issue...
Any ideas?
I don't want to take the meter out just to check it. It seems too fragile and tricky to me, I'm not that experienced.
Thanks. |
Old_school
Tinkerer
Username: Old_school
Post Number: 100
Registered: 04-2011
Rating: N/A
Votes: 0 (Vote!) | | Posted on Thursday, July 21, 2011 - 08:43 pm: |
|
N: Clean the contacts on the switches & the energy cell compartment, even if they do not look bad. Use either an old ink or typewriter eraser or glass brush for the compartment & drag a strip of an old business card through the contacts of the switches while pinching them together with tweezers. The other possible culprit may be an oxidized conector on the other side of the battery compartment. If you feel comfortable, pop the prism off & check the meter needle to see if it got disstorted some how & draging on the prism or condensor. The prism may be removed without removing the frame it lives in as this is nice to be carefull of as the FTbn has the shutter speed indicator attached. The canon meter is a very ruged unit & I have been surprized as to how well they have held up for all these years. The needle may have a residue on it that came from the evironment or the deterioration of the foam in the camera & this of course will cause it to stick, but this is most likely to happen at the extreme ends as it hit the bumpers or stops. If you run a check on the prior chats you will see a whole lot of information that has been posted very recently on this camera, plus the battery delema. Hope this helps! The Best Mike.... |
Nico
Tinkerer
Username: Nico
Post Number: 45
Registered: 07-2010
Rating: N/A
Votes: 0 (Vote!) | | Posted on Saturday, August 20, 2011 - 12:03 pm: |
|
Thanks Mike for your response! Sorry for the delay. I didn't had time to spend on it until today. I tried to clean thoroughly every contact again, but with no success. It keeps getting stuck.
So the contacts are fine and the needle seems to be completely free, at least the outer part. I think it could be some gunk INSIDE the instrument that is causing the needle to stop. If that is the case, is there any remedy to it? or I have to throw the entire meter unit away?
It certainly works but you can't get an accurate reading as it is!
Maybe I could blow it a bit with an air compressor but I'm afraid of bending something.
Regards |
Brcamera
Tinkerer
Username: Brcamera
Post Number: 108
Registered: 08-2010
Rating: N/A
Votes: 0 (Vote!) | | Posted on Saturday, August 20, 2011 - 04:07 pm: |
|
Nico, from my experience with meter movements, it sounds like you may have a particle inside the meter itself that is causing the needle to become stuck at times. I have attached a photo of the inside of a meter to show how the needle assembly rotates around a magnet. Any small metal particles get attracted to the magnet and cause erratic needle movements. The solution is to do careful micro surgery on the galvanometer to remove the particle(s). An air compressor definitely not a good idea!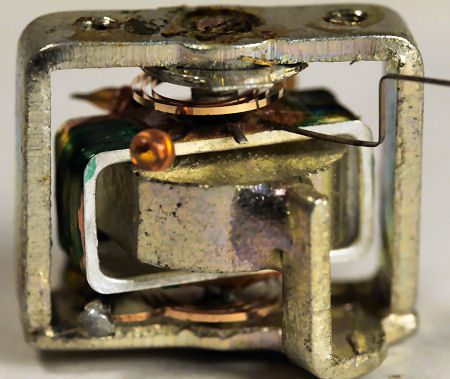 |
Nico
Tinkerer
Username: Nico
Post Number: 46
Registered: 07-2010
Rating: N/A
Votes: 0 (Vote!) | | Posted on Sunday, August 21, 2011 - 10:28 am: |
|
Thats what I thought... "Micro surgery". I'm scared... Hope that operation don't become an autopsy...
Thanks for your opinion.
I'll let you know the result |
Brcamera
Tinkerer
Username: Brcamera
Post Number: 109
Registered: 08-2010
Rating: N/A
Votes: 0 (Vote!) | | Posted on Sunday, August 21, 2011 - 11:10 am: |
|
The tools that I use for this type of operation are fine tip tweezers, a strong pin point light source, and a stereo inspection microscope (I think you will find some type of magnification helpful). I shine the light source down into the meter movement while searching for a small bit of metal. It does not take very much, just a sliver, to stop the meter movement from rotating. Being very careful you can reach into the meter and remove the contaminant from the magnet. Just keep in mind that the meter movement is very fragile and very easy to damage, steady hands are needed! |
Nico
Tinkerer
Username: Nico
Post Number: 47
Registered: 07-2010
Rating: N/A
Votes: 0 (Vote!) | | Posted on Sunday, August 21, 2011 - 11:39 am: |
|
Great. Thanks for the tips. I think I'm going to get some diazepam pills... |
Ron_g
Tinkerer
Username: Ron_g
Post Number: 86
Registered: 07-2009
Rating: N/A
Votes: 0 (Vote!) | | Posted on Sunday, August 21, 2011 - 03:35 pm: |
|
I use toothpicks when working around that magnet when I can,you can break the toothpick if it is too large to work with.Ron G |
Old_school
Tinkerer
Username: Old_school
Post Number: 114
Registered: 04-2011
Rating: N/A
Votes: 0 (Vote!) | | Posted on Monday, August 22, 2011 - 11:38 pm: |
|
Nico: I worked on probably over a thousand movements. Just relax. If you are at the point Brcamera has in the photo above, you are doing good. Here is a tip: get a fine sewing needle & insert it with the eye or hole portion into a small diameter dowel rod so you can handel it like a pencil or such. The fine point can then be used to extract the small iron particles that are attached to the magnet, just touch the point to the particle & it will follow the needle point off the magnet. You could try it in just a kitchen magnet or such first for a trial run with some iron filings. Just in case you think this is bull. If for some reason you take the movement apart, remove the coil, a keeper should be inserted in place of the coil to keep the magnetic field strength in form. Use a magnet to sweep your bench area so you are not adding to the problem also. Do not take it apart on a steel bench top also, or work on one with an open meter movement, not a good idea. A fine piece of scotch tape in a cone shape with the sticky side out can can be used if careful too. If the coil moving around troubles you, put a little folded stip of paper in between the coil & the magnet. While on meters, the Topcon system needs to be secured with a set screw as directed in the manual, or the spring tension plays havoc on it. Also the top portion of the Topcon is plastic & cracks from age. The technicians would also buff the pressure plates with newspaper to remove any potential burs. For what the last part is worth, thought some one might like to know.
I think some where in the archive an article on meter movements that was posted by me if you do a back search it should come up. Oh & bees wax can be used to balace the pointer, you use it with a soldering iron on the cross arms + or - as needed, or a little paint works too. Almost forgot, if you are at this point it might not hurt to flush the pivots out with a little naphtha or lighter fluid. A piece of paper towel cut into strips to draw or wick up the fluid works well. Check for end shake & any distortions.
The Best Mike.... |
Nico
Tinkerer
Username: Nico
Post Number: 49
Registered: 07-2010
Rating: N/A
Votes: 0 (Vote!) | | Posted on Tuesday, August 23, 2011 - 01:32 pm: |
|
Well, thank you guys! Your help will be very useful for sure! This week I will continue with this job. I'll let you know what happen.
Best regards
Nicol�s |
Old_school
Tinkerer
Username: Old_school
Post Number: 117
Registered: 04-2011
Rating: N/A
Votes: 0 (Vote!) | | Posted on Thursday, August 25, 2011 - 03:29 am: |
|
Nico: Just a note, before you get too involved. Try disconnecting the lead wire to the meter movement & connect up a volt / ohm meter in its place. One to the body & one to the circuit. The body connection can be tricky, just make sure it has good conductivity.
You should be able to get a smooth response to the VOM & this will help validate the movement as the problem.
Hope this helps narrowing it down.
The Best Mike.... |