| Author |
Message |
    
Icr
Tinkerer
Username: Icr
Post Number: 1
Registered: 08-2011
Rating: N/A
Votes: 0 (Vote!) | | Posted on Friday, August 19, 2011 - 08:45 am: | 


|
I am currently working on three Yashica FX-3 bodies and a bunch of lenses. I discovered something today and wanted to pass it along.
In the Yashica FX3 Repair manual (available on scribd), the adjustment of the mirror is not covered. Making me think there is no adjustment. However, the CONTAX 139 has similar mechanics and the 139 Service Manual (also available on scribd) shows the adjustment. There are two little screws. One to adjust the angle and another to adjust the pivot point. 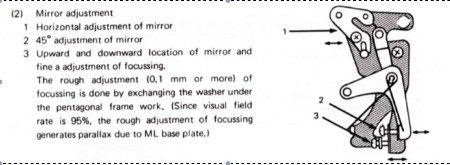 |
Monopix
Tinkerer
Username: Monopix
Post Number: 218
Registered: 11-2008
Rating: N/A
Votes: 0 (Vote!) | | Posted on Friday, August 19, 2011 - 09:29 am: |
|
Couldn't post a link to the FX3 manual could you. A search of Scribd didn't find it. |
Icr
Tinkerer
Username: Icr
Post Number: 4
Registered: 08-2011
Rating: N/A
Votes: 0 (Vote!) | | Posted on Friday, August 19, 2011 - 11:25 am: |
|
http://www.scribd.com/collections/2877565/fx3 |
Icr
Tinkerer
Username: Icr
Post Number: 5
Registered: 08-2011
Rating: N/A
Votes: 0 (Vote!) | | Posted on Friday, August 19, 2011 - 11:27 am: |
|
Contax 139
http://www.scribd.com/doc/54625225/Contax-139-Repair-Manual |
Icr
Tinkerer
Username: Icr
Post Number: 6
Registered: 08-2011
Rating: N/A
Votes: 0 (Vote!) | | Posted on Friday, August 19, 2011 - 03:01 pm: |
|
So this turned out to be easier than expected. Under the rewind-side front covering are two holes in the front plate. These holes lead to screws #2 and #3 in the above diagram.
In my case the top and bottom of the screen focused slightly off. A few tweaks of the screw #2 brought it back perfect. Film-plane focus had been slightly off in the center, now its ok, so no need for any adjustment of screw #3. |
Monopix
Tinkerer
Username: Monopix
Post Number: 219
Registered: 11-2008
Rating: N/A
Votes: 0 (Vote!) | | Posted on Saturday, August 20, 2011 - 04:16 am: |
|
Thnaks for the link. No sure why I couldn't find it. The 139 manual is mine so no problem finding that ;-)
Monopix aka Equiphoto |
Icr
Tinkerer
Username: Icr
Post Number: 7
Registered: 08-2011
Rating: N/A
Votes: 0 (Vote!) | | Posted on Saturday, August 20, 2011 - 06:49 am: |
|
Monopix, thanks for posting the 139 manual! It saved me from taking the mirror box out and analyzing the mechanism.
With the front plate off, here is screw #3 just below the red wire (#2 can't be seen in this shot).
http://img.photobucket.com/albums/v670/ic-racer/2011/MirrorScrew.jpg
[IMG]http://img.photobucket.com/albums/v670/ic-racer/2011/MirrorScrew.jpg[/IMG] |