| Author |
Message |
    
Baris
Tinkerer
Username: Baris
Post Number: 1
Registered: 01-2012
Rating: N/A
Votes: 0 (Vote!) | | Posted on Wednesday, January 11, 2012 - 05:43 pm: | 


|
Please have a look at this picture
http://img41.imageshack.us/img41/3410/img3869xh.jpg
and tell me how to remove the film advance lever (see green arrow).
Many thanks |
Amplifierword
Tinkerer
Username: Amplifierword
Post Number: 2
Registered: 01-2012
Rating: N/A
Votes: 0 (Vote!) | | Posted on Thursday, January 12, 2012 - 07:38 pm: |
|
My konica S 1.6 has a similar looking piece. Mine simply was twisted (in an upward motion) and came right off. If that doesn't work I bet those two engravings will are supposed to be used to remove it. Also, sometimes they get "stuck" due to age and constant pressure holding them down. That said, try using something to pry it upwards without scratching the chrome.
Hope this helps
Jacob |
Loosecanon
Tinkerer
Username: Loosecanon
Post Number: 25
Registered: 07-2006
Rating: N/A
Votes: 0 (Vote!) | | Posted on Thursday, January 12, 2012 - 09:42 pm: |
|
I believe that is a retaining nut. You will need a spanner wrench (or similar device) to unscrew it. Wrench fits in the slots on either side. There is a possibility that it is left-hand thread. |
Ron_g
Tinkerer
Username: Ron_g
Post Number: 89
Registered: 07-2009
Rating: N/A
Votes: 0 (Vote!) | | Posted on Friday, January 13, 2012 - 08:06 am: |
|
Unscrew the nut that you have pointed out with your green arrow.It is right hand thread.There are springs and wave washers under there so be careful when you remove it to remember the sequence that everything comes off.That determines the preload or friction of the cocking lever when it is assembled.Ron G |
Baris
Tinkerer
Username: Baris
Post Number: 2
Registered: 01-2012
Rating: N/A
Votes: 0 (Vote!) | | Posted on Saturday, January 14, 2012 - 06:15 am: |
|
Thanks, was easy. |
Kareldc
Tinkerer
Username: Kareldc
Post Number: 1
Registered: 07-2012
Rating: N/A
Votes: 0 (Vote!) | | Posted on Wednesday, July 04, 2012 - 08:10 am: |
|
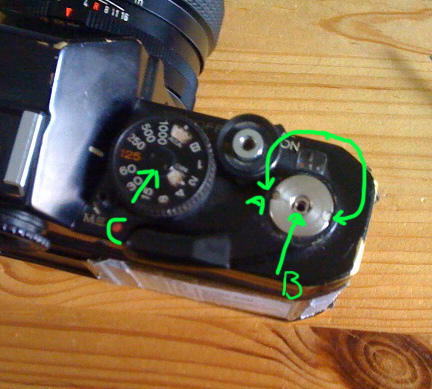
Hi, just wondering which screw it is that needs to be unscrewed to remove the film advance lever.
Is it:
A. the metal plate in it's whole?
B. The Screw in the middle of the plate
Also, do I have to remove C to remove the shutter speed dial?
Anyone with service manuals to spare, please feel free to contact me!
Thanks,
Karel.
 |
Kareldc
Tinkerer
Username: Kareldc
Post Number: 2
Registered: 07-2012
Rating: N/A
Votes: 0 (Vote!) | | Posted on Friday, July 06, 2012 - 04:35 pm: |
|
It ended up being: A and C. |
Kareldc
Tinkerer
Username: Kareldc
Post Number: 3
Registered: 07-2012
Rating: N/A
Votes: 0 (Vote!) | | Posted on Friday, July 06, 2012 - 04:48 pm: |
|
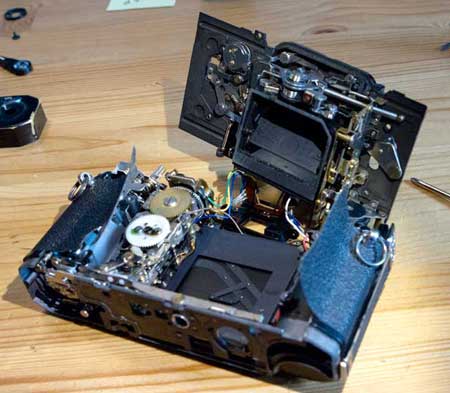
Here are some pics of the dissasembly. Email me if you need to see details in hi-res. [email protected]
The problem ended up being a corroded wire carrying the negative polarity from the battery to the system. You can see the battery box with the corrosion in the last picture.
    |
Hovaness
Tinkerer
Username: Hovaness
Post Number: 89
Registered: 07-2006
Rating: N/A
Votes: 0 (Vote!) | | Posted on Wednesday, July 11, 2012 - 01:16 pm: |
|
This is the worst aspect of the T3 design. You can't get to the battery box without a major teardown of the camera. Still, the T3 is a fine piece of equipment, and prices are ridiculously low on eBay. |