| Author |
Message |
    
Denverdad
Tinkerer
Username: Denverdad
Post Number: 16
Registered: 05-2011
Rating: N/A
Votes: 0 (Vote!) | | Posted on Sunday, August 26, 2012 - 01:42 pm: | 


|
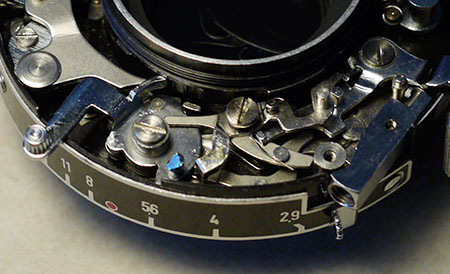
I am working on the Pronto shutter in my Goldammer Goldeck, and noticed something that has me thinking "that can't be right!" Should this part be bent at the odd angle like that? I'm guessing not, but thought I would find out for sure before trying to bend it straight. 
 |
Denverdad
Tinkerer
Username: Denverdad
Post Number: 17
Registered: 05-2011
Rating: N/A
Votes: 0 (Vote!) | | Posted on Tuesday, August 28, 2012 - 10:11 am: |
|
Well its a moot question now. I couldn't stand it any longer and (for better or worse) took out the arm and straightened it. It only makes sense though, as the pin in that arm now slides in a slot in the shutter cam plate, rather than interfering with it.
So now I'm moving on to solving a problem with the retarder assembly... the arm on the slow speed mechanism which apparently is supposed to follow the cam on the shutter speed ring, doesn't snap to the different positions, and no slowing action occurs. If I manually push the arm to its proper position before activating the shutter, I seem to get correct retardation (the gears spin and the shutter speed is noticeably slower). Also, I find that if I loosen the mounting screws on that assembly, it seems to free up the arm and things move properly. But I don't think i want to leave it loose like that. I have cleaned the entire assembly but haven't attempted to lubricate anything yet. Any thoughts? |
Hanskerensky
Tinkerer
Username: Hanskerensky
Post Number: 216
Registered: 05-2009
Rating: N/A
Votes: 0 (Vote!) | | Posted on Tuesday, August 28, 2012 - 11:58 am: |
|
Here is how it looks in the Prontor-S shutter of my Franka Rolfix :

You can find more images in my Flickr set here :
Franka Rolfix Prontor-S |
Hanskerensky
Tinkerer
Username: Hanskerensky
Post Number: 217
Registered: 05-2009
Rating: N/A
Votes: 0 (Vote!) | | Posted on Tuesday, August 28, 2012 - 12:02 pm: |
|
Here another image of the Time Lever :

But i see now that you have already solved the problem with the bent one in your Pronto :-) |
Denverdad
Tinkerer
Username: Denverdad
Post Number: 18
Registered: 05-2011
Rating: N/A
Votes: 0 (Vote!) | | Posted on Tuesday, August 28, 2012 - 06:54 pm: |
|
Thanks Hanskerensky. Yep, that's what mine looks like now too. |
Hanskerensky
Tinkerer
Username: Hanskerensky
Post Number: 219
Registered: 05-2009
Rating: N/A
Votes: 0 (Vote!) | | Posted on Tuesday, August 28, 2012 - 11:57 pm: |
|
Concerning your other problem with the escapement i guess that there is something wrong in the area where the hook is on the cocking ring that drives the blades ring. |
Br1078lum
Tinkerer
Username: Br1078lum
Post Number: 358
Registered: 11-2010
Rating: N/A
Votes: 0 (Vote!) | | Posted on Wednesday, August 29, 2012 - 11:17 am: |
|
I'm just wondering how that lever got bent like that. For your other problem, it might be best to start by removing the escapement and delay gear sets, and watching the actions to see if you can locate where it is hanging up. And clean everything again, while you have the gear sets out. You may not have gotten all the crud out, and it migrated somewhere else. Don't worry about lubing this shutter, it's supposed to run dry.
PF |
Denverdad
Tinkerer
Username: Denverdad
Post Number: 19
Registered: 05-2011
Rating: N/A
Votes: 0 (Vote!) | | Posted on Wednesday, August 29, 2012 - 03:31 pm: |
|
Thanks for the suggestions. Actually I found and fixed the problem with the escapement arm sticking. I did exactly as you suggested PF, and removed the assembly entirely so I could check it out better. Strangely, I found that the mechanism worked perfectly fine when not installed, but would hang up whenever mounted in the shutter. The problem turned out to be that the first gear of that mechanism (a sector gear?) was hanging up on the little copper strip in the shutter body that is part of the flash synchronization system. After bending the flash tab out of the way a bit, I was able to get it to work when installed, without interference. For what its worth, I also tested the flash circuit with an electronic flash after getting that going, and amazingly, it still works! It syncronizes correctly on all speeds (all 4 of them).
As for just how the arm got bent in the first place; well I would like to know that too! The ebay seller claimed this camera worked great, and in fact was the best of the lot of several he had had. But it would seem that this was a bit of an exaggeration (to be polite about it). The shutter barely worked at all, being extremely slow at all speeds(this was primarily due to oil on the blades), then there was the bent arm, and I still seem to be uncovering little problems. I can't help wondering if this was all the result of a botched DIY shutter cleaning.
Previously, the most complicated shutter I had overhauled was the SINGLO on my Agfa Isola II. But this Pronto has considerably more going on with it, so as you might expect, it has been something of a learning experience. Not that I mind too much - so far I am still enjoying the sense of accomplishment I derive from getting it working again.
But if anyone is following along, I can tell you the next little "issue" that I have discovered and will soon be troubleshooting. It is that the bulb mode setting doesn't work. Well, almost never. Most often the shutter doesn't stay open when set to B (it responds pretty much as if it was set to 1/25s). And even when it occasionally DOES stay open, releasing the shutter usually doesn't do anything and so the shutter never closes. Once again... any suggestions are appreciated! |
Br1078lum
Tinkerer
Username: Br1078lum
Post Number: 359
Registered: 11-2010
Rating: N/A
Votes: 0 (Vote!) | | Posted on Wednesday, August 29, 2012 - 07:22 pm: |
|
As I recall, B is controlled by the levers on the upper left quadrant, as you look at the front of the shutter. The actions on these are controlled by small wound springs that can snap off. Also, burrs can develope on the leading edges of the levers, and cause hang-ups and non-function. Some of the springs are hard to see, as they are wrapped around posts, and are placed under some of the levers. Take a look at this site, for some tips on where everything goes, how it works, and how to fix it.
http://www.rolandandcaroline.co.uk/repair/prontors1.html
PF |
Denverdad
Tinkerer
Username: Denverdad
Post Number: 20
Registered: 05-2011
Rating: N/A
Votes: 0 (Vote!) | | Posted on Thursday, August 30, 2012 - 10:20 pm: |
|
Thanks for the link. I've checked that one out and everything else I can find online, but I still haven't been able to pin down exactly what is supposed to happen on B. I may just have to disassemble it a little further, stare at it for a while, and see if I can figure out how it is supposed to work. |
Hanskerensky
Tinkerer
Username: Hanskerensky
Post Number: 221
Registered: 05-2009
Rating: N/A
Votes: 0 (Vote!) | | Posted on Friday, August 31, 2012 - 12:27 pm: |
|
Jeff, here an image of the Pronto shutter on my Agfa Isolette II. This one differs a bit from yours because it doesn't have the shaft for the cable release.

The green arrow points to a lip which rides in a slot of the timerring (removed here). The lever with this lip is pushed outwards as soon as the release lever is actuated. Only in the B-position of the timerring is this lip free to move outwards. Then the other side of that lever moves inwards and blocks the cocking lever (see red arrow) as long as the release lever is depressed. |
Denverdad
Tinkerer
Username: Denverdad
Post Number: 21
Registered: 05-2011
Rating: N/A
Votes: 0 (Vote!) | | Posted on Saturday, September 01, 2012 - 03:17 pm: |
|
That was very helpful! Even though mine looks a little different, I got the idea of where to look and found out what was going on. It turns out that the bad arm above was bent on the other end too! Actually, you can see it in the first picture too, but here it is removed from the shutter, along with the spring, screw, and the other piece directly underneath it:

You can see where I straightened the first end.
Unfortunately, bending this second end back to straight didn't go quite as smoothly:

That was a little disheartening, but in the end I decided to try my hand at fabricating a fix. Basically, I made a small extension out of brass to match the broken-off piece, and then I soldered it in place. In the end, I think it came out pretty good!:

And here it is installed:
So after a little bit more twaking, I have a working bulb mode again!
 |
Br1078lum
Tinkerer
Username: Br1078lum
Post Number: 361
Registered: 11-2010
Rating: N/A
Votes: 0 (Vote!) | | Posted on Saturday, September 01, 2012 - 07:33 pm: |
|
Fantastic! Hope the first bent end holds up, and you don't have to do anymore soldering. Looks like you could have cracked it a bit. I'll look at my Agfas to see if I have a matching part for you. Just in case.
PF |
Hanskerensky
Tinkerer
Username: Hanskerensky
Post Number: 223
Registered: 05-2009
Rating: N/A
Votes: 0 (Vote!) | | Posted on Sunday, September 02, 2012 - 01:02 am: |
|
Nice job Jeff !
You are a real soldering craftsman ! |
Denverdad
Tinkerer
Username: Denverdad
Post Number: 22
Registered: 05-2011
Rating: N/A
Votes: 0 (Vote!) | | Posted on Sunday, September 02, 2012 - 01:27 pm: |
|
Well, maybe more of a filing craftsman ;) - I ended up with a great big blob of solder all around that took quite a while to file down to get to what you see! Actually I don't even have a proper soldering vice or holder for the pieces, so I pressed my 10 year old into service as an extra holder. With a total of 4 hands, one overly large clamp and a pair of needlenose pliers, we somehow got the job done.
The bad news now is that I may have to remake that end yet again. The piece of brass I used wasn't really stiff enough and is bending with use (maybe I should have left more of the solder blob in place!)
PF, you're right about the other end too. Although I don't think it is cracked per se and it did feel strong enough, it certainly is suspect over the long term. I'll keep you in mind if I end up needing a replacement part. Thanks for offering to look for one.
Jeff |
Br1078lum
Tinkerer
Username: Br1078lum
Post Number: 368
Registered: 11-2010
Rating: N/A
Votes: 0 (Vote!) | | Posted on Wednesday, September 05, 2012 - 12:34 pm: |
|
Jeff, I just got done looking at the catch lever on my Agfa Silette, and the end that you broke off goes in the opposite direction, up instead of down. Actually, the whole lever is a different design, though it does the same thing. I'll keep looking to see if I've any other Pronto parts laying around. Sorry.
PF |
Denverdad
Tinkerer
Username: Denverdad
Post Number: 23
Registered: 05-2011
Rating: N/A
Votes: 0 (Vote!) | | Posted on Wednesday, September 05, 2012 - 07:52 pm: |
|
No problem - I really appreciate you looking. I hope to get to soldering on a stiffer extension piece some time this weekend. Only time will tell if the lever will survive all this abuse I am putting it through!
In the mean time I finally measured the shutter speeds. Initially the top speed (1/200th) was slow by ~1/3 stop, and the slower speeds were progressively worse, with 1/25th coming in a full two stops too slow. This was after doing multiple cleanings with naptha in an ultrasonic cleaner, including the entire assembly, and also hand cleaning certain parts and sub-assemblies. In the end, I decided to add a tiny bit of oil to all the gear shafts in the slow speed mechanism. That, plus some fine tuning of the position of the little striker which hits the arm of the slow speed assembly, seemed to do the trick. The speeds are now all consistently only about 1/3 stop too slow. I figure that's pretty good - possibly as good as it ever was, as far as I know.
Jeff |