| Author |
Message |
    
Jeffk
Tinkerer
Username: Jeffk
Post Number: 73
Registered: 10-2011
Rating: N/A
Votes: 0 (Vote!) | | Posted on Wednesday, November 14, 2012 - 09:59 am: | 


|
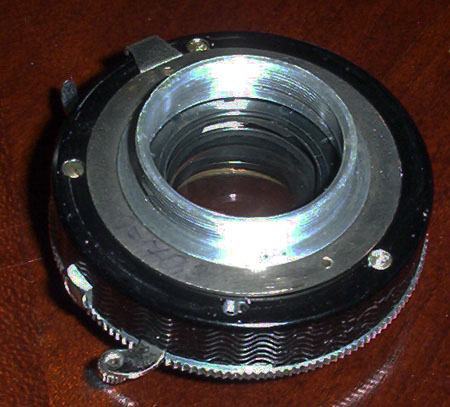
I picked up a practice camera recently to learn how to do this before trying to tackle grandpa's old Super Ikonta. Someone has been into this camera before and was a hack, judging by the chewed up bits - also the shutter is stuck open, the lens is coated with what looks like oil, etc., but fortunately I don't care if I can't get it to work again.
However I am now stuck at where the attached photos show. I would assume from other repair guides I've read that the brass lens piece should unscrew, but I can't get it to budge, and whoever was into it before appears to have tried vice grips. Alternatively there are three screws on the other side that I can't easily turn, and another screw on the side.
How do I continue with disassembling this?

 |
Br1078lum
Tinkerer
Username: Br1078lum
Post Number: 427
Registered: 11-2010
Rating: N/A
Votes: 0 (Vote!) | | Posted on Wednesday, November 14, 2012 - 11:14 am: |
|
I believe there is a spanner nut holding that ring in, but it's hard to tell from your photo, Jeff. Here are a couple of sites that might help you.
http://www.davidrichert.com/zeiss_521_16_compur_rapid_shutter.htm
http://benoit.suaudeau.perso.neuf.fr/manuels_rep/obturateurs/Compur-shutter-repa ir-manual.html
I wouldn't be messing with the screws on the back at this stage. They hold the shutter base to the casing, and you could wind up with aperture and shutter blades all over the place.
PF |
Johnnyh
Tinkerer
Username: Johnnyh
Post Number: 20
Registered: 06-2009
Rating: N/A
Votes: 0 (Vote!) | | Posted on Wednesday, November 14, 2012 - 11:40 am: |
|
It looks as if you might be able to get a grip with one of these (browse to find the smallest available in your part of the world).
http://www.ebay.co.uk/itm/MULTI-PURPOSE-JAR-BOTTLE-OPENER-STRAP-WRENCH-OIL-FILTE R-NEW-/130786694305?pt=UK_Babay_Baby_Feeding_Cups_Dishes_Cutlery_LE&hash=item1e7 37e94a1
The example shown has worked for me. |
Hanskerensky
Tinkerer
Username: Hanskerensky
Post Number: 234
Registered: 05-2009
Rating: N/A
Votes: 0 (Vote!) | | Posted on Wednesday, November 14, 2012 - 12:58 pm: |
|
You have to remove that brass ring from the front first.
The screws on the backside are holding the 2 shutter housing halves together. When you remove them and try to open you will be surprised by the shutter blades which will fall out.
That front ring can be real nasty. Sometimes they have no slits for a lensspanner.
In that case try pushing the shutter with that fronring against a rubber mat, at the same time trying to rotate counterclockwise.
Also applying heat with a hairdryer (NOT a paintstripper) for some minutes might help.
That tip from Johnnyh is also a good one and a way to go.
Don't despair, i once tried for almost 2 weeks before such a ring finally came loose.
DO NOT use regular pliers, they will deform the brass ring. |
Denny
Tinkerer
Username: Denny
Post Number: 119
Registered: 08-2009
Rating: N/A
Votes: 0 (Vote!) | | Posted on Wednesday, November 14, 2012 - 06:58 pm: |
|
This is something I used on a stuck lens.
http://www.davidrichert.com/AGFA%20rebuild/agfa.htm
Scroll down and see the part about tape and hose clamp. I used a short piece of heater hose, but a piece of rubbery "jar opener" pad would probably work too. Just use some kind of non-slip padding between the brass ring and hose clamp.
Good Luck |
Jeffk
Tinkerer
Username: Jeffk
Post Number: 74
Registered: 10-2011
Rating: N/A
Votes: 0 (Vote!) | | Posted on Wednesday, November 14, 2012 - 07:46 pm: |
|
Thanks all for the tips and links! Damn, that thing is on tight, and there are no accomodations for a spanner. Since the previous hack used vice grips and I wondered if he had re-used them to put the lens back in, I gave pliers a try - nothing with reasonable force that I didn't want to exceed. I'm guessing the previous person stopped here, soaked everything in oil, put it back together and hoped for the best - which is good if I can get this lens off, that means the inside should be unmolested, and in any case it does not appear that the screws on the back side have ever been removed. This may turn into quite a challenge... |
Jeffk
Tinkerer
Username: Jeffk
Post Number: 75
Registered: 10-2011
Rating: N/A
Votes: 0 (Vote!) | | Posted on Wednesday, November 14, 2012 - 11:15 pm: |
|
Ah, and now it makes sense why the very front element of the lens just fell out after I got the camera - it couldn't be screwed down more than a fraction of a turn because the previous hack deformed the brass tube below it with vice grips. This may be a lost camera, though fortunately it was cheap. |
Hanskerensky
Tinkerer
Username: Hanskerensky
Post Number: 235
Registered: 05-2009
Rating: N/A
Votes: 0 (Vote!) | | Posted on Wednesday, November 14, 2012 - 11:56 pm: |
|
That's why i allways tell "DO NOT use regular pliers, they will deform the brass ring.".
Well, if nothings is to loose any more you can go the hard way Jeff ! |
Johnnyh
Tinkerer
Username: Johnnyh
Post Number: 21
Registered: 06-2009
Rating: N/A
Votes: 0 (Vote!) | | Posted on Thursday, November 15, 2012 - 12:55 am: |
|
That's a shame, but at least you've confirmed the worth of using a 'practice' camera, and the shutter should be a practice/usable/saleable spare part. In fact, I would also suggest that you don't throw the lens in the trash; it might be salvagable for use in a unit-focus, rather than cell-focus, application ;-) . |
Jeffk
Tinkerer
Username: Jeffk
Post Number: 1
Registered: 11-2012
Rating: N/A
Votes: 0 (Vote!) | | Posted on Saturday, November 17, 2012 - 08:40 am: |
|
Oh I won't throw anything away. :-) The brass cell may be damaged beyond repair but everything else seems functional. Body is fine, rangefinder works fine, good albada finder, film advance and multiple exposure prevention mechanism work fine, o.k. bellows, glass is fine, and I'm betting the shutter and aperture mechanism is unmolested and just stuck with deteriorated lubricant. Parts worth something to someone, I'm sure. The multiple-exposure prevention mechanism in grandpa's camera does not work, but I'm not sure I want to bother tackling that - main issue making it unreliable to use is the sticky shutter. |
Jeffk
Tinkerer
Username: Jeffk
Post Number: 2
Registered: 11-2012
Rating: N/A
Votes: 0 (Vote!) | | Posted on Saturday, November 17, 2012 - 08:41 am: |
|
Odd. My username evaporated after site issues, now it comes back with 1 post and a new registration date. |
Johnnyh
Tinkerer
Username: Johnnyh
Post Number: 1
Registered: 11-2012
Rating: N/A
Votes: 0 (Vote!) | | Posted on Saturday, November 17, 2012 - 12:07 pm: |
|
[Just had to re-register myself to post this].
For the lens cell, you might be able to cut the damaged part of the brass out quite radically, enough to get the front part to enter sufficiently to be operational as a 'pre-set'. It's even possible that the helicoid threads could be cleaned-up at the edge of the damage to allow its reuse as intended. So long as there's not a hole exposed to allow stray light! From your picture, the brass structure looks pretty substantial. I have successfully salvaged a Ross Xpres of similar construction; it was in a shutter that was so corroded that it had to be *cut* off the lens (the assembly looked as if it had spent 60 years in a damp cellar). |
Jeffk
Tinkerer
Username: Jeffk
Post Number: 78
Registered: 10-2011
Rating: N/A
Votes: 0 (Vote!) | | Posted on Tuesday, November 20, 2012 - 08:49 am: |
|
Funny, I decided to soak the entire mechanism in nail polish remover, and within just a few minutes the shutter snapped closed all by itself. Who knows how long that had been stuck open... Pity the previous hack didn't try other means to fix it, rather than attack it with vice grips. |
Jeffk
Tinkerer
Username: Jeffk
Post Number: 79
Registered: 10-2011
Rating: N/A
Votes: 0 (Vote!) | | Posted on Tuesday, November 20, 2012 - 09:24 am: |
|
And now it appears to function perfectly at all speeds... Of course once it dries it may stick again, but if not for the distorted brass cell this would be a potential fully functioning Super Ikonta A shooter. Pity about that cell. |
Jeffk
Tinkerer
Username: Jeffk
Post Number: 80
Registered: 10-2011
Rating: N/A
Votes: 0 (Vote!) | | Posted on Tuesday, November 20, 2012 - 11:41 pm: |
|
Got it! Light tug with pliers over thick tape did the trick after soaking everything in nail polish remover most of the day. Trick now is to get a better understanding of the shutter mechanism without damaging it in any way, so I can hopefully fix grandpa's camera later.
Wondering how to salvage that brass cell though, and turn this camera back into a shooter. I was thinking of maybe notching the threaded area that the outer lens screws into, so the deformed areas have a chance to get pushed out to allow the outer lens to screw all the way down. Does this sound totally stupid? |
Jeffk
Tinkerer
Username: Jeffk
Post Number: 81
Registered: 10-2011
Rating: N/A
Votes: 0 (Vote!) | | Posted on Saturday, November 24, 2012 - 10:45 pm: |
|
Nice, shutter works fine now - this site was invaluable, http://www.davidrichert.com/zeiss_521_16_compur_rapid_shutter.htm. I had to tear it all the way down to the blades and a bit beyond, lots of rust and fossilized black stuff that was probably once lubricant - seems to have lived a humid life judging by the metal inside. One tip, it seems I did not need to remove the escapement to get at the blades, and removing that apparently throws off your shutter speeds unless you fine-tune it back into the correct position with a meter of some kind that I don't have. I'm sure the shutter speeds are a bit off now, though they don't seem way off. This whole effort relied on some acetone, lots of lighter fluid, and some very thin gun oil, and anyone going down this road will need these. |
Johnnyh
Tinkerer
Username: Johnnyh
Post Number: 4
Registered: 06-2009
Rating: N/A
Votes: 0 (Vote!) | | Posted on Sunday, November 25, 2012 - 08:10 am: |
|
Glad the shutter works OK now. I've never found the accuracy of timing of a cleaned, reassembled, 'not too far off sounding' shutter to be critical in practice, thanks to the latitude of most modern negative film.
[quote]Wondering how to salvage that brass cell though, and turn this camera back into a shooter. I was thinking of maybe notching the threaded area that the outer lens screws into, so the deformed areas have a chance to get pushed out to allow the outer lens to screw all the way down. Does this sound totally stupid?[/quote]
No, I would say it's worth a try ;-) |
Jeffk
Tinkerer
Username: Jeffk
Post Number: 82
Registered: 10-2011
Rating: N/A
Votes: 0 (Vote!) | | Posted on Wednesday, November 28, 2012 - 09:12 am: |
|
Does anyone know how the large (looks to be 1.05") diameter threads were tapped into the brass lens cell? It appears to be about 4 thousandths out of round now, about a hair, so if I could get my hands on a tool that would re-cut the threads then I wouldn't need to do radical surgery on this piece, which is basically the only thing keeping this camera from being a fine shooter now. |
Jeffk
Tinkerer
Username: Jeffk
Post Number: 83
Registered: 10-2011
Rating: N/A
Votes: 0 (Vote!) | | Posted on Wednesday, December 05, 2012 - 12:42 am: |
|
I wound up doing radical surgery on the lens cell, and after several cuts, gentle bends, cleanings, threading down the outer lens and backing it off, etc., it seems to work fine - the outer lens smoothly screws all the way down and back out again. Butchery, I know, but without spending a lot of money finding someone to re-thread the cell for me, it was this or make a parts camera out of it since the lens cell was useless. Now it can be either a parts camera or a shooter. ;-) Just need to reset infinity focus and it's done. Grandpa's camera may be more challenging, it's never been apart so it's unmolested, but I also have to be much more careful not to mar any of the fittings. Thanks for the tips!
 |
Johnnyh
Tinkerer
Username: Johnnyh
Post Number: 5
Registered: 06-2009
Rating: N/A
Votes: 0 (Vote!) | | Posted on Wednesday, December 05, 2012 - 04:50 am: |
|
Neat job :-) |
Jeffk
Tinkerer
Username: Jeffk
Post Number: 86
Registered: 10-2011
Rating: N/A
Votes: 0 (Vote!) | | Posted on Friday, December 21, 2012 - 09:19 pm: |
|
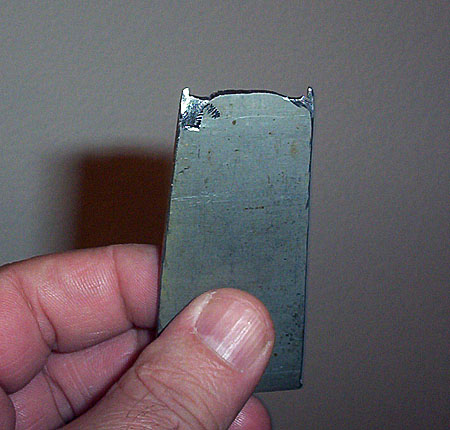
Follow-up, finished with Grandpa's pre-war Super Ikonta A, and the shutter works beautifully now. From my experience with the practice camera, I decided not to remove the middle lens and dig into the shutter mechanism unless absolutely necessary, and it was not necessary - instead I disassembled the back end enough to get at the shutter blades, and cleaned them with a Q-tip and acetone. Works smoothly and stick-free all the way down to B! I only had to fabricate one tool for this whole effort, pic is attached - this unscrews the ring attaching the lens to the lens board from inside the bellows. Just a piece of 3/8" steel, with horns cut with various Dremel bits. Hopefully it'll last another 70 years with no more maintenance!
 |