| Author |
Message |
    
Hollenbj
Tinkerer
Username: Hollenbj
Post Number: 95
Registered: 03-2012
Rating: N/A
Votes: 0 (Vote!) | | Posted on Monday, February 18, 2013 - 03:17 pm: | 


|
For the life of me, I cannot find information on exactly how this comes off. A close up photo or good description would be very helpful. All descriptions and/or photos I can find are quite ambiguous or fail to show how this piece attaches.
The attached photo shows the optical wedge part on my Zorki 6. The knurled cap ring has been removed. I can't turn this right or left, nor work it off. I will damage it if I don't find out how its supposed to come off.
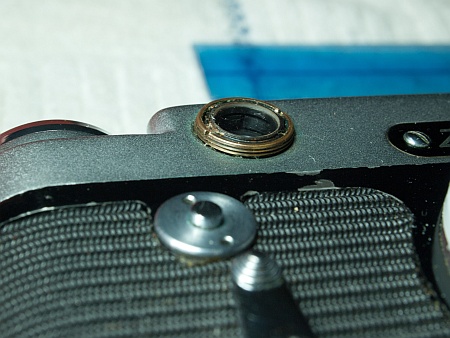
If anyone knows how this attaches (more importantly, how it can be removed) I would like to hear from you. I can't remove the top plate from my camera and fix the shutter without first removing this part.
Thank you very much!!! |
Aerowoof
Tinkerer
Username: Aerowoof
Post Number: 69
Registered: 02-2009
Rating: N/A
Votes: 0 (Vote!) | | Posted on Monday, February 18, 2013 - 04:02 pm: |
|
looks like you need a spanner that fits in the notches to unscrew it.would have to be a good fit looks like it is brass and could be soft |
Hollenbj
Tinkerer
Username: Hollenbj
Post Number: 96
Registered: 03-2012
Rating: N/A
Votes: 0 (Vote!) | | Posted on Monday, February 18, 2013 - 04:08 pm: |
|
I would not even try to use those notches to remove the piece. I did give them a light try, but very undersized if they are to remove the entire piece. The brass is quite soft. I would LOVE to see a photo of the rangefinder assembly with the piece removed so I can see if there are threads, or just friction fit. Has anybody removed this piece from a Zorki 6 or a Zorki 5 (same design)? |
Br1078lum
Tinkerer
Username: Br1078lum
Post Number: 485
Registered: 11-2010
Rating: N/A
Votes: 0 (Vote!) | | Posted on Monday, February 18, 2013 - 07:24 pm: |
|
Make yourself a spanner out of a utility knife blade, by first grinding down the cutting edge (so you don't slice yourself wide open), then cut it to the neccessary shape to fit the notches, and clear the edge of the optical block. A Dremel tool comes in handy for this. I did this with a Zorki 1, it's not a difficult job to do.
PF |
Br1078lum
Tinkerer
Username: Br1078lum
Post Number: 486
Registered: 11-2010
Rating: N/A
Votes: 0 (Vote!) | | Posted on Monday, February 18, 2013 - 07:36 pm: |
|
Just a little correction to my last post. After looking at my Zorki 1, I realize that it has pin holes, instead of spanner slots, so it must have been another camera I was thinking about.
But if your part has spanner slots, then that's because it is screwed in, like all camera parts with such slots.
PF |
Prasanna
Tinkerer
Username: Prasanna
Post Number: 87
Registered: 10-2009
Rating: N/A
Votes: 0 (Vote!) | | Posted on Tuesday, February 19, 2013 - 07:06 am: |
|
I use petrol or kerosene drops where the brass ring sits on the chromed metal. After soaking overnight you can turn the thread almost by your fingers. Try not to use force. Just dissolving the dirt and gum will ease the ring out. I have worked on several Zorkis and Feds in this way. Later when you re-assemble pleas use some thin oil on the grooves after cleaning them. And please do not tighten with a wrench. Finger torque is sufficient. Best of luck. |
T6nn
Tinkerer
Username: T6nn
Post Number: 35
Registered: 06-2009
Rating: N/A
Votes: 0 (Vote!) | | Posted on Tuesday, February 19, 2013 - 07:54 am: |
|
You could make the task easier by first removing the optical part. Soften the shellac with a drop or two of alcochol and you should be able to get the optical wedge out of the larger brass frame. A sewing pin could also be of help there. |
Hollenbj
Tinkerer
Username: Hollenbj
Post Number: 97
Registered: 03-2012
Rating: N/A
Votes: 0 (Vote!) | | Posted on Tuesday, February 19, 2013 - 10:50 am: |
|
Some very good suggestions. Thanks all. The one curiosity I would like to satisfy is:
Does the brass frame portion thread into the rangefinder assembly (behind the top plate). The threads visible in the photo stop just at the plate and I can't see what it looks like "inside" behind the top plate. My hope is the brass frame reduces in diameter and is threaded into the rangefinder assembly (prism housing?).
Can anyone confirm this?
Thanks again everyone. |
T6nn
Tinkerer
Username: T6nn
Post Number: 36
Registered: 06-2009
Rating: N/A
Votes: 0 (Vote!) | | Posted on Tuesday, February 19, 2013 - 03:54 pm: |
|
Yes, I can confirm this. Good luck! |
Hollenbj
Tinkerer
Username: Hollenbj
Post Number: 98
Registered: 03-2012
Rating: N/A
Votes: 0 (Vote!) | | Posted on Tuesday, February 19, 2013 - 07:48 pm: |
|
T6nn and other very helpful folks.
I would really like to see a photo of the actual interface between the optical wedge assembly and the prism housing. I don't know if the optical wedge assembly (brass part sticking out of the top plate in my original photo) unscrews to the left or the right. As best I can, I've soaked this part in lighter fluid and alcohol. I have tried every kind way of turning this assembly that I have available (lens wrench, rubber sheet and socket, fingers, etc.). It will not turn, budge, work loose or anything. It would help to know just which direction it is supposed to turn before I apply extreme force (I have vice grips with electrical tape on the jaws). The notches in the brass assembly will not survive any attempt to turn this piece, so there's no need to make a spanner for that. In fact, the vice grips will likely ruin the outside threads if I have to use them. In 20+ years, I have never had this much difficulty with a rangefinder window piece. I am beginning to think someone epoxied this assembly in place (but alcohol should soften epoxy). The frustrating part is this camera is the nicest Zorki 6 I've encountered and the shutter issue is a trivial fix if I could just remove the top plate. I'm desperately accepting any advice on how to get this dang thing off. I don't want to destroy this camera with stupid brute force. That optical wedge assembly is mostly very soft brass and I've already mangled it more than I'd like. Photographs of the parts (front of prism housing and back of optical wedge) and how they go together would be extremely helpful. I simply cannot find this information anywhere in my searches or in my literature. I have great photos of the top of the prism housing (from behind) and photos of the optical wedge on the camera with the cap ring in place, but that's it. Maisenburg just skims over this part of disassembly, saying there's two versions of the optical wedge; one that sticks out of the top plate (mine) and one that doesn't stick out of the top plate.
The only current information I can find on Zorki 6 disassembly is from Rangefinder Forum and the author said that upon unscrewing the cap ring of the optical wedge, it "just fell out" suggesting the piece is friction fit and not threaded at all. So, I just need to know if I'm going to unnecessarily destroy my camera or if I'm going to knowingly destroy my camera but at least I was attempting to remove the part in the correct way. |
T6nn
Tinkerer
Username: T6nn
Post Number: 37
Registered: 06-2009
Rating: N/A
Votes: 0 (Vote!) | | Posted on Wednesday, February 20, 2013 - 03:39 am: |
|
What is friction fit is the frame of the optical wedge (or rather a prism) that sits, and can be rotated inside the larger frame that is screwed into the camera body with a normal thread (Turn CCW to unscrew). If you manage to remove the inner part, you can modify the spanner notches, or to make a pair of new ones, and use a straight blade of some kind to unscrew it.
Have you tried heating the assembly? It helps if cyanoacrylate is used to cement it. But I would'nt try a torch until the glass prism is still there. 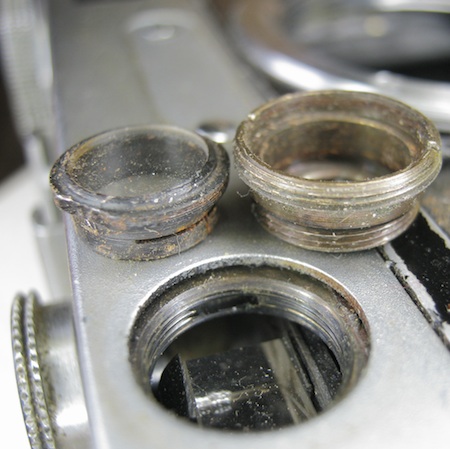 |
Br1078lum
Tinkerer
Username: Br1078lum
Post Number: 488
Registered: 11-2010
Rating: N/A
Votes: 0 (Vote!) | | Posted on Wednesday, February 20, 2013 - 08:48 am: |
|
Have you tried acetone (fingernail polish remover)?
PF |
Hollenbj
Tinkerer
Username: Hollenbj
Post Number: 99
Registered: 03-2012
Rating: N/A
Votes: 0 (Vote!) | | Posted on Wednesday, February 20, 2013 - 09:25 am: |
|
Thank you both. First, I forgot about acetone. It worked on the Agfa folder with dreaded "green grease". Heat was key there too, so I'll wait until my wife is out of house and "borrow" the hair dryer. That might do the trick as well.
Second, the photo from T6nn clears up all my questions about how this all goes together (and eventually will come apart). With patience and persistence, I now hope to get this disassembled so I can get on to the real repair. I gave some thought to modifying the brass frame to get a better grip by a lens spanner, but I'm loathe to make such modifications when I just don't know what the parts look like underneath. With the photo, I can strategize that approach now.
I would not be surprised if this was superglued by a previous owner. Why oh why?
Thanks again everyone, very much! |
Hollenbj
Tinkerer
Username: Hollenbj
Post Number: 100
Registered: 03-2012
Rating: N/A
Votes: 0 (Vote!) | | Posted on Thursday, February 21, 2013 - 02:26 pm: |
|
Acetone, heat, and careful force in the correct direction made the day. Thanks again everyone. |
Br1078lum
Tinkerer
Username: Br1078lum
Post Number: 489
Registered: 11-2010
Rating: N/A
Votes: 0 (Vote!) | | Posted on Thursday, February 21, 2013 - 07:48 pm: |
|
Glad to be of service.
PF |