| Author |
Message |
    
Kb2qqm
Tinkerer
Username: Kb2qqm
Post Number: 2
Registered: 12-2008
Rating: N/A
Votes: 0 (Vote!) | | Posted on Wednesday, December 24, 2008 - 11:38 am: | 


|
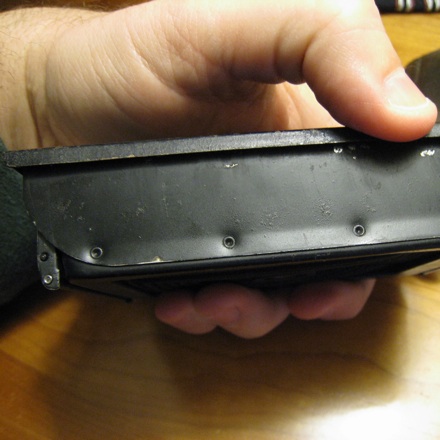
Just wanted to post pics of these rivets I will have to drill out to get to the bellows for replacement.
What are these rivets called? What do I need to order and what type of tool can I use to re-install the rivets after I get new bellows?
Greg
  |
Connealy
Tinkerer
Username: Connealy
Post Number: 12
Registered: 02-2008
Rating: N/A
Votes: 0 (Vote!) | | Posted on Wednesday, December 24, 2008 - 01:28 pm: |
|
Whoa! If that's a Kodak, those rivets don't hold in the bellows. There are little bendable tabs which press the back of the bellows up against the film frame. A screwdriver with a sharpened and bent tip is handy for prying up the tabs.
There may be four rivets at the front end of the bellows that will need to be drilled out. They aren't always very critical in holding the bellows in place, but it might be good to replace at least the heads with some glue so that you don't get light leaking through. |
Kb2qqm
Tinkerer
Username: Kb2qqm
Post Number: 4
Registered: 12-2008
Rating: N/A
Votes: 0 (Vote!) | | Posted on Wednesday, December 24, 2008 - 02:20 pm: |
|
Many thanks! I sure hoped someone was going to say that ! I will look for he tabs and get back to you.
Greg |
Kb2qqm
Tinkerer
Username: Kb2qqm
Post Number: 6
Registered: 12-2008
Rating: N/A
Votes: 0 (Vote!) | | Posted on Saturday, December 27, 2008 - 07:07 am: |
|
Hope everyone had a good holiday.
I have been looking for the tabs to remove the bellows and I cannot feel them at the base. The first photo is the side of the Kodak folder. I need to post the end photo that shows the bellows material "under" the end rivets.
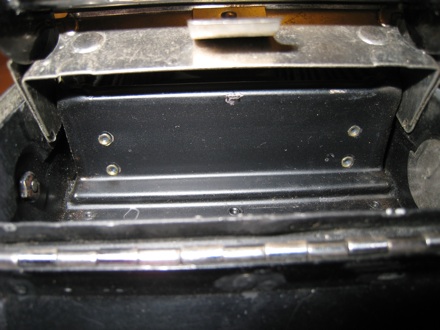
The second photo is from the kodak six-20 (uk version) which appears to have the bellows under the riveted sides. |
Kb2qqm
Tinkerer
Username: Kb2qqm
Post Number: 7
Registered: 12-2008
Rating: N/A
Votes: 0 (Vote!) | | Posted on Saturday, December 27, 2008 - 07:16 am: |
|
Here is the end photo of the kodak No.1 folder.
Above the rivet holes...are bigger holes and the bellows material is underneath it.
once I remove the rivets I will post some pictures.
I also found some hardware that I can replace the rivets with.
I think some mentioned a "press" to reattach the rivets. Anyone know where I can get a cheap press. If I can't find that, I will use some sort of brass bolts and screws. 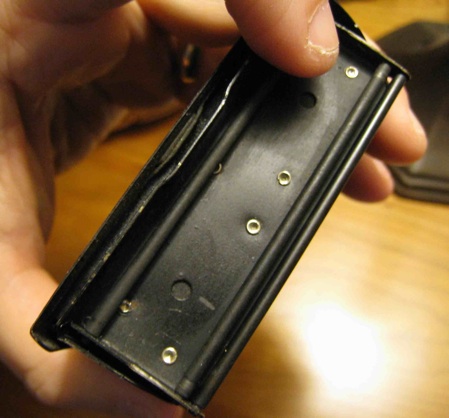 |
Kb2qqm
Tinkerer
Username: Kb2qqm
Post Number: 8
Registered: 12-2008
Rating: N/A
Votes: 0 (Vote!) | | Posted on Saturday, December 27, 2008 - 07:21 am: |
|
I forgot to mention that I found bellows at Craig Camera dot com and ordered them. $10 each. Hopefully they fit. If they do not, I will post them here for someone else to use.
Some of the blackout curtain material I posted about last week that I found at joann fabric looks like a white fabric with the black out material on the fabric some sort of rubber material.
This afternoon I'm going to try to paint it...flat black. The outer material is fabric like and will take the paint I believe. If it works, then I will attach the cardstock to it and the inner bellows material will be taffetta. Found that at Joann fabric too.
Good, light, black color, and looks very tight and strong.
Will keep you posted.
Greg |
Glenn
Tinkerer
Username: Glenn
Post Number: 472
Registered: 07-2006
Rating: N/A
Votes: 0 (Vote!) | | Posted on Saturday, December 27, 2008 - 10:28 am: |
|
The riveting job is very easy if you use a bit of lateral thinking. firstly the press - you already have the makings in your engineers bench vice. You can easily modify this by placing a piece of angle iron over each jaw. You then attach - weld or screw - two rivet setts made from suitable diameter rod - you must turn the business end of the sett to produce the form of the finished rivet. This operation can be done in and electric drill if you do not have a lathe - use drill bit and file to produce shape.
I actually replace the vice jaw pieces with two pieces of steel plate that will hold various cylindrical rivet setts. This keeps everything located firmly and allows the use of 'dog legged' setts so that rivets can be placed in confined spaces - you only have to consider the actual camera body and the pieces you are riveting on and not worry about clearing the vice jaws with the article to be repaired.
As for the rivets - use small well annealed tubular aluminium ones. If you can only get solid rivets, modify these by counter drilling the end - the rivet shank only needs to be solid for slightly more than the thickness of ONE of the pieces you are riveting together.
With a bit of thought and simple metal bashing, you can produce tools that will give you a repair that is indistinguishable from the original work shown in your pictures. most of my tooling has been produced from off cuts left over from other jobs.By all means spend money on proper tools if you are going to get many years use out of them; otherwise spend a few hours making your own, and use the money saved on adding to your collection |
Norman
Tinkerer
Username: Norman
Post Number: 14
Registered: 03-2008
Rating: N/A
Votes: 0 (Vote!) | | Posted on Saturday, December 27, 2008 - 12:57 pm: |
|
Hi Glenn, what you say is true. It is possible to buy tools to do any job that you will ever come across but it is so wasteful if you only use the tool once. I have access to a lathe but not a milling machine, I made a jig from MDF which enabled me to mill some aluminium for the front of my modified Nikon F. Then I made a centre finder so that I could bore a hole in the right place. The whole lot took about 6 hours of free time. To me time well spent! |
Glenn
Tinkerer
Username: Glenn
Post Number: 473
Registered: 07-2006
Rating: N/A
Votes: 0 (Vote!) | | Posted on Saturday, December 27, 2008 - 01:38 pm: |
|
Norman,
Glad to meet a fellow believer and from the looks of the work on your Nikon F, a man after my own heart. MDF is a wonderful material in the engineering workshop - I have a number of similar jigs that although made as a 'one off', have been used for many other jobs after 'slight' modifications.
Like you I have done much milling on my lathe, the preparation time being nothing when the finished results are viewed.
I have a well equipped toolroom lathe and a very small simple vertical miller at the moment. Interestingly; I am considering swapping the lathe for a fully kitted out Bridgeport milling machine, and getting a smaller simple lathe. For the type of work I do now, a proper miller would be far more useful. |
Kb2qqm
Tinkerer
Username: Kb2qqm
Post Number: 12
Registered: 12-2008
Rating: N/A
Votes: 0 (Vote!) | | Posted on Thursday, January 15, 2009 - 07:36 pm: |
|
Well the camera is back together now.
I replaced the No.1 Pocket folder original bellows with a 6x9 new bellows I found at Craigcamera.com for $10.
I really don't have any experience with tiny rivets and rivet sets.
All the old timers were correct, and I stand corrected. The bellows were held in by the bended tabs at the base of the bellows accessible from inside the camera.
I drilled out the rivets because I saw the inner bellows material through holes in the ends of the camera sides. When they originally joined the camera together, the metal parts that were mated, they used black fabric as a sort of 'washer' material. That material was the same material that was used for the inner bellows. It was surely confusing until I had all the rivets out.
Whoops.
Learned allot though. I took many pictures and will post them on my website shortly.
I also took apart the lens and shutter assembly and soaked everything in Naptha (lighter fluid) for about 2 hours. You should have seen the dirt and sand or whatever come out of that shutter. It was truly amazing. I did try using a light oil on the shutter, but that was a mistake, so I resoaked the shutter and again rebuilt it. It works great now. It does not stick and works fantastically. Truly amazing what people accomplished with shutters so long ago.
When I took it apart, I found a thumbprint of the person who probably put it together. I pondered that while reassembling the camera. That person now dead and gone, but their camera is still living on. For every piece of sand and dirt that came out of the shutter/lens, each one of those grains had a story to tell, of pictures of places been. I wondered where that camera had been since 1920. In peace or war, the stories it held we will never know.
I used the smallest of machine screws to piece the camera back together. Took me three days. The bellows are back on, and I have the first roll of FP4 in it right now.
The camera is not original, but looks original, and it is back to taking memories.
I had been looking for a nice medium format camera at keh.com but all were out of my price range, plus most are not pocketable.
Now I have a medium format camera with a new bellows all for
$25 total. Great price for being unemployed !
Thanks everyone for the help. |
Picker77
Tinkerer
Username: Picker77
Post Number: 3
Registered: 05-2008
Rating: N/A
Votes: 0 (Vote!) | | Posted on Sunday, February 22, 2009 - 05:58 am: |
|
Greg, what's your website URL? I'm probably going to have to go through this exercise soon with an old but nice Senior Six-20, would like to look at your photos.
Thanks, Jerry |