| Author |
Message |
    
Walkersj
Tinkerer
Username: Walkersj
Post Number: 6
Registered: 10-2007
Rating: N/A
Votes: 0 (Vote!) | | Posted on Saturday, February 28, 2009 - 04:12 am: | 


|
I've got a Yashica Lynx 1000 which had sticky aperture blades. I've fixed that but now I've gone and broken the cocking mechanism in the shutter, by checking it without putting those little C clips back on the shaft, (I could do with a couple of those on account of they cracked which is why I didn't replace them). It jumped forward and pulled the rivetted catch off the bottom of the cam inside. Now I can probably rivet it back but, how is the little spring that operates the catch arranged, and how does one wing up that large spring around the cocking shaft? |
Nickon51
Tinkerer
Username: Nickon51
Post Number: 53
Registered: 05-2008
Rating: N/A
Votes: 0 (Vote!) | | Posted on Saturday, February 28, 2009 - 07:13 am: |
|
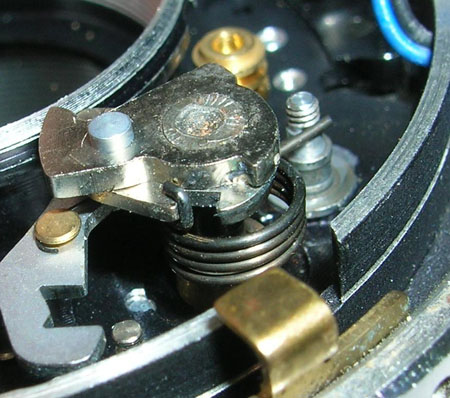
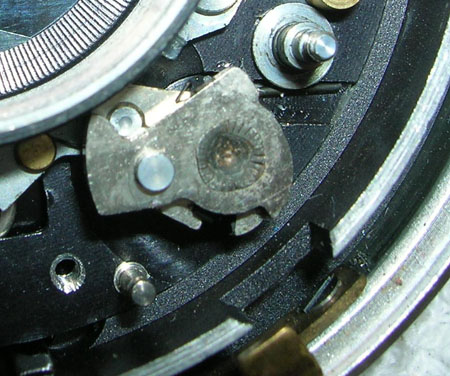
Here's a couple of pictures of an SVA shutter. It may be close enough for you to see how the shutter release spring fits in. Start with the spring located in the notch on the cam, than as you push it down, pull the other down. Then position the end under the post.
There's also a view of some of the latches, are any of those the catch that you are referring to? |
Nickon51
Tinkerer
Username: Nickon51
Post Number: 54
Registered: 05-2008
Rating: N/A
Votes: 0 (Vote!) | | Posted on Saturday, February 28, 2009 - 07:20 am: |
|
Here's the pix
 |
Walkersj
Tinkerer
Username: Walkersj
Post Number: 7
Registered: 10-2007
Rating: N/A
Votes: 0 (Vote!) | | Posted on Saturday, February 28, 2009 - 11:19 am: |
|
The shutter in your pics looks very similar. It does show the catch, (and the little copper spring that went on the flash contact which I also dislodged!). I think I can see how the catch spring goes. It looks like you have to remove the other part off that threaded post to wind the big black spring up then? |
Nickon51
Tinkerer
Username: Nickon51
Post Number: 55
Registered: 05-2008
Rating: N/A
Votes: 0 (Vote!) | | Posted on Saturday, February 28, 2009 - 04:38 pm: |
|
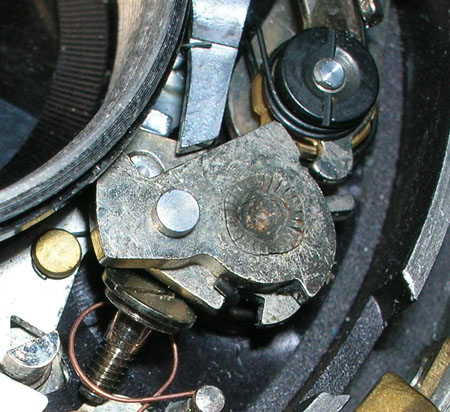
I think you will have to remove the silver pointed latch and spring (to the right in the last photo). Also, I found that it was easier to take the parts off the threaded stud. Better than strugging against the spring tension to get the end seated down past the plate on the bottom of the stud.
Heres a better view of the parts mounted on that stud.
 |
Walkersj
Tinkerer
Username: Walkersj
Post Number: 8
Registered: 10-2007
Rating: N/A
Votes: 0 (Vote!) | | Posted on Sunday, March 01, 2009 - 12:54 pm: |
|
Thanks for your clear pictures. I've managed to get the cocking mechanism back together, albeit a bit scratched and the screws a little mangled. Oh, well if I did another one I'd make a better job of it. Now for the rest of it, and I hope it works eventually! |
Nickon51
Tinkerer
Username: Nickon51
Post Number: 56
Registered: 05-2008
Rating: N/A
Votes: 0 (Vote!) | | Posted on Sunday, March 01, 2009 - 09:07 pm: |
|
You're Welcome. Good luck with putting the rest back together. |