| Author |
Message |
    
Ismaelg
Tinkerer
Username: Ismaelg
Post Number: 5
Registered: 11-2009
Rating: N/A
Votes: 0 (Vote!) | | Posted on Monday, November 09, 2009 - 07:12 pm: | 


|
Hello,
Can someone point me to maybe a tutorial or pictorial on how to disassemble an A series 50mm f2 Pentax lens? Mine has some fungus inside. The lens is good but not overly expensive, so I want to try it myself. While I have disassembled, cleaned and reassembled other cheap lenses before, these are uncharted waters for me.
Any advise?
Thanks,
Ismael |
Bossman
Tinkerer
Username: Bossman
Post Number: 104
Registered: 02-2009
Rating: N/A
Votes: 0 (Vote!) | | Posted on Tuesday, November 10, 2009 - 06:45 am: |
|
Ismael: Remove the serial number ring (piece of rubber or tap it loose with tiny punch counterclockwise) and you can then remove the entire front lens assy. Chances are, the fungus is on the innermost lens surface and the surface of the first lens you can get to under the blades. If you need to disassemble the lens assy further, you may need to soak the threads with a drop of acetone before attempting to loosen. Need further help? Art at www.flcamerarepair.com (call or e-mail!!) |
Ismaelg
Tinkerer
Username: Ismaelg
Post Number: 9
Registered: 11-2009
Rating: N/A
Votes: 0 (Vote!) | | Posted on Tuesday, November 24, 2009 - 03:06 am: |
|
Success!
Here are some pictures of the process.
Before:
http://images54.fotki.com/v555/photos/4/1233394/8163544/IMGP0742b-vi.jpg
During:
http://images53.fotki.com/v420/photos/4/1233394/8163544/IMGP0754b-vi.jpg
After:
http://images53.fotki.com/v432/photos/4/1233394/8163544/IMGP0765b-vi.jpg
http://images53.fotki.com/v432/photos/4/1233394/8163544/IMGP0764b-vi.jpg
Tested on the DSLR: No post processing
http://images52.fotki.com/v644/photos/4/1233394/8163544/IMGP0757-vi.jpg
Thanks, |
Harkon
Tinkerer
Username: Harkon
Post Number: 1
Registered: 11-2009
Rating: N/A
Votes: 0 (Vote!) | | Posted on Sunday, November 29, 2009 - 06:56 am: |
|
Hey,
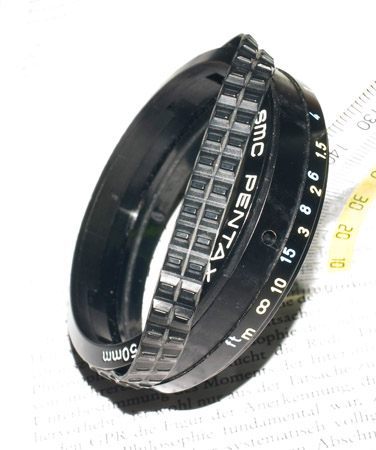
a few days ago I disassembled my Pentax-A 50mm f/2 lens because of a sticky focus-ring. On the first picture you can see how the lens looked like when I opened it. It seemed to me as if the grease had increased and was going to swell outside... is this normal?
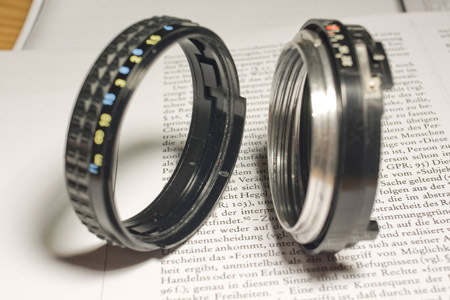
I superfically cleaned the parts from the grease that I considered to be too much. Now I tried to reassemble the lens. I managed to reassemble the aperture-ring and was left with the focus-ring (with the lettering and the serial-number on it) and the three screws that are marked blue in the second image...
A few days ago I have screwed these three screws outside somewhere, but now I have no idea where I have to screw them inside again in order to attach the focus-ring! It's a real mystery to me. Because you managed to reassemble the lens, you should be able to explain it to me. It is my first time disassembeling a lens, and I think that I have to deepen my understanding.
Thanks in advance,
Harkon
image 1:
http://img269.imageshack.us/i/pentaxa50mmf2disassembl.jpg/
image2:
http://img269.imageshack.us/i/pentaxa50mmf2disassemblw.jpg/ |
Ismaelg
Tinkerer
Username: Ismaelg
Post Number: 10
Registered: 11-2009
Rating: N/A
Votes: 0 (Vote!) | | Posted on Monday, November 30, 2009 - 03:32 pm: |
|
Hi,
Those are most likely the screws that go behind the serial number ring. Remove the plastic ring that has the serial number from the focus ring. Remove the rubber grip to reveal the tabs that hold that ring in place. There are 3 screws in there, most likely the ones you have left.
Let me know if this helps.
Thanks,
Ismael |
Harkon
Tinkerer
Username: Harkon
Post Number: 2
Registered: 11-2009
Rating: N/A
Votes: 0 (Vote!) | | Posted on Tuesday, December 01, 2009 - 11:20 am: |
|
Hey Ismaelg,
thanks for your help, but I am still puzzled. I did not know that the serial-number-ring and the focus ring are two different parts, I thought they were one and I had never removed the serial-number-ring. Nonetheless I tried to do what you described. I was not able to remove the serial number ring, but I was able to partly lift off the rubber grip (see image 1). I did not lift it off further, because it is glued.
But I still see no solution to my problem. I think that what I need to know is how I can attach the focus ring to the threaded aluminum ring. What is puzzeling me is the fact that the aluminium ring has no thread on the outside, the focus-ring has no thread on the inside, and that I can see no holes for the screws. I hope that I can make myself intelligible and that you can bring light into the dark :-)
Harkon
 |
Ismaelg
Tinkerer
Username: Ismaelg
Post Number: 12
Registered: 11-2009
Rating: N/A
Votes: 0 (Vote!) | | Posted on Wednesday, December 02, 2009 - 05:08 am: |
|
Hi,
The focusing ring attaches to the metal housing but has no screw holes. It is held in place by the edge of the screws. Check if these pictures help. I did not post actual pics here due to the small size limit.
http://images53.fotki.com/v431/photos/4/1233394/8163544/Picture1-vi.jpg
http://images27.fotki.com/v981/photos/4/1233394/8163544/Picture2-vi.jpg
http://images53.fotki.com/v431/photos/4/1233394/8163544/Picture4-vi.jpg
Let me know if these help.
Thanks,
Ismael |
Glenn
Tinkerer
Username: Glenn
Post Number: 725
Registered: 07-2006
Rating: N/A
Votes: 0 (Vote!) | | Posted on Thursday, December 03, 2009 - 01:50 am: |
|
Harkon,
The most important lesson you should learn from this experience is Always Make Notes! We have all been in your situation at some time or another, any body who states differently is either very clever/lucky or has a very short memory.
I use a small voice activated tape recorder - a carry over from my working days - and just talk myself through the stripdown. The reason I do this is because my written note taking can be somewhat lazy and less than methodical, but more importantly the old brain forgets what actually needs to be written down as the years advance. Perhaps one should not carry out camera repairs with a glass of good Single Malt on the bench!! |
Fallisphoto
Tinkerer
Username: Fallisphoto
Post Number: 101
Registered: 09-2006
Rating: N/A
Votes: 0 (Vote!) | | Posted on Thursday, December 03, 2009 - 08:44 am: |
|
Better yet, if you have a digital camera lying around not doing anything is to take photos of the disassembly process. you can refer to those when putting it back together. |