| Author |
Message |
    
Fabio
Tinkerer
Username: Fabio
Post Number: 9
Registered: 09-2009
Rating: N/A
Votes: 0 (Vote!) | | Posted on Friday, November 19, 2010 - 06:49 am: | 


|
Does someone has any idea on how to re-create a camera logo silkscreened to an old camera? I have some half-century russian cameras (zorki, zenit) that have the non-engraved logos almost completely erased 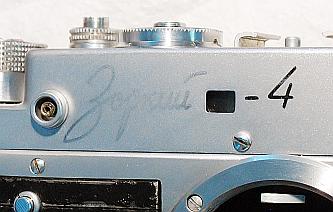 . .
I've tried this solution:
I created a mask by photo-etching a thin metal sheet   . .
then glued to the camera: 
and sprayed the varnish. The results was not so appealing....
Then tried to apply the varnish with a cotton swab in the hope that very little varnish applied at a time would not smear below the mask... Still no good results, so far.
Any ideas?? Thanks to all!
Fabio |
Glenn
Tinkerer
Username: Glenn
Post Number: 866
Registered: 07-2006
Rating: N/A
Votes: 0 (Vote!) | | Posted on Saturday, November 20, 2010 - 10:13 am: |
|
Never apply paint by brush or any similar techniques when using stencils on matt chrome. The correct procedure involves the use of an air brush - There are a number of cheap airbrushes aimed at the model fraternity that will work, using readily available cans of propellant.
Method is as follows:- Attach the stencil and then apply by airbrush two or three fine coats of Clear Satin Varnish, the varnish should be applied wet on dry. Leave final coat to dry for a few minutes before following up with two or three fine coats of Satin Black.If the clear varnish has sealed the stencil edges, the colour coat can be applied wet on wet with no risk of the colour coat bleeding under the edges of the stencil cutouts.
For best results with this method just lay the stencil on the area to be lettered and secure with a couple of pieces of self-adhesive tape at each end. Do not use double sided tape or contact adhesive - you want the smallest possible gap between stencil and substrate for the sharpest letter edges on the finished logo.
The paint formulations I use with fine detailed stencils, allow stencil removal after the colour coats have fully dried. If you find when you remove the stencil from fully dried paint the letter edges appear ragged and torn, you should try removing the stencil before the colour coats have fully dried.
I have used this technique to restore all manner of things - from speedometer, clock and watch dials, equipment logo and nameplates to detailing fine scale models.
If you have the ability to create the stencil - which you obviously have - the spray painting is the easy part of the restoration. |
Fabio
Tinkerer
Username: Fabio
Post Number: 10
Registered: 09-2009
Rating: N/A
Votes: 0 (Vote!) | | Posted on Monday, November 22, 2010 - 01:18 am: |
|
Many thanks Glenn.
I think I'll have to make more than a few attempts to get good results... but with your knowledgeable suggestions I am more than confident to succeed.
What kind of paint/varnish do you suggest on this kind of surfaces? Acrylic, solvent etc? I am concerned about adhesion to surfaces and to subsequent use/wear. |
Glenn
Tinkerer
Username: Glenn
Post Number: 867
Registered: 07-2006
Rating: N/A
Votes: 0 (Vote!) | | Posted on Wednesday, November 24, 2010 - 03:43 am: |
|
I have had very good results using the black enamels sold by Micro-tools as body touch up media, these paints are loaded with pigment and the Satin version has given me good, hardwearing results. Having said that - I did a quick restoration on a piece of scientific equipment a while back using bog standard aerosols of acrylic clear automobile top coat and satin black, the results were very good. So this might be worth a try, but you should note that the spray nozzle to surface distance is far more critical than when using an airbrush if surface finish of the letters is critical. If a bit of 'orange peel' is acceptable I can see no reason not to try the aerosol route, - you can always remove the lettering and reuse the stencil, and the cost of a couple of aerosols is certainly cheaper than having to specially purchase an airbrush. |
T6nn
Tinkerer
Username: T6nn
Post Number: 12
Registered: 06-2009
Rating: N/A
Votes: 0 (Vote!) | | Posted on Friday, November 26, 2010 - 11:54 am: |
|
Glenn: I've wondered how the logo of Zorki-4 never wears off completely?
After all, the chrome is said to be almost impossible to paint. The secret is probably in primer. Is it etching primer? Or maybe the logo was somehow electrochemically etched? Like the "black chrome" on Leicas?
Fabio: How did you make that metal mask? I have planned to make similar ones from pre-coated photosensitive circuit board material, but I have no clue how to separate the copper layer from the board... |
Glenn
Tinkerer
Username: Glenn
Post Number: 870
Registered: 07-2006
Rating: N/A
Votes: 0 (Vote!) | | Posted on Saturday, November 27, 2010 - 09:10 am: |
|
TT,
Although I have never bothered to test this type of Soviet logo, I am pretty sure they are produce by some form of chemical 'etch + dye' technique - hence the ever present 'ghost' image. I am sure if I played around long enough, I could come up with a suitable modern DIY technique - there are plenty of metal blackening chemicals on the market and my original working background was industrial chemistry. However, the paint and stencil method gives me very good results on the items I restore, and the reduced wearability on camera bodies does not bother me - so why waste precious time? |
Fabio
Tinkerer
Username: Fabio
Post Number: 11
Registered: 09-2009
Rating: N/A
Votes: 0 (Vote!) | | Posted on Monday, November 29, 2010 - 01:42 am: |
|
TT,
I've made the metal mask/stencil by photoetching a 0.2mm brass sheet. I used this material because I had it at hand, other choices could be better suited. I sprayed the photosensitive coating with a product by Electrolube -source RS 198-9651- (I think many different brands/types should be available), then etched it in standard ferric chloride. I think a lot of info could be gathered in modeling related web sites. |