| Author |
Message |
    
Jonnymorris
Tinkerer
Username: Jonnymorris
Post Number: 1
Registered: 09-2006
Rating: N/A
Votes: 0 (Vote!) | | Posted on Monday, September 18, 2006 - 06:39 am: | 


|
Hi! I'm totally new to camera repair, I just got hold of a TL3 but the counter is frozen at 14, although the rest of the camera appears to work just fine. Is there a guide for fixing the counter, getting the top off, etc? I have looked and searched, found bits and pieces here and there, but nothing really like a step by step guide to taking the top off. This would be a great help, I really want to get this camera back to full working order and take it for a spin!
I know it will work without the counter, but I just like things to be fully working. |
Steve_s
Tinkerer
Username: Steve_s
Post Number: 2
Registered: 07-2006
Rating: N/A
Votes: 0 (Vote!) | | Posted on Monday, September 18, 2006 - 03:12 pm: |
|
Have a look at the instructions for the MTL3 in the Articles section on this forum.
https://kyp.hauslendale.com/classics/prakticanotes.html |
Jonnymorris
Tinkerer
Username: Jonnymorris
Post Number: 3
Registered: 09-2006
Rating: N/A
Votes: 0 (Vote!) | | Posted on Tuesday, September 19, 2006 - 04:14 am: |
|
I got as far as taking the cover and two washers off the film advance lever, then it mentions a screw but I can't find one there at all! Help!!
(there isn't even one in their photo) |
Steve_s
Tinkerer
Username: Steve_s
Post Number: 3
Registered: 07-2006
Rating: N/A
Votes: 0 (Vote!) | | Posted on Tuesday, September 19, 2006 - 02:36 pm: |
|
The screw is the part with 2 holes in it. I made a tool to fit, but as a last resort you might be able to use fine-tipped pliers or similar, if it is not too tight. This is the only difficult part of the job!
When you get the top off you can see how the frame-counter disc has a ratchet wheel below it, and it is sprung anti-clockwise by a phosphor-bronze hair-spring. To the right are two levers. The lower one pushes the ratchet-wheel round clockwise by one notch when you wind on; The upper one acts as a ratchet pawl to hold the disc in position. You should see it click into the next notch as you wind. This upper one has a tiny tension spring at the back which also holds it in place. Check that this has not got lost, and that the levers are not gummed up with oil.
If you take the thing apart, thread a loop of cotton through the tiny spring first, as it is easy to lose. |
Ethostech
Tinkerer
Username: Ethostech
Post Number: 8
Registered: 07-2006
Rating: N/A
Votes: 0 (Vote!) | | Posted on Tuesday, September 19, 2006 - 09:41 pm: |
|
May I offer a caution.
With the top-plate removed, look at the film advance lever end of the camera. You will see a black vertical lever-post with the horizontal tail of a spring resting on such outermost.
The spring-tail tensions the lever-post which interfaces with the shutter escapement. If it gets dislodged during your service work and the horizontal tail is no longer outermost, your shutter will then no longer work.
This technicality is very easy to miss and this little note might save you some frustrations. |
Jonnymorris
Tinkerer
Username: Jonnymorris
Post Number: 5
Registered: 09-2006
Rating: N/A
Votes: 0 (Vote!) | | Posted on Wednesday, September 20, 2006 - 06:49 am: |
|
OK I have the cover off and I can see the mechanism that controls the counter. When I pull the little lever with the spring on it, the dial doesn't like moving off 1 (from a reset) and also sticks at around 15, also the winding lever doesn't appear to have any effect on advancing the counter (I assume it moves the lever at the front of the camera, correct? Perhaps the cam is just worn). Any advice? Is it fixable? I can't see any appreciable amounts of grease, although I'm no camera repair professional so wouldn't know what's supposed to be there. Might a tiny drop of sewing machine oil help? |
Steve_s
Tinkerer
Username: Steve_s
Post Number: 5
Registered: 07-2006
Rating: N/A
Votes: 0 (Vote!) | | Posted on Wednesday, September 20, 2006 - 02:49 pm: |
|
I don't think there is anything in the counter mechanism that is liable to wear out. Check that the ratchet wheel hasn't lost any teeth, but I have never seen a damaged one myself. Mounted on the post at the far front is a lever which is moved outwards by pins on the winding mechanism. It is sprung towards the pins by the little tension spring I mentioned before (which also holds the upper pawl on to the ratchet wheel). This lever is linked to the lower pawl (which increments the counter) at a pivot at the far right-hand corner and there should be a spring at the joint which holds the lower pawl on the ratchet wheel.
When you pull the lever at the front away from the wind mechanism it should increment the counter. If both the pawls are engaging with the ratchet wheel, and both the springs are in place, as far as I can see, it has to work!
Normally all the parts seem to be unlubricated, and are best left that way. I had an intermittent counter on an Exakta RTL1000 (Praktica in disguise) due to oil between the two pawls which was preventing the upper pawl clicking into place as the lower one pushed it round.
If everything seems to be in place as above, but it still doesn't work, it is very easy to take apart. You can strip the counter in-situ without disturbing any of the wind/shutter-timing mechanism - just don't lose that little spring! |
Steve_s
Tinkerer
Username: Steve_s
Post Number: 6
Registered: 07-2006
Rating: N/A
Votes: 0 (Vote!) | | Posted on Wednesday, September 20, 2006 - 04:06 pm: |
|
Just one more thought. Have a look at the vertical spring-loaded lever that lifts the pawls away from the ratchet-wheel when you open the back, to reset the counter. There should be a little clearance between this lever and the ratchet pawls when the back is closed. |
Jonnymorris
Tinkerer
Username: Jonnymorris
Post Number: 7
Registered: 09-2006
Rating: N/A
Votes: 0 (Vote!) | | Posted on Thursday, September 21, 2006 - 04:01 am: |
|
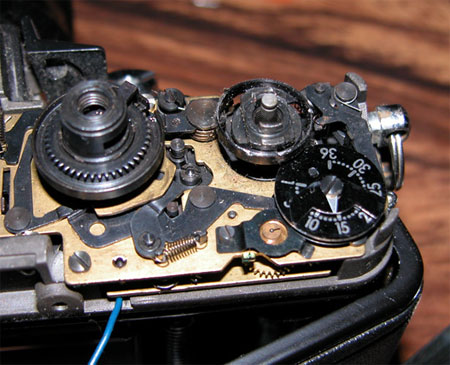
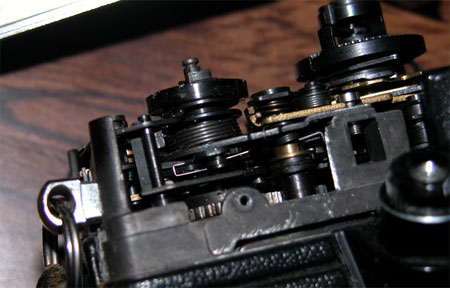
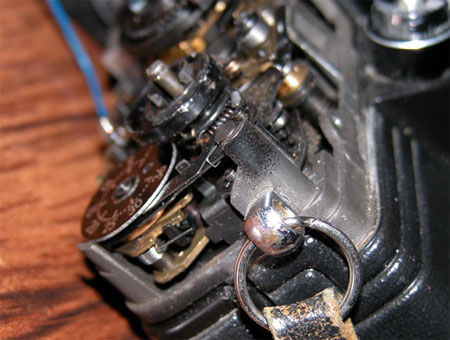
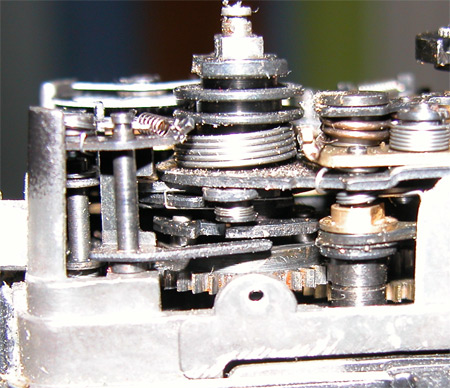
With the top pawl off, the reset mechanism works when I open the camera back, as soon as I re-attach the top pawl it no longer does that, the little lever still pushes the pawls but not far enough it would seem. Also, the arm which engages with the notches/cam on the wind shaft seems to be out of place (sits just below them), but even when it is in place and is moved by the cams it doesn't advance the counter wheel, nor does pulling the arm out manually as far as it will go (beyond what would be the camera top cover). I really don't know why the top pawl seems to be causing so much grief, I can't see anything wrong with it or the rest of the mechanism. Attached are some photographs in case you can spot something. :-)
   |
Ethostech
Tinkerer
Username: Ethostech
Post Number: 9
Registered: 07-2006
Rating: N/A
Votes: 0 (Vote!) | | Posted on Thursday, September 21, 2006 - 07:50 am: |
|
Your lower picture tells it all - I think.
See the posting by "Steve s" a key line of which goes :
"Mounted on the post at the far front is a lever which is moved outwards by pins on the winding mechanism."
Those two stacked spingplate leaves should be substantially parallel.
In your picture I can clearly see that the bottom leaf is spreading radically downwards and is way to low for its business end to be propely engaged.
Hope this helps. |
Steve_s
Tinkerer
Username: Steve_s
Post Number: 7
Registered: 07-2006
Rating: N/A
Votes: 0 (Vote!) | | Posted on Thursday, September 21, 2006 - 01:40 pm: |
|
I think Ethostech has cracked the problem. The leaves he is referring to are the parts I have called the pawls. Between the ratchet wheel and the hair-spring is a thin disc. BOTH the pawls should be above this disc. It rather looks from your picture as though your lower one has got itself below this disc. |
Steve_s
Tinkerer
Username: Steve_s
Post Number: 8
Registered: 07-2006
Rating: N/A
Votes: 0 (Vote!) | | Posted on Thursday, September 21, 2006 - 03:29 pm: |
|
One other thing I notice from your third picture, though not relevant to the present problem: It looks as though the hair-spring has been fully unwound. It will do this if you manually pull both the pawls away from the ratchet-wheel. The counter will work like this (assuming you fix it) but the counter may not reset reliably.
To correct this first check the spring actually is fully unwound by releasing the pawls (the counter will now probably read about 30). Now make sure both the pawls are above the thin disc, and engaged with the ratchet-wheel. Turn the counter disc clockwise by hand to "1", and then another full turn. This should now be correct, but to check, advance the disc to "36" to check the spring is not overtightened. |
Steve_s
Tinkerer
Username: Steve_s
Post Number: 9
Registered: 07-2006
Rating: N/A
Votes: 0 (Vote!) | | Posted on Friday, September 22, 2006 - 02:48 am: |
|
Closer perusal of your pictures shows another possible cause of your problem. The lever which is driven by the wind mechanism appears to be too far out and too high up. Its end should be in the gap below the notched plate on the wind spindle, where it is driven by the 3 bright metal posts . At its pivot, the lever should rest on the shoulder at the bottom of its pivot post. Your picture clearly shows a clearance. The forked end of the upper pawl should engage in the lower of the 2 notches on the post. The upper notch does not do anything. |
Jonnymorris
Tinkerer
Username: Jonnymorris
Post Number: 8
Registered: 09-2006
Rating: N/A
Votes: 0 (Vote!) | | Posted on Friday, September 22, 2006 - 04:53 am: |
|
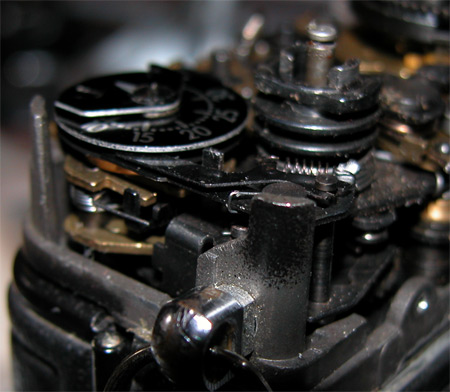
Thanks for your input so far, it's been great, but alas it's not helped me fix the problem. All is where it should be according to your descriptions, indeed I believe that's where things were when I took the cover off (just my meddling that put them out of place!) Sorry for uploading more pictures but if there's anything you can see that's wrong then shout out. When I use the film advance lever I see hardly any action, when I pull on the lever which is usually actuated by the pins on the shaft the pawls push at the exposure counter wheel but then just snap back into place, the wheel does not move. I have re-tensioned the leaf spring as described, it resets to 1 only if I move the pawls out by hand (not far enough to totally unwind the leaf spring).
Really stuck on this one, can't see anything that's unduely worn or bent. Only thing I can think of is that the upper pawl is preventing the counter wheel from turning, but what can I do about this?

 |
Steve_s
Tinkerer
Username: Steve_s
Post Number: 10
Registered: 07-2006
Rating: N/A
Votes: 0 (Vote!) | | Posted on Friday, September 22, 2006 - 01:40 pm: |
|
More and more puzzling! My mention of 2 notches on the pivot post seems to have been a red herring, as it appears yours only has the one. The lever that is operated by the pins on the wind spindle does still seem to be much too far out. At risk of using up all rangefinderforum's server space I'm uploading a (badly lit!) image of my own. This is of a PLC3 which as far as I know should be identical.
Is it image distortion (wide-angle lens), or is your pivot post rather off the vertical? If it is, and the pivot point where the wind-spindle lever joins the lower pawl is catching on the vertical part at the corner of the camera body, this could account for the whole problem. Check that there is clearance here. If there is clearance, see if you can find some other reason why your lever is in the position it is. 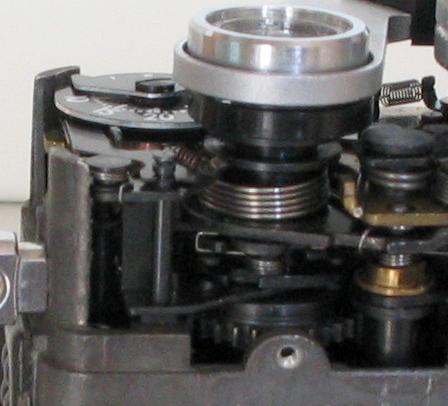 |
Jonnymorris
Tinkerer
Username: Jonnymorris
Post Number: 9
Registered: 09-2006
Rating: N/A
Votes: 0 (Vote!) | | Posted on Saturday, September 23, 2006 - 04:04 am: |
|
EUREKA! The large chassis post was slightly bent inward, preventing the pawls from coming back far enough to push the arm into the cam groove (that sounded far too complicated!) Suffice to say that now the arm position looks like it does in your photo. I didn't want to move the pivot post for fear of it snapping off, I figured the chassis would survive better for a few minor bends. The case still fits over and it winds on OK, and although I haven't tried it with everything screwed back in place I have no doubt that it will work :D
Also had to adjust the reset lever to be a hair-line away from the pawls to get the counter reset to work when the back is opened.
Thanks to everyone who helped, and especially Steve_s who offered that final clincher suggestion!
Now... fingers crossed I can get this thing back together still working. |
Ethostech
Tinkerer
Username: Ethostech
Post Number: 10
Registered: 07-2006
Rating: N/A
Votes: 0 (Vote!) | | Posted on Sunday, September 24, 2006 - 01:35 am: |
|
Sorry Jonnymorris - but the chassis end was correct. It's vertical axis is clearly parallel with the axis of the lever-wind main-shaft.
The error (was) really in the off-vertical lever-post and could have been corrected by bending its lower horizontal mount-plate.
BUT - the end result would have been pretty much the same as you have achived by bending the casting. I am surprised that the casting didn't break off. Regardless - it is best that you now quit whilst you are ahead.
Best |
Steve_s
Tinkerer
Username: Steve_s
Post Number: 11
Registered: 07-2006
Rating: N/A
Votes: 0 (Vote!) | | Posted on Sunday, September 24, 2006 - 08:07 am: |
|
I'm inclined to agree that the error does look as though it is in the pivot post according to your images, but I'm glad you fixed it safely. The bottom end of the post is pressed into a fairly weak extension from the body casting (not in a plate). When I suggested that this post could be the source of the problem I was a bit concerned that trying to bend it straight could break its mounting, which would be terminal as far as the counter is concerned! I was going to suggest that filing a bit off the corner casting might do the trick.
I am not sure if the body casting is aluminium or zinc-alloy but either way they don't like being bent, so you were lucky here. But as long as it didn't take the strap-loop with it it wouldn't have mattered too much if it broke.
Congratulations on spotting the need to adjust the reset lever! Hope you get some good shots with the Praktica - they are a very usable camera. |
Glenn
Tinkerer
Username: Glenn
Post Number: 59
Registered: 07-2006
Rating: N/A
Votes: 0 (Vote!) | | Posted on Sunday, September 24, 2006 - 11:57 am: |
|
Sorry to spoil the fun; Jonnymorris is correct in identifying the source of his problem as the bent strap-lug mount post.
The photographic evidence is contained in the second frame of his original set of photographs. This is the only image, taken from a viewpoint that allows the alignment of the lug post to be verified with other fixed reference points, on the chassis.
All the other images exhibit various spacial distortions, making them useless for determining the relative disposition of the components under discussion.
Not that this matters one jot, now that the camera is working. However I do base my comments on many years of forensic photography and image analysis, remember the camera has always been able to lie - Photoshop is nothing new. |
Jonnymorris
Tinkerer
Username: Jonnymorris
Post Number: 11
Registered: 09-2006
Rating: N/A
Votes: 0 (Vote!) | | Posted on Tuesday, September 26, 2006 - 04:10 am: |
|
I agree with you there - I checked all the other corner posts to see if there was any sort of incline on them, they were all definitely vertical, and the pivot post had a nice 90 degree angle to the chassis it was attached to.
During my repair I did actually lose the tiny spring once, amazingly found it on the floor in a couple of minutes, next to my mass of computer wires! Just lucky I guess :D |