| Author |
Message |
    
Pix
Tinkerer
Username: Pix
Post Number: 1
Registered: 10-2006
Rating: N/A
Votes: 0 (Vote!) | | Posted on Wednesday, October 11, 2006 - 05:01 am: | 


|
Hello all...
i just found a 25-30 years old K1000 at my grandmother's house. fully operational, like a true K1000. except for one thing - the lens release lever. the lens won't budge. the lever itself wiggles a bit (i don't know how much it supposed to move).
now what? i don't want to oil the thing (in case of corrosion) - it will probably wreck the lens. and i don't have anything to pry open and take a look. looking through lens from the back side, won't reveal anything useful.
please please please - any help would be greatly appreciated. thanks. |
Pix
Tinkerer
Username: Pix
Post Number: 2
Registered: 10-2006
Rating: N/A
Votes: 0 (Vote!) | | Posted on Wednesday, October 11, 2006 - 07:28 am: |
|
oh, and another thing: is there any way to determine what year the camera was manufactured? the serial number is still visible...or maybe there are different revisions by era? |
Ethostech
Tinkerer
Username: Ethostech
Post Number: 22
Registered: 07-2006
Rating: N/A
Votes: 0 (Vote!) | | Posted on Thursday, October 12, 2006 - 01:29 am: |
|
The release lever depresses 2mm toward the camera front-plate and comes to a very positive stop. At this point the pin which holds the lens locked in place would be fully withdrawn and the lens should remove counter-clockwise from its mount.
It is not likely that the pin is seized or corroded in the mount but more likely that the return spring behind it is corroded and broken. It seems that you are not fully depressing the lever because you sense resistance which is the broken spring. You have only one course and that is to force depress the lever hard so as to withdraw the locking pin. If anything breaks it will be the lever itself but int his case you will then have access to the side of the lens mount which the lever normally obscures and you would be able to lever the locking pin down with a fine screwdriver. Once the lens is off you will need to remove the lens mount. The damaged lever-pin and spring can be easily replaced with identical components from a junker camera. If you are not confident - then take the camera to a techie who should be able to do the little job in less than five minutes. |
Pix
Tinkerer
Username: Pix
Post Number: 3
Registered: 10-2006
Rating: N/A
Votes: 0 (Vote!) | | Posted on Friday, October 13, 2006 - 06:20 am: |
|
i think i understood everything you said. however, after breaking the lever, and looking in (as in the attached photo), i wasn't able to take off the lens.

i also took off the front panel along with the lens base (pulling loose 2 soldered wires of the diaphragm-resistor) in order to try and get there from the other side. can i do it that way? |
Ethostech
Tinkerer
Username: Ethostech
Post Number: 25
Registered: 07-2006
Rating: N/A
Votes: 0 (Vote!) | | Posted on Friday, October 13, 2006 - 10:23 pm: |
|
The pin shaft can be seen on the right-hand side of the square opening which your picture reveals. With strong pointed pliers with serated business-end grips, move the pin to the left. The spring inside the left had section into which the pin slides, is obviously broken so you will have to use some muscle to compress whatever remains of it.
Pulling the mirror-box was a drastic measure and never could have been helpful. You shouldn't have done that - but seeing as you have - then don't put it back without cleaning and lubing the main latching.
And Oh - with the film advance lever wind, cock the shutter before attempting to reinstall the mirror-box.
Direct email me when you have successfully removed the lens and I will find a replacement lever/spring & pin assembly for you. |
Ethostech
Tinkerer
Username: Ethostech
Post Number: 26
Registered: 07-2006
Rating: N/A
Votes: 0 (Vote!) | | Posted on Saturday, October 14, 2006 - 01:12 am: |
|
Tom - Disregard my last posting. I have had another look at your picture and what I am seeing is problematic.
I have before me the exact same front panel all disassembled from a junker camera.
In your picture the lens-release action is already as far down as its design will permit and the spring is therefore properly compessed to its design limit. You can confirm this be looking behind the front-plate where you should be seeing the release-pin protruding 2mm. If this is indeed so - and your lens is still arrested against removal - then there is but one explanation.
The vertical plate (in your picture) is rivetted to the left (shiny) part of the lens release. And it is from that left portion that the black plastic release head has broken away. Right ?
The other side (the blind side in your picture) of that vertical plate features a fork. The actual pin which is protruding up into the lens mount and which is preventing lens removal is 4mm long and it has a groove machined whereby the aforementioned fork mates. So when the plate is in the position shown in your picture, the pin should in fact be totally clear of the lens-mount surface and your lens should remove normally.
If it does not so remove - then the fork (which we cannot see) has somehow separated from the pin which it is designed to withdraw. So the pin is stuck firm in the lens-mount hole.
I promise you I have studied this most carefully and what I am about to advocate is absolutely your only solution.
You will need to sever (cut off by grinding with a Dremel-bit or similar)) the left shiny part (in your picture) so you can pull out the vertical plate/fork to which it is rivetted. You will then be able to see the actual arrester-pin which is preventing your lens from rotating to remove.
You will see the lower section of that pin - as machine-grooved. You will then be able to insert an implement into its groove and pull the dammned thing to the left and thus away from the lens-mount. If it does not readily yield then this is one of those rare occasions when one would resort to WD40 in camera work.
Let a little WD40 seep toward the lens. (just whatever amount will cling to the end of a fine screwdriver - and no more). Leave it overnight with the lens facing downward on you worktable.
This offending pin WILL withdraw and your lens will remove.
In order to completely remove the old spring and release lever you then remove the lens mount plate (6 screws) and then remove the anodised aluminuim fairing. The latter is held to the front-plate chassis by dabs of contact adhesive at the 1,5,7 and 11 o'clock positions. assembly. If it doesn't pull off fairly easily - then trickle WD40 into the front lens-mount seam at those positions and leave overnight. It will then pull off.
You are welcome to the replacement parts (lens arrestor pin, release lever and spring) with my compliments. I'll airmail them to you from Australia. |
Krp
Tinkerer
Username: Krp
Post Number: 4
Registered: 07-2006
Rating: N/A
Votes: 0 (Vote!) | | Posted on Saturday, October 14, 2006 - 11:14 pm: |
|
from my view of the picture shown, the locking pin is fully retracted. The lens is simply froze to the mount ring itself. the lens is removed using a counter-clockwise rotation by the way |
Ethostech
Tinkerer
Username: Ethostech
Post Number: 27
Registered: 07-2006
Rating: N/A
Votes: 0 (Vote!) | | Posted on Monday, October 16, 2006 - 01:23 am: |
|
Sorry Krp. You are mistaken. You cannot see the offending arrestor pin so you cannot say that it is fully retracted.
If it were so - then the lens would un-bayonet but the owner reports that it remains solid.
See my second para above.
The withdrawal-fork plate is indeed in the maximum withdrawal position but the arrestor pin has obviously separated from it and remains in the lens-lock position. I have explained how to get out of that dilemma. |
Pix
Tinkerer
Username: Pix
Post Number: 4
Registered: 10-2006
Rating: N/A
Votes: 0 (Vote!) | | Posted on Saturday, October 21, 2006 - 09:55 am: |
|
maybe this will help (referencing the first and second posts by Ethostech): after taking off the metal plate behind the lens, i noticed that the pin ISN'T sticking out those 2mm of it's travel length. so it is full retracted, isn't it? photo attached - red circle marks the pin.
 |
Ethostech
Tinkerer
Username: Ethostech
Post Number: 34
Registered: 07-2006
Rating: N/A
Votes: 0 (Vote!) | | Posted on Saturday, October 21, 2006 - 08:33 pm: |
|
Pix ...... This is gettig complicated by misuse of terminlogy as to the word "retracted".
What you have ringed in red is the tail of the lever assembly. The chassis hole is its guide. And yes - when the pin is protruding by 2mm the arrestor pin which is currenty blocking lens removal should in fact be withdrawn and the lens should rotate. So ... if everything is otherwise intact and connected your ringed "flush" guide pin would be consistent with the arrestor pin still being extended into the back of the lens-mount.
But this is not consistent with what can be seen through the rectangular opening in the mount-fairing. Maybe the particular guide pin in shorter than normal - as perhaps cannibalised from another camera model with a K -Mount.
My posting of October 14th portrays your only exit from the problem - I believe. |
Glenn
Tinkerer
Username: Glenn
Post Number: 84
Registered: 07-2006
Rating: N/A
Votes: 0 (Vote!) | | Posted on Saturday, October 21, 2006 - 08:45 pm: |
|
Surely if that pin is not protruding 2mm, then the mechanism is Fully Engaged not fully retracted. Second para of Ethostech's 3rd post. Maybe I have read the information wrong? |
Krp
Tinkerer
Username: Krp
Post Number: 5
Registered: 07-2006
Rating: N/A
Votes: 0 (Vote!) | | Posted on Sunday, October 22, 2006 - 06:32 am: |
|
If you look at the original photo, you will see one thing. The flat piece in the middle of the locking pin assembly is where the black plastic tab was attached before it broke off. That flat brass coloured piece is the forked arm that holds the actual locking pin. The photo clearly shows that the locking pin is still attached to the fork and is visible to the right. Since it floats in the fork, you see it having a slight angle. I say again, there is nothing blocking the lens on the mount other than corrosion/rust. Get a firm grip on the front plate in one hand and at the mount end of the lens in the other, turn the lens in a counter-clockwise direction. Don't use the nose of the lens for a hand hold, you could damage the focusing. 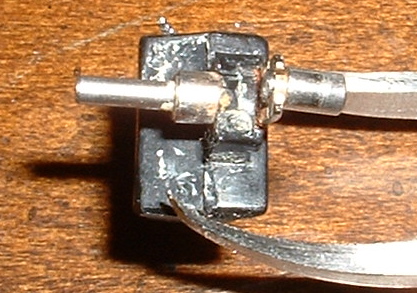 |
Ethostech
Tinkerer
Username: Ethostech
Post Number: 35
Registered: 07-2006
Rating: N/A
Votes: 0 (Vote!) | | Posted on Sunday, October 22, 2006 - 10:35 pm: |
|
Krp's post is logical but I do not think Pix's picture shows the arrestor-pin still connected to the forked plate. The diameters of the arrestor pin and that of the lever-guide are in fact almost the same - but that is not what is seen in the pic. There is a machined recess in the lens mount and I think the Pix photograph is showing only reflected light from such.
Pix. Solve this one for us.
Poke a fine screwdriver in there.
Is there a shaft extending to the right of the forked plate as toward the lens-mount ........ or NOT ?
If there isn't - then the lens arrestor pin is separated fro the fork and is still holding the lens solid. |
Pix
Tinkerer
Username: Pix
Post Number: 5
Registered: 10-2006
Rating: N/A
Votes: 0 (Vote!) | | Posted on Monday, October 23, 2006 - 12:12 pm: |
|
I'm returning home this Friday, and then i will be able to answer that. I think the plate (while is totally free to move to the right of it's position in the first picture - but not to the left) is still connected to something and it's not broken off that. i will to try and take a picture with a digital camera, using auto timer and tripod (so i can shoot with no flash that will be reflected).
I'll ask something that should come in a later time: to solder back the wires i tore - should i just connect yellow to yellow, black to black? should i calibrate something before closing up, as the two wires are related to the light-metering mechanism? (i think)
stay tuned... |
Pix
Tinkerer
Username: Pix
Post Number: 6
Registered: 10-2006
Rating: N/A
Votes: 0 (Vote!) | | Posted on Friday, October 27, 2006 - 03:45 am: |
|
how about now?

i got some more photos, from different angles using different lightings, if it would help. |
Pix
Tinkerer
Username: Pix
Post Number: 7
Registered: 10-2006
Rating: N/A
Votes: 0 (Vote!) | | Posted on Friday, October 27, 2006 - 06:47 am: |
|
Success! the oiling worked! well, the WD-40 did the trick eventually:


thank you so very much, Ethostech and Krp, for your time and efforts. today marks the end to the violence my K1000 should go through. now i face the task of putting it all together:
1. in the first photo you can see the weird red substance on the mount with some defects. what is it for, and should i clean it somehow?
2. the wires: just solder them?
3. the mount: should i buy another mount?
4. before putting it together: do i need to calibrate anything, like the light metering mechanism?
5. any other advices?
thanks again! toda...
Tom. |
Ethostech
Tinkerer
Username: Ethostech
Post Number: 40
Registered: 07-2006
Rating: N/A
Votes: 0 (Vote!) | | Posted on Saturday, October 28, 2006 - 03:57 am: |
|
Nope, Tom. Unless the arrestor-pin hole in the lens mount is damaged (unlikely) , you won't need to procure a new mount.
The corrosion (or whatever it is on the edge of the mount (your picture refers) may well be the result of some magic potient which someone has tried to inject into the arrestor-pin section - and that may indeed have been the source of your current troubles.
May I suggest you leave the existing lens mount in position until you have the replacement pin and lever assembly on hand and ready to install. You want to be able to reinstall all in one session and without disturbing the aperture coupling mechanism. Gently- Gently.
What you "could" do in the meantime is to trickle some WD40 into the seam between the silver front plate and the black portion from which you will need eventually to separate By the time you are ready to proceed the WD40 should have destroyed the contact adhesive with which the silver plate is tacked on. |
Pix
Tinkerer
Username: Pix
Post Number: 8
Registered: 10-2006
Rating: N/A
Votes: 0 (Vote!) | | Posted on Saturday, October 28, 2006 - 04:51 am: |
|
it is damaged - it won't pop back up. i think i will at least need to take off the mount to work things up with the spring & pin.
as far as i know, for at least 10 years no one had touched the camera, and no one ever tried to disassemble it like i did.
how can i disturb the aperture coupling?
and what is soft red spot?
thanks |
Ethostech
Tinkerer
Username: Ethostech
Post Number: 41
Registered: 07-2006
Rating: N/A
Votes: 0 (Vote!) | | Posted on Monday, October 30, 2006 - 12:09 am: |
|
As I mentioned in an earlier posting, you will have to remove the lens mount and the silver front-plate in order to install the replacement lever,spring and lens arrestor. It is not a big deal - but it is better that you don't disassemble until you have the replacement parts before you. You should have no difficulty in obtaining those bts and pieces from any camera techie in Israel. Same with a replacement lens mount. So don't waste time in extracting the the old arrestor-pin out of the old mount. I doesn't matter any more.
When you have the replacement parts to hand, lay the camera on its back; remove the five screws and carefully lift off the mount.
You will then see a copper-coloured ring-washer with three humps which must align with mating machined receses in the back of the mount. Lift it off - and then remove the silver front plate to install the new lever and arrestor pin assembly.
Reinstall the silver front plate then reinstall the copper-coloured ring washer in the same position as was the old one. The Mount fits in only one position - so the spring detents must be correctly aligned before you install it. Otherwise there will be no tension lens when you bayonet it on.
Tom - why don't you just buy those bits from a local Israeli camera repair man and get him to pop them on for you?
It is but a three minute job
The red spot on the Mount is a marker index.
To mount your lens, you align the red spot on the lens with the red spot on the lens mount - and then turn the lens clockwise to bayonet in position. The arrestor-pin will click into position to secure the lens. |