|
|
| Favorite Classics |
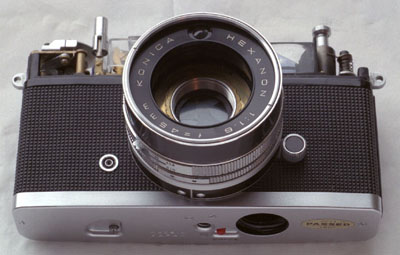
| Konica Auto S1.6 Repair Adventure by Kar Yan Mak Ahh...it feels good having another camera working. Actually this is my first multiple-problem fixed camera, ever, so it's really a confidence booster. OK, what was wrong with this one?
Shutter and aperture blades Alright, this is an easy one. If you've read Henry's Demi repair articles it's basically the same problem and solution. The aperture and shutter blades are stuck due to grease from the shutter assembly leaking onto the blades. Remove retaining ring around the lens then the name plate will come out, no force applied. Then I used a dental dam (alternative: balloon) to have a nice and tight grip on the front lens element then unscrew it (I bet someone tinkered on this one before or else it'll be very very tight). Then you'll see the shutter blades. I dropped some Ronsonol lighter fluid on the blades, the self timer released (usually if the shutter does not release someone would wind the self timer and think it'll start working like magic), and the shutter blades clicking. I flooded the shutter blades a while, clicked it a couple of times, and still stuck. Used kleenex and dabbed it with some lighter fluid then very carefully wiped the shutter blades to wipe off the grease. Repeat that a couple of times...fixed! Note: Wait overnight or a day to make sure that the lighter fluid dries and the aperture and shutter blades are still click/moving, don't wanna open up this baby again!
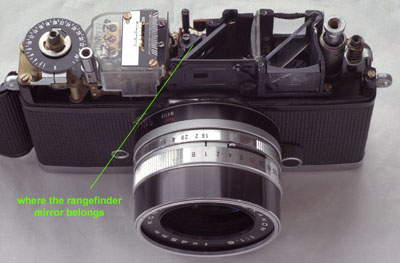
Aperture blades, how to get to those? Since I did not wish to remove the back lens element, I worked on the shutter blades from the front opening. (Note: If you can get to the aperture blades from the front, don't try to take the back elements apart) The aperture blades are located right behind the shutter blades. So what I did was set the camera to "Bulb (B)" and cleaned these blades like I did with the shutter (you are at your own risk with this procedure). Fixed again. Rangefinder Have no idea what's wrong until I opened the top cover of the camera. The problem was that the mirror fell, only re-gluing was necessary. I used a contact cement called Pattex from Germany to glue it on...fellows in the US can use Pliobond. Actually I prefer Pliobond for all sorts of gluing, but can't help it if they don't sell it here in Hong Kong.
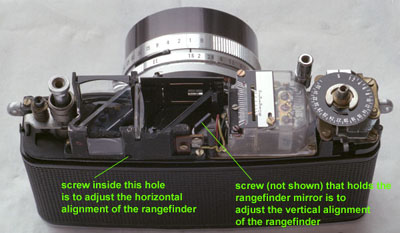
Not over with the rangefinder yet...got to align it now. It's pretty much straight-foward. Usually you'll see a screw that holds down the rangefinder mirror. For the Konica Auto S1.6, there were two places where the rangefinder is aligned. One is located right next to the rangefinder window which is to align the rangefinder horizontally. The other one is the screw that holds the rangefinder mirror to align it vertically. If the screws are loose then there's a chance that the rangefinder will be knocked out of alignment very easily. Put a drop of Pliobond so it stays.
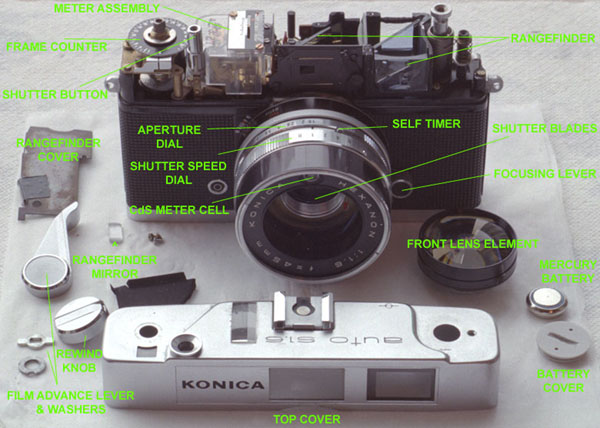
Light baffles Finally, the easiest part of the whole trip. Only a couple of materials/tools are needed, some may be optional depending on your preferences. 1.) Isopropyl Alcohol (Rubbing alcohol) This is a very messy, sticky, and dirty job. First, before you do anything else, make a sketch of the location and how thick (estimate) the deteriorating baffles are. I would use a cut piece of paper towel to cover the film plane so that the sticky stuff wouldn't get on the lens element. Time to clean out the light baffles. I cut pieces of paper towels (Bounty) to 1.5x1.5" size and dab some rubbing alcohol on it and use a pair of tweezers to remove the "big" parts. The detailed parts, I would use toothpicks/Q-tips to scrape it out. Rubbing alcohol removes the baffles fairly easily so no force is needed. Then cut your light baffles/seals with X-acto knife, nice and straight, and place it on (I prefer the self-adhesive light baffles, gluing is messy). Everything assembled and working...I'm ready to burn a roll of film... Partially exploded view of the Auto S1.6 with description of parts |