|
|
| Favorite Classics |
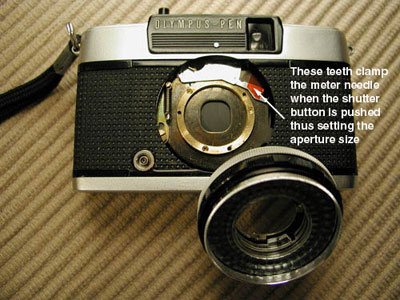
| Olympus Pen EES-2 Aperture Repair by Henry Taber The Olympus Pen EES-2 is one of the easiest cameras I’ve ever tinkered on. It’s a repairman’s dream (unlike the Pen FT, which is a nightmare in comparison). The Pen EES-2 has two shutter speeds: 1/30 and 1/200. The camera automatically selects which speed to use. Although in flash mode only 1/30 is used. Basically, without flash, it is a point and shoot camera that has zone focusing. The metering is done via lock-needle in the AUTO position only. There is a red flag that pops up in the viewfinder if light conditions are beyond the scope of the metering. There is no manual exposure position unless you get tricky and use the flash settings and a handheld meter. It’s a very compact yet terrific little camera. I have two EES-2’s and they both had identical problems: the aperture stuck shut. Btw, this was both’s only problem! Other than the aperture blades sticking together they seem very reliable. And even this problem is minor, being a friction problem caused because of dust, oils, condensation and...time. A little heavier spring tension from the factory might have helped. If you’ve read the Demi article on stuck shutters you’ll understand exactly what we will be doing here. Only we’ll be doing it to the aperture. In the Demi article we only did a halfway job, we didn’t fully disassemble the shutter mechanism. And there is a good reason! The Demi shutter is very hard to get at and not that easy to assemble/disassemble. However, on the EES-2 it is so easy to take apart we’ll do a complete job. Let’s begin...
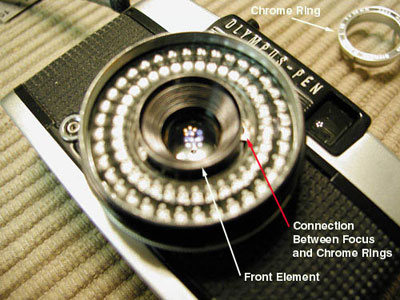
Around the front element you’ll see a chrome ring. This ring is driven by the focusing ring on the outer periphery of the lens. We must use care not to lose the focus adjustment. This chrome ring is setscrewed to the front element and turns the front element during focusing. There are 3 setscrews around the perimeter and they take a very small slot screwdriver. Before removing this chrome ring, turn the focus to the infinity position. i.e. the mountain icon. Loosen the setscrews about a turn and a half each. Do not fully unscrew the setscrews, they’ll be hard to get back in. Now lift the chrome ring straight up being careful not to turn the front element. Measure from the outer edge of the element to the metal base and record this distance. Alternately you can mark the position, say at twelve o’clock, then screw the element in and recording the amount of turns/degrees it moves until bottoming out. I think measuring is easier and maybe more accurate. That is the hardest thing we’ll have to do!
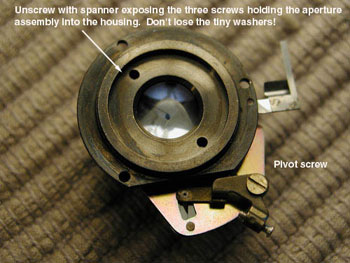
Now with your fingers unscrew the front element. Then remove the 3 screws holding the selenium cell to the front of the lens. Leave the 2 screws that hold the cell pieces together. To make life a little easier, remove the bottom cover so the meter wires can be stretched out longer and the lens lain flat. Remove the 3 screws holding the brass middle element/aperture housing to the shutter housing. Leave the screw holding the auto detent lever in place. Once removed 3 brass screws can be seen that retain the aperture blades. Before removing these screws note the position of the aperture blades in the aperture bracket and loosen the screw that retains the blade pivot. Remove the 3 screws and pull the aperture out of the slot in the side of the housing. Do not lose the 3 brass washers beneath the aperture plate, they space the plate from the housing allowing clearance for the blades.
After the pivot screw is loosened sufficiently, the blades can be spread (do not remove the blades from their pivot) on a clean, flat surface and swabbed with Ronsonol, dried and rubbed with graphite if necessary. Neither of my EES-2’s needed the graphite treatment. Be VERY, VERY careful not to bend the blades. Also do not touch with fingers. After cleaning, reassemble the aperture components. The brass washers will be frustrating to position but, trust me, it’s possible. Adjust the blades, using the pivot screw as a lock, so when activating the cam pin the blades open equally. Reassemble everything in reverse order paying close attention to two things: all dust is blown from glass areas. And the first element is positioned the proper distance out to maintain correct focus. Remember to have focus ring set to the mountain icon. |