|
|
| Favorite Classics |
|
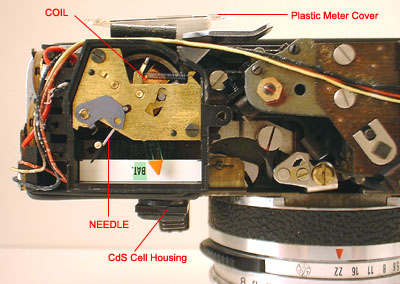
Vito CSR Meter Repair The Vito CSR has a coupled CdS meter powered by a PX625 mercury battery. My first inspection of the camera was that the needle is no where in sight and inserting a battery did not make a difference. The only way to start this was to remove the top cover and reach the meter assembly, so that's what I did. AH! Now I see the meter needle. I used a toothpick and gently tried to move the needle to see if it would move freely, nope, it's completely stuck. OK, let's stop here and do some troubleshooting. What might be the problem? 1.) Magnet attracted some scrap metal parts and caused jam So I thoroughly inspected the innards of the meter but I can't see too clearly because there's not much space. I attempted to remove the top gold plate that is held on by 2 screws, but it didn't seem to want to be removed, so I left it as-is. Next step, I removed the entire meter assembly and see if I can get a better view on the bottom. But as you can see in the picture below, there's only half a circle and I still couldn't see pretty well either!
Even with my limited view of the innards I was assured that there was nothing jamming the innards so #1 possibility is crossed out. All the pivots looks fine so it can't be #2 or #3. After looking here and there, I noticed that the magnet in between the coil was misaligned! The coil itself is aligned properly but the magnet is out of place. So I use a toothpick again (I like toothpicks because they won't make scratches) and gently tried to move the magnet, there we go, the magnet is back in place and the needle is now free! You see, the magnet was attracted against the coil so it could not move. But the magnet could easily be knocked out of place again so I added a drop of Pliobond. I waited for the glue to dry overnight and checked once again if the meter is working...great, it's still working! A tip: no matter what kinds of repair you're doing, always wait one to two days to make sure everything is working properly before reassembling. Sometimes you assume it's working now, but the next day it stops working. The coupling linkage (photo #2) wraps around the screw that is marked "x." The meter is calibrated by just changing the length of the linkage by turning the screw. |