|
| Author |
Message |
    
Aphototaker
Tinkerer
Username: Aphototaker
Post Number: 37
Registered: 12-2009
Rating: N/A
Votes: 0 (Vote!) | | Posted on Sunday, January 03, 2010 - 03:26 pm: | 


|
Hello.
As some would know from my earlier threads, I am resurrecting a recently acquired FTb.
I solved a few problem with it already and some remain. During all this, I have taken out the prism and cleaned the focusing screen (from the top), the prism and the eye piece.
Now I have put them back along with the long rack that runs across the camera and which transfers the ASA speed dial and shutter speed dial movements to the meter.
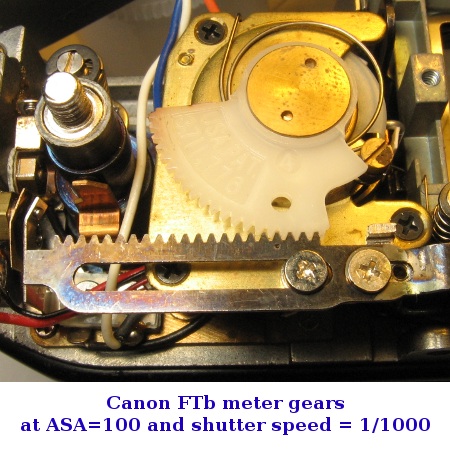
Before removing the top, based on some comments here, I had set ASA to 100 and shutter speed to 1/1000. I carefully noted the position of the rack gear and put it back the way it was before. The arrangement before taking it out is shown below.
Now, my question: I have read a few posts in the archive that state that with ASA=100, one should see the red "out of measurement" mark come up in the viewfinder when the shutter speed is moved from 1/2 to 1/4 sec. Mine doesn't do this. The red mark comes up when I move from 1 sec to B. Is something the matter with the ASA speed dial and shutter speed dial and meter alignment?
On a related note, I verified the exposure meter of the camera with an EOS A2e (set in Partial metering mode) and the meters seem to agree for the most part. Maybe a difference of half a stop here or there, but nothing too great to worry about. |
Don
Tinkerer
Username: Don
Post Number: 50
Registered: 07-2006
Rating: N/A
Votes: 0 (Vote!) | | Posted on Monday, January 04, 2010 - 12:16 pm: |
|
Looks like the timing isnt quite right. 3 things have to line up-- the hole in the gear, the timing dimple on the meter rack (it appears these 2 do) & the screw holding the meter rack |
Aphototaker
Tinkerer
Username: Aphototaker
Post Number: 39
Registered: 12-2009
Rating: N/A
Votes: 0 (Vote!) | | Posted on Monday, January 04, 2010 - 01:02 pm: |
|
To do that, do I just unscrew the rack, rotate the sector gear and reposition the rack? In other words, I don't need to change any other part's position to do this?
Also, given the misadjusted setting as you describe, is it surprising that the exposure is reasonably accurate?
Thanks. |
Don
Tinkerer
Username: Don
Post Number: 51
Registered: 07-2006
Rating: N/A
Votes: 0 (Vote!) | | Posted on Monday, January 04, 2010 - 04:36 pm: |
|
Remove the coupling disk & push the rack towards the wind side until all 3 line up. Then install the coupling disk w/1 of its 4 slots facing the camera front. Ususlly 1 of the slots is factory marked w/red pt or a scribe & thats the 1 to put to the front. But if its off, try 1 of the other slots ( they're offset) until you get the 1 that points directly to the front. Then hold the lingage w.the timing marks lined up & replace the spd knob (asa 100/1/1000 sec. Then check @ 1/4 sec/asa 100. The red flag should come up when U go to 1/2 sec. If not quite right, there's a lug on the meter rack that will give a fine adj. Not surprising that exp. is fairly close w/the settings shown. |
Aphototaker
Tinkerer
Username: Aphototaker
Post Number: 40
Registered: 12-2009
Rating: N/A
Votes: 0 (Vote!) | | Posted on Monday, January 04, 2010 - 06:57 pm: |
|
Thanks for the instructions, Don.
The current position of the coupling disk is shown in the macro photo below. The disk has one of slots marked with a blue mark.
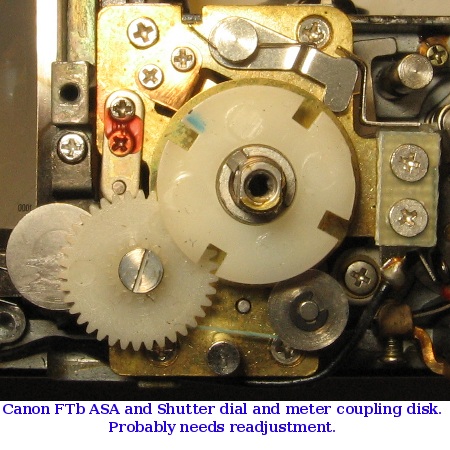
I suppose that if I were not to take out the coupling disk and move the rack toward the wind side, the blue marked slot will rotate and point towards the front. Just trying to verify that this is what I want if I were to follow your method of taking out the coupling disk, then moving the rack and then re-inserting the coupling disk with the marked slot pointing forward.
Also, I must admit that I am a bit lost as to why the exposure meter is reasonably good despite the misadjusted shutter speed dial and meter coupling. Could you explain a bit why this makes sense? The most I can make out is that by following the above procedure, I am not affecting the exposure metering at all, just the valid metering range, and that the procedure will affect only the point where the red mark appears in the viewfinder.
Thanks. |
Aphototaker
Tinkerer
Username: Aphototaker
Post Number: 42
Registered: 12-2009
Rating: N/A
Votes: 0 (Vote!) | | Posted on Wednesday, January 06, 2010 - 07:41 pm: |
|
Thanks to Don's instructions, I made the adjust made the adjustment and the red flag now appears when I turn the speed dial from 1/4 sec to 1/2 sec, as it should.
Next, now the meter is all wrong. How do I go about fixing that up?
Given the context, I have a few other camera bodies whose meter works perfectly. Some of these bodies also have partial metering mode (IIRC, FTb has partial metering mode only).
Thanks. |
Aphototaker
Tinkerer
Username: Aphototaker
Post Number: 43
Registered: 12-2009
Rating: N/A
Votes: 0 (Vote!) | | Posted on Thursday, January 07, 2010 - 10:42 am: |
|
Google helped a bit. And after playing around a bit with the variable resistors (pots) beside the viewfinder, I seem to have eventually figured it out. The two pots beside the viewfinder (the right hand side pots of the three) are the ones I tweaked.
The meter adjusted at three settings.
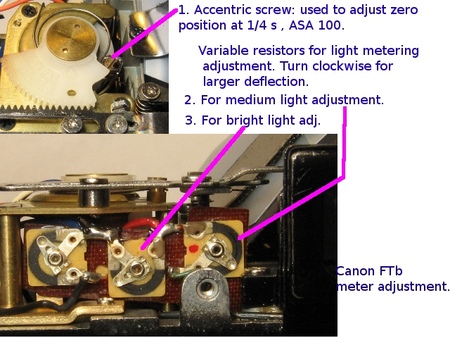
Zero setting is done at 1/4s at ASA 100. At this position, the needle must rest at the lower black warning mark. It should be more or less parallel with the slant of the mark (it will be pointing at around 8'o clock position).
Medium light adjustment is done with the right most var. resistor (the one beside the viewfinder).
Bright light adjustment is done with the next one (middle one of the three).
Also, rotating the contact point of the variable resistors in the clockwise direction results in larger deflection of the needle, thus resulting in smaller aperture setting for proper exposure.
So if one's FTb is over-exposing (i.e. smaller deflection of the needle, resulting in larger aperture setting) in bright light, one should rotate the middle variable resistor a bit clockwise. This would result in larger deflection, hence a setting of a smaller aperture would be required.
The reference meter I used for calibration was an EOS 5 set in partial metering mode.
Here is a picture to illustrate the method.
 |
|
|