| Author |
Message |
    
Der_uli
Tinkerer
Username: Der_uli
Post Number: 1
Registered: 05-2010
Rating: N/A
Votes: 0 (Vote!) | | Posted on Wednesday, May 19, 2010 - 08:45 am: | 


|
Hello to all!
I found this forum through a search for documentation of a Vivitar Series 1 Zoom - there are some related posts in the 2005 archive. I was quite surprised that there are a lot of people doing things to photographic equipment that other forums try to discourage!
Anyway, as a newbie I have to try out how to post.
Here's a picture of the Vivitar. The pin operating the iris diaphragm broke (green arrow).
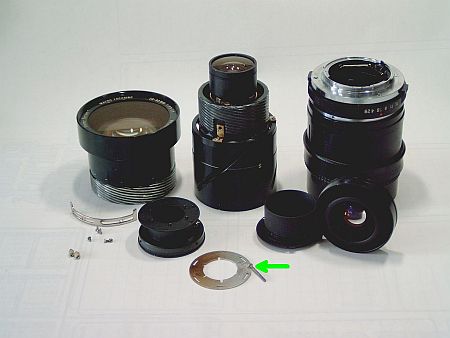
Glueing it back in place didn't work, soldering didn't stick - the pin is brass but the ring is aluminium. Next I will try to braze it!
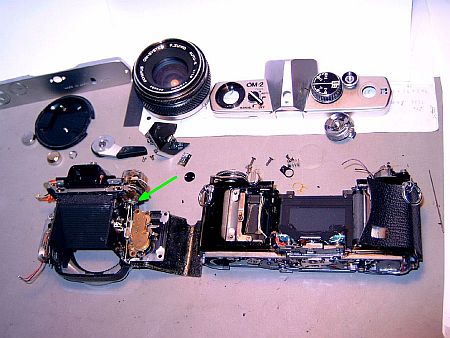
The following was an older repair task of an Olympus OM-2. A tiny string which couples the time ring with the internal parts got loose...
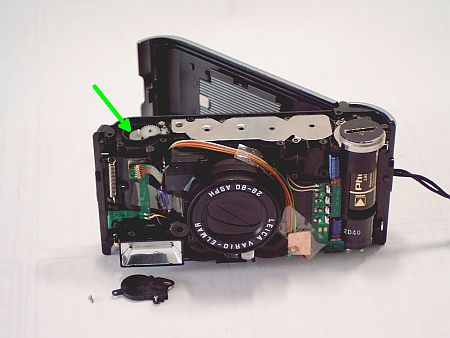
Maybe the following Leica C3 is too new for this forum? There is a mechanical fault in the film transport gear. As Leica does no longer supply parts for analog cameras, I had to order a six-toothed, 2mm diameter M0.2 gear wheel here. I'm still waiting for it's arrival.
Now that's enough or a first post. The next weeks I will have to browse through all older topics here!
-uli |
Monopix
Tinkerer
Username: Monopix
Post Number: 129
Registered: 11-2008
Rating: N/A
Votes: 0 (Vote!) | | Posted on Wednesday, May 19, 2010 - 02:57 pm: |
|
Hi Uli, I'd say you're qualified. Welcome to the forum. |
M_currie
Tinkerer
Username: M_currie
Post Number: 228
Registered: 07-2006
Rating: N/A
Votes: 0 (Vote!) | | Posted on Wednesday, May 19, 2010 - 04:07 pm: |
|
I think you're plenty qualified, and courageous as well, but I don't think you'll have luck trying to braze brass to aluminum. If you can somehow drill a neat enough hole in the end you might be able to get a little screw into it. If it was swaged in, you could try to re-do that, but it's likely that the hole is a bit sloppy, and you'll have difficulty getting anything tight enough to keep from wobbling and working loose again.
Good luck, anyway, with all the projects. |
Der_uli
Tinkerer
Username: Der_uli
Post Number: 3
Registered: 05-2010
Rating: N/A
Votes: 0 (Vote!) | | Posted on Monday, May 31, 2010 - 03:59 am: |
|
I've found a solder that sticks to both brass and aluminium! It's a zinc-based alloy that is sold here as "Aluminium Weichlot". It melts around 420 deg. Celsius, which was within reach of my electronics soldering gun. But unfortunately, the flux (potassium fluoride?) needs a minimum of 500 �C. This is pretty close to the melting point of aluminium! The heatgun I tried first blew everything away, so I had to take a pencil torch - and burned a big hole into the aluminium :-O
Now I have to make a new plate exactly like the one with the green arrow in my first picture. Fortunately I scanned it before soldering.
Since my precision machinig skills aren't good enough for this task, I'm thinking of a photo-etching process... any hints are welcome.
-uli |
Charlie
Tinkerer
Username: Charlie
Post Number: 240
Registered: 07-2006
Rating: N/A
Votes: 0 (Vote!) | | Posted on Monday, May 31, 2010 - 04:40 am: |
|
Do you know how the brass pin and aluminum ring were attached in the first place? If you found a pin with a large flat head, that might give you enough surface area for epoxy to hold. |
Der_uli
Tinkerer
Username: Der_uli
Post Number: 4
Registered: 05-2010
Rating: N/A
Votes: 0 (Vote!) | | Posted on Tuesday, June 01, 2010 - 07:34 am: |
|
They seem to have been swaged or riveted together... the hole in the ring was slightly conical and the pin's end was hollow and spread out a bit. Cyanacrylate glue didn't hold them together. Furthermore, the inner side of the aluminium ring has to be absolutely flat because it slides directly over the diaphragm blades. There is no room for any screw, head etc..
-uli |