| Author |
Message |
    
Donyet
Tinkerer
Username: Donyet
Post Number: 10
Registered: 06-2009
Rating: N/A
Votes: 0 (Vote!) | | Posted on Thursday, July 01, 2010 - 08:22 am: | 


|
Now that I have access to the shutter on my Yashica-Mat LM, it's time to figure out what is wrong with it.
The shutter is in the closed position at the moment. When I cock the shutter and press the release button nothing happens. The lever that's connected to the shutter moves fine, and the lever coming out of the shutter that meets the lever from the release moves fine as well, but the shutter itself just sits there frozen.
I haven't actually opened up the shutter itself yet, I will do that tonight and see if it's something obvious.
What signs should I look for in case someone jammed the shutter by putting it on 'M' and using the self-timer? Would the shutter be jammed in the closed position? How would I go about un-jamming it?
If I can learn to do this, it would be a valuable skill to have in my quest to resurrect these old cameras.
Thanks for your help!
Alex |
Mareklew
Tinkerer
Username: Mareklew
Post Number: 118
Registered: 03-2010
Rating: N/A
Votes: 0 (Vote!) | | Posted on Thursday, July 01, 2010 - 12:16 pm: |
|
First step is to determine, whether the shutter cocks and releases, but doesn't open, or it is cocked and can't get released.
The shutter is an independent sub-assy, so you can move the cocking lever and the release lever by hand, there are no interlocks with the camera mechanics (double exposure prevention is implemented by inhibiting re-cocking the shutter, not within the shutter itself). Operate these levers and listen, if the shutter goes 'click'.
AS to the M-X lever: does it move freely now, and does the shutter make slight whirring sound when moving it? (it makes this slight sound only when moving the lever one way, not the other).
If there's no mechanical damage, most likely it's lubricant that migrated into the activator ring/shutter leaves and dried there, gumming things up.
Marek |
Donyet
Tinkerer
Username: Donyet
Post Number: 11
Registered: 06-2009
Rating: N/A
Votes: 0 (Vote!) | | Posted on Thursday, July 01, 2010 - 02:33 pm: |
|
Thanks Marek,
The M-X lever does indeed make the whirring sound when I set it from X to M, which is what my working Yashica-Mat does, so I think that part may be fine.
When I cock the shutter with the cocking lever, and press the shutter release button there is no 'click' evident.
Your idea about the hardened lubricant sounds plausible, as from what the previous owner told me the camera has not been used for over 40 years. Maybe I should think about cleaning the shutter with some naphtha lighter fluid and see what happens.
What do you think?
Thanks,
Alex |
Donyet
Tinkerer
Username: Donyet
Post Number: 12
Registered: 06-2009
Rating: N/A
Votes: 0 (Vote!) | | Posted on Thursday, July 01, 2010 - 02:35 pm: |
|
Oh and yes, I've tried operating these levers directly on the shutter and still no 'click'. |
Mareklew
Tinkerer
Username: Mareklew
Post Number: 120
Registered: 03-2010
Rating: N/A
Votes: 0 (Vote!) | | Posted on Thursday, July 01, 2010 - 03:08 pm: |
|
How hard is the tensioning lever to move?
If the shutter is cocked (and can't get released) you press only against a weak return spring that makes the lever go back after cocking shutter. If the shutter isn't cocked because the main catch isn't catching, you pull against the main spring and the lever will be much harder to operate.
Can you wind and set off the self timer? Does it release anything when it winds down?
Anyway:
Rule number one: don't just flush it with naphta. It's old shutter and if you just do it, you will get all the grit onto the shutter (and aperture) blades and it will still not work, just get harder to clean.
Now, before I try to describe the process of CLA on a Copal, do tell me, how much experience you have, so that I can skip the obvious and cut to the pudding.
- Did you ever take a diaphragm apart?
- Do you have proper tools? You'll need fine flat-blade screwdrivers with about 2.5 - 3mm wide sharp blades, tweezers (sharp as well as flat-ended), trays for parts, some sort of shutter tester (photodiode+mike jack...), preferably an ultrasonic bath, fine watch oil and patience.
What you are facing is (unless all the mess is just jammed self timer) is what I call a two-thirds shutter strip-down. You will remove main shutter assembly modules as whole units (the retarder and delay timer), and then completely disassemble the shutter leaves-and-activator-ring part. All the cogs and gears remain in their respective assemblies, so the hardest part (the last third) is spared, but reassembling the leaves is a challenge if you do it first time.
Marek |
Donyet
Tinkerer
Username: Donyet
Post Number: 13
Registered: 06-2009
Rating: N/A
Votes: 0 (Vote!) | | Posted on Thursday, July 01, 2010 - 08:21 pm: |
|
Hello Marek,
To be honest I've never taken apart a diaphragm on a camera. I may need the full descrition if you have the time.
The timer does not work, although now that I've tried testing it I now have both the timer lever and the M-X lever down. Now I will certainly need to fix the shutter to put the camera back together, which is good incentive.
I have all the tools except the shutter tester and ultrasonic cleaner. I can probably get the ultrasonic cleaner this weekend, I have a place close by that sells them for a good price and they are usefull for all manner of projects.
If you don't mind, you may give me instructions on the disassembly of a Copal shutter. I am a detail oriented person with great patience so it is do-able. If anything, I can shelve the project with your detailed instructions for another time when I have all the tools at my disposal.
I'm sure your detailed instructions will be valuable to many on this forum.
Thanks,
Alex |
Donyet
Tinkerer
Username: Donyet
Post Number: 14
Registered: 06-2009
Rating: N/A
Votes: 0 (Vote!) | | Posted on Thursday, July 01, 2010 - 08:26 pm: |
|
Oh and yes, the cocking lever was quite easy to turn and there was little resistance when I would do the cocking motion to return it back to position. I have the camera disassembled at the moment so I can't test that right at this moment. |
Donyet
Tinkerer
Username: Donyet
Post Number: 15
Registered: 06-2009
Rating: N/A
Votes: 0 (Vote!) | | Posted on Thursday, July 01, 2010 - 08:56 pm: |
|
If it helps, I think the shutter is jammed in the cocked position. |
Mareklew
Tinkerer
Username: Mareklew
Post Number: 121
Registered: 03-2010
Rating: N/A
Votes: 0 (Vote!) | | Posted on Friday, July 02, 2010 - 12:22 pm: |
|
Okay, sorry for the delay, I'm on holiday.
At each step it's a good idea to take a picture of what you are going to remove with a digicam or even a better camera phone. Especially pay attention to spring ends (their hook points as well as which way around they get mounted). Also, if you remove a screw that had some washers, arrange the washers and springs etc. in a row in order how they were mounted, with up-side up and take a picture. It's invaluable!
Use Scotch/3M invisible document tape (it looks like waxed paper, tears easily and is removable) to tape small washers etc to a piece of paper with a note where did they come from. Some washers aren't, they are shims, and although they look identical, they aren't: they might differ in thickness by 0.05mm. Luckily, not many of these in a Yashica.
Step 0: remove lens bezel (4 small screws) and outer front bezel (another 4 small screws). On some Yashicas these screws are of different size (4 such and 4 other), so have a look.
Step 1: remove the lens plate from the camera (4 obvious screws on the front). Yashicas don't have shims under the lens plate put in the factory, but if the camera was serviced and found with bad focus it could have been shimmed later. So pay attention to any washers between the lensplate and the focusing arms that the screws went into.
Step 2: Remove front lens group of the taking lens. It unscrews as a whole piece (all that black part) out of the shutter. Put it in a clean new zip-lock bag to prevent from getting dirty and scratched.
Step 3: Remove two springs that connect levers around the shutter assy with the lens plate. There's a third spring that's within a lever rotating around the lens, you don't need to remove that one.
Step 4: Unsolder the flash sync cable from flash sync socket. Remove the rear element shade (the outer tube). It holds the shutter in the lensboard. There are going to be several rings and levers free, note their order and position, as well as which way do they face.
Between ths shutter and the lens board there will be few shims and rings, that might 'stick' to the shutter and fall down later - carefully try to dislodge them all, none are screwed, just might be crimped a bit too hard the last 50 years. Save all shims noting their order.
Step 5: remove the rear lens element, it unscrews just like the fron one. Put it in a plastic bag too. Put the lens board with the viewing lens aside, wrapped in something soft to protect the viewing lens.
T.B.C |
Mareklew
Tinkerer
Username: Mareklew
Post Number: 123
Registered: 03-2010
Rating: N/A
Votes: 0 (Vote!) | | Posted on Friday, July 02, 2010 - 12:43 pm: |
|
Now you should have the shutter in your hands.
Step 6: The front is held by a notched ring. This ring is a screw nut - it unscrews, but is secured by means of either a normal tiny screw, or an eccentric latch. Either you need to unscrew the small screw, or just turn it 1/2 turn to let the ring be removed. Before you do, make a mark on the notched ring, in which notch the small screw was, so that you know, how far to tighten it later.
Step 7: After removing the ring, remove the lens faceplate (don't worry, it can be put only one way around) and the setting cam (the plate with many cut-outs). Try to remember, which way did it go in, but it fits only one way anyway.
There's a small lever that's responsible for the shutter speed setting 'click-stop'. It can fall out as it's not fixed in any way. Locate it and put it somewhere safe.
Now take a picture of the works and post it here. All Copals are very close in build, but there are some differences anyway.
Step 8 that you may try already anyway: The delay timer assembly is fixed only by putting it on ONE pin. It's held down by small E-clip or similar. Remove this clip carefully, it likes to jump! Now you should be able to wiggle the delay timer out of its place, use tweezers to help the spring on top of it go around the bulge of the center column (look on the shutter, it's obvious, even if the description is confusing). Hold the assy by the timer lever.
Now I have to go, send me a mail to mareklew [sign-with-tail] web dot de once you post some pictures of the open shutter, I'll get back to you.
Marek |
Donyet
Tinkerer
Username: Donyet
Post Number: 16
Registered: 06-2009
Rating: N/A
Votes: 0 (Vote!) | | Posted on Saturday, July 03, 2010 - 09:01 pm: |
|
Hello Marek,
Here is the shutter, open to the world.
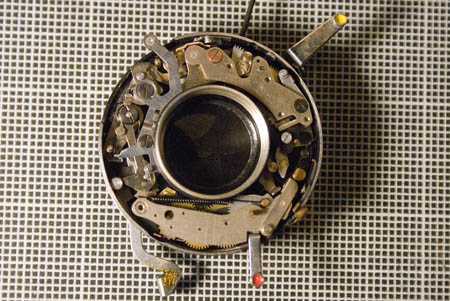
I was not sure what you meant by 'E' clip in regards to the self-timer assembly.
Here is a photo of the self-timer assembly. Please advise as to where the clip I need to remove resides.
Thanks,
Alex |
Mareklew
Tinkerer
Username: Mareklew
Post Number: 124
Registered: 03-2010
Rating: N/A
Votes: 0 (Vote!) | | Posted on Sunday, July 04, 2010 - 01:36 am: |
|
Alex, right now I'm hanging on GPRS connection, so I will not be able to uplooad pictures, too slow. I will try to describe as much as I can, the rest will have to wait till Tuesday.
1. Identifying what is what:
- From about 11 o'clock till about 3:30 you have the speed selector/retarder unit. That's responsible for every shutter speed slower than the shortest.
- from about 4 till 8 o'clock you have the self-timer
- 8 to 10 o'clock sits the release assy responsible for M/X sync and B 'speed'.
- 10-11 is the main spring shaft with cocking lever and main latch
tbc, pc neeeds reboot
Marek |
Mareklew
Tinkerer
Username: Mareklew
Post Number: 125
Registered: 03-2010
Rating: N/A
Votes: 0 (Vote!) | | Posted on Sunday, July 04, 2010 - 02:04 am: |
|
Note: from now on I suggest you wear thin latex/rubber household gloves. Skin oil corrodes and there are parts here that rely on smooth sliding against each other. Check the gloves' fingertips often and replace them as soon as they get mucked up with grease or dirt. In Germany you can get such gloves in a pharmacy for 6EUR per 100. They aren't resistant against solvents though.
The self timer assembly sits on the pin that its lever rotates around. In your photo about 5 o'clock, in the centre of the cogwheel to which the black spring is attached. In Copal MX-V there's a small e-clip-type ring on that pin preventing the self-timer from riding up and off. Your shutter is a slightly earlier model. Inspect the assy close, it might be so, that it also had a clip there and it's gone for some reason and the timer now popped up a little, else you'd be able to see a undercut in the pin where the e-clip sat. If there was a clip and isn't now, it well might be somewhere loose in the shutter locking it up.
Wiggle the whole self timer a bit and see if it's fixed anywhere else (as said, in later Copals it isn't) and try to lift it up. The long black spring will sure prevent it somewhat, hanging on the edge it touches, use a pin to ease it around - don't unhook the spring!
The small flat lever with a pin, that sits on top of the self timer assembly, is the shutter speed click-stop thing, it can be just lifted off, pay attention not to lose it when manipulating the unit.
As soon as you lift the self timer a little, it should disengage and try to unwind. That's okay, it has an internal stop (won't unwind away). You have to let it unwind enough, so that the silver cog wheel that the black spring is attached to clears the shutter centre part. Look, there is a part with teeth missing, it has to face the centre column.
Once you get the self timer out, inspect the mounting pin again. If you determine, that it is shaped as to accept a locking ring, you have to assume this clip-ring is on the loose inside the shutter. This would make things harder, because while it would be most likely the reason of malfunction, it might damage the works if the shutter is actually released.
If there wasn't ever a clip (mounting pin straight smooth without cuts, edges or anything), try to release the shutter. Don't worry, at this point no parts should go flying if you try.
Post your findings. I have to go now, will try to get back to you today, but can't promise it. I will be on-line tomorrow (German time) again.
Marek |
Donyet
Tinkerer
Username: Donyet
Post Number: 17
Registered: 06-2009
Rating: N/A
Votes: 0 (Vote!) | | Posted on Sunday, July 04, 2010 - 11:54 pm: |
|
Hi Marek,
I was out on a day trip today and didn't get to the shutter.
I will certainly keep an eye out for a possible 'E' clip loose inside the shutter. I will post my findings as soon as I get back to it.
Thanks,
Alex |
Donyet
Tinkerer
Username: Donyet
Post Number: 18
Registered: 06-2009
Rating: N/A
Votes: 0 (Vote!) | | Posted on Monday, July 05, 2010 - 01:33 pm: |
|
Hello Marek,
I finally fgured out the self-timer and what was keeping it attached. This design has a small screw similar to the screw that keeps the shutter cover nut from turning. One quarter turn let the self-timer loose. I added arrows pointing to this feature.
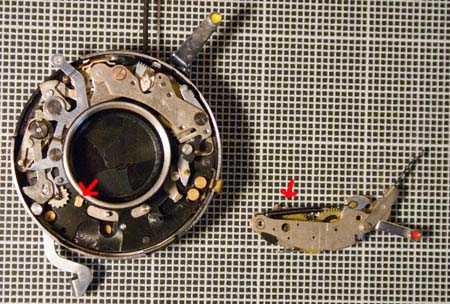
I tried the shutter now that the timer is off and it is still jammed. Are there any levers I should wiggle first and make sure before I begin disassmbly?
Thanks,
Alex |
Mareklew
Tinkerer
Username: Mareklew
Post Number: 127
Registered: 03-2010
Rating: N/A
Votes: 0 (Vote!) | | Posted on Tuesday, July 06, 2010 - 01:33 pm: |
|
Identifying parts II:
description follows in next post. |
Mareklew
Tinkerer
Username: Mareklew
Post Number: 128
Registered: 03-2010
Rating: N/A
Votes: 0 (Vote!) | | Posted on Tuesday, July 06, 2010 - 02:46 pm: |
|
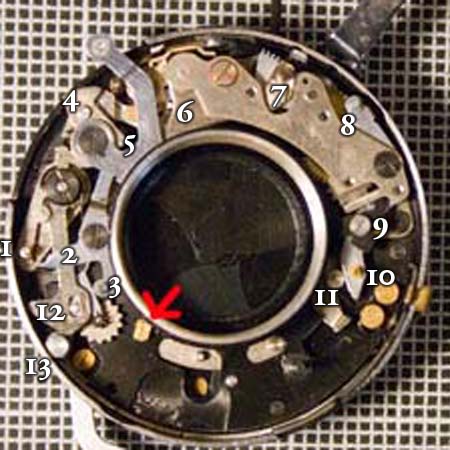
Pin 1 releases the shutter when moved inwards. Lever 2 with pin 3 is responsible for "B" setting. In position as it is now it will 'catch' the main latch in 'open' position (you can't see the interaction easily).
Part 4 is the main delay catch. It is in cocked position now, after release it will drop till corner 5 of the cocking lever. On its way it will hit lever 6 of the speed retarder. Pin 7 interacts with speed setting cam (the removed faceplate) and influences the point at which lever 6 'waits' for lever 4. The earlier it sits on lever's 4 way, the longer it will take to push lever 6 out of the way. Now exactly how slow lever 6 moves depends on two factors:
- Lever 8 switches gears. Depending on its setting the cogwheel coupling with escapement 9 will need to make more or less turns per mm of lever's 6 travel.
- pin 10 can lock the escapement 9 and let the wheels spin free.
1s, 1/2s and 1/4s: pin 8 on 'slow' pin 10 enables escapement.
1/8s 1/15s 1/30s: pin 8 on 'fast' pin 10 enables escapement
1/60s, 1/125s, 1/250s: pin 8 on 'fast' pin 10 locks escapement balance
Top speed: all locked, lever 6 does not interact with catch 4.
tbc |
Mareklew
Tinkerer
Username: Mareklew
Post Number: 129
Registered: 03-2010
Rating: N/A
Votes: 0 (Vote!) | | Posted on Tuesday, July 06, 2010 - 03:06 pm: |
|
- Pin 11 sits on shutter activator ring. This ring moves clockwise to open the leaves and ccw to close them again. it sits below the floor now, you can see it through gaps around the center part, between number 11 and 3. Flushing shutter with naphta usually deposits debris in the activator ring channel and retards its movement. Results in shutter moving reliably on all speeds, but always slow (albeit not so noticeably at slow speeds, that are easy to check).
This Pin 11 locks escapement 9 until shutter is released. As soon as shutter opens, and provided pin 10 isn't locked by speed selector cam, the escapement balance will drop towards escapement cogwheel and retard its rotation.
Parts 12 and 13 and the small cogwheel below form M-Sync delay. They cause the shutter release to be delayed by a small amount of time to let M-Bulb fire up.
Now, the funny thing is, the retarder module is in a position 'released', as if it was trapped by lever 4, which is, however, in cocked position. Use a toothpick to move pin 7 gently. It should be spring loaded, but the whole assy can be stuck due to old grease. Try releasing shutter using the main release lever. SOMETHING should move inside, notice what. If nothing moves, inspect the shutter bottom. Turning the aperture settin ring will let you at one position see the coupling between the release lever and inside mechanics. Check if it jumped. If it didn't, hold the release and wiggle pin 11 with a toothpick (press south as in the picture, don't force), as well as move lever 3 around.
Pull cocking lever as if you wanted to cok the shutter and have a look underneath - there is X-Sync contact with a fine spring. If it got lost into the mechanics that surround it, it could have jammed things.
The retarder assembly can be taken out for cleaning by removing the flat-headed screw between 6 and 7, as well as the recessed screw to the right of 9. DON'T remove the screw between 8 and 9! Under the assembly there are going to be shims, either one big or two small, they might stick to the bottom plate of the retarder, so beware. You can bath the whole retarder assy in lighter fluid for few hours exercising its gears every hour or so.
Marek |
Donyet
Tinkerer
Username: Donyet
Post Number: 19
Registered: 06-2009
Rating: N/A
Votes: 0 (Vote!) | | Posted on Tuesday, July 06, 2010 - 07:51 pm: |
|
Hi Marek,
I tried wiggling the levers you mentioned with a toothpick and they are all pretty jammed. It feels jammed in a mechanical way as opposed to old grease.
I did notice one thing that may give you a clue. When turning the aperture ring it felt as if there was something snagging it. The aperture leaves look good though, and the shutter leaves as well. Could there be a spring from the shutter snagging the aperture? They seem to share a very close space to each other.
Alex |
Mareklew
Tinkerer
Username: Mareklew
Post Number: 130
Registered: 03-2010
Rating: N/A
Votes: 0 (Vote!) | | Posted on Wednesday, July 07, 2010 - 07:41 am: |
|
I put a lot of work in describing things. Invest at least equally much time in answering all my suggestions with your observations, not only the very last sentence.
Else all my attempts to help you are void.
Marek |
Donyet
Tinkerer
Username: Donyet
Post Number: 20
Registered: 06-2009
Rating: N/A
Votes: 0 (Vote!) | | Posted on Wednesday, July 07, 2010 - 09:17 am: |
|
Hi Marek,
Sorry about that.
When I moved pin 7 gently, it felt jammed but there was a very slight movement of the gears in the area between 8 and 9.
Moving the main shutter release lever did nothing I could see, and I noticed that the catch that connects to lever 4 disengages but lever 4 is frozen. At this point I did what you mentioned and moved the aperture ring and noticed intermittent resistance as if it was snagging on something.
Lever 3 moves when the release lever is not pressed, but nothing else moves. When I held the release lever down and wiggled pin 11 it also did not move.
I will have to take another look and make sure I know what I'm looking at in regards to the X-sync contact. Can you point to the location I should be looking at for the fine spring?
I did not take out the retarder assembly yet, I wanted to make sure you thought it appropriate to take it out at this time.
Thanks,
Alex |
Donyet
Tinkerer
Username: Donyet
Post Number: 21
Registered: 06-2009
Rating: N/A
Votes: 0 (Vote!) | | Posted on Wednesday, July 07, 2010 - 09:22 am: |
|
When I mentioned lever 3 I meant pin 3. |
Mareklew
Tinkerer
Username: Mareklew
Post Number: 131
Registered: 03-2010
Rating: N/A
Votes: 0 (Vote!) | | Posted on Wednesday, July 07, 2010 - 10:47 am: |
|
AAAAAAAAAARGH 15 minutes typing and board server returns an error :/
1) does anything happen when you press pin 1 towards shutter center?
2) nothing -> When pin 1 is pressed towards center, can you move lever 4 clockwise? (use a small screwdriver in case it just unlatched, it's spring-loaded!)
3) In a cocked shutter pin 7 should move freely restricted only by a weak spring and inertia of all the wheels, so moving it would result in a whirr of spinning cogs. Necessary force is less than cocking shutter and comparable to spring on shutter release. Since this seems not to be the case, you have one problem pinned: most likely dried (wrong) lubricant in the works. This would not be the only problem here, but might be the base of all problems, i.e. stuck retarder wouldn't stop shutter from opening, but bad lubricant might have stuck all mechanics up equally.
Remove the retarder as described above (two screws). Make sure your screwdriver is as wide, as screw head, if necessary, file the screwdriver blade down to make it sharper - it has to get into the groove DEEP. These two screws can be pretty tight and they are rather soft, so don't strip them.
Cleaning:
- put it for an hour into lighter fluid before you even try to move it. Then satisfy your curiosity and try moving the levers. If they got unstuck, but are somewhat hard to move, or even move free now, leave the assembly in the bath overnight. If you can, move it form time to time.
- If after one hour in fuel nothing budged and there isn't any obvious foreign object in the works, dunk it into WD40 or any light, penetrating oil overnight. This is usually better to soften-up sticky old grease. After a night in oil change the bath to lighter fluid (coleman fuel) to wash away oil+gunk.
Ultrasonic cleaned will help, but be VERY careful with fuel! it heats up liquids by ultrasonic power alone and might boil your bath, which would lead to a lot of explosive fumes.
If neither helped, report.
4) X-Contact is the hat-shaped piece of orange-shiny metal above #6, touching the outer wall almost. If you move cocking lever out of the way you will see its pivot point, a screw. There should be a fine thin spring of copper/bronze loading the contact. I'll post a photo later. Check that spring, it's easily dislocated.
Marek |
Mareklew
Tinkerer
Username: Mareklew
Post Number: 132
Registered: 03-2010
Rating: N/A
Votes: 0 (Vote!) | | Posted on Wednesday, July 07, 2010 - 12:11 pm: |
|
http://img651.imageshack.us/img651/8859/201003232103005611.jpg
The yellow metal is the X-Sync contact. The half-circle pin is connected to activator ring, as soon as it gets released (towards the left in the photo) it releases the X-contact and the small copper-colored spring presses it against the outer shutter wall.
Marek |
Donyet
Tinkerer
Username: Donyet
Post Number: 22
Registered: 06-2009
Rating: N/A
Votes: 0 (Vote!) | | Posted on Wednesday, July 07, 2010 - 09:52 pm: |
|
Hi Marek,
Here is the report so far:
I looked at the X-contact area and everything seems to be there and in the correct position.
You: 1) does anything happen when you press pin 1 towards shutter center?"
Yes, the shutter release lever moves, this disengages lever 4, but lever 4 stays jammed.
You: 2) nothing -> When pin 1 is pressed towards center, can you move lever 4 clockwise?
No, lever 4 does not move when pin 1 is pressed toward center.
I have removed the retarder and have it soaking in lighter fluid right now. I will report on it later. The gears were definitely jammed by something, hopefully this will loosen them.
I tried moving what is left of the shutter mechanism on the shutter and it is still jammed. Since both the retarder and self timer are out, I guess this is not good news.
I will get back to you as soon as I can.
Thanks,
Alex |
Mareklew
Tinkerer
Username: Mareklew
Post Number: 134
Registered: 03-2010
Rating: N/A
Votes: 0 (Vote!) | | Posted on Thursday, July 08, 2010 - 03:07 am: |
|
I'm out for a day, so more will follow later:
no, it's not bad news. The rest of the shutter is pretty much unbreakable by user input, so if the retarder is okay after cleaning, I'd say you are facing a stripdown but chances to fix it are good.
If after soaking in lighter fuel the retarder works, I'd try dunking the whole rest of the shutter too. Just use fresh fuel in - if available - ultrasonic cleaner. Let it soak for few hours first and then activate ultrasonic action, again few hours still and so on. At the end flush it again with fresh fuel.
It will most likely not save you from disassembling the shutter, but it will make the disassembly easier and you can test the shutter before taking it apart.
Marek |
Donyet
Tinkerer
Username: Donyet
Post Number: 23
Registered: 06-2009
Rating: N/A
Votes: 0 (Vote!) | | Posted on Thursday, July 08, 2010 - 07:36 am: |
|
Hi Marek,
I soaked the retarder overnight, only because I had placed it in the fuel right before going to bed. The gears seem to be working this morning when pin 8 is nudged towards the "center". I don't know how much movement I should be expecting from lever 6 / pin 7 but it is only slight.
I will begin soaking the rest of the shutter in fuel when I get back from work today and report.
Thanks,
Alex |
Donyet
Tinkerer
Username: Donyet
Post Number: 24
Registered: 06-2009
Rating: N/A
Votes: 0 (Vote!) | | Posted on Thursday, July 08, 2010 - 07:48 am: |
|
The little 2/5 part-round gear below pin 7 may not be meshing well with the small black gear it is in contact with. There is barely perceptible movement of this gear when I nudge pin 8 towards "center". Nudging pin 7 or lever 6 barely moves anything, the only reason it moves seems to be due to play between gears, not actual gear movement. Does this sound normal?
Thanks,
Alex |
Mareklew
Tinkerer
Username: Mareklew
Post Number: 135
Registered: 03-2010
Rating: N/A
Votes: 0 (Vote!) | | Posted on Thursday, July 08, 2010 - 01:00 pm: |
|
No, it doesn't Lever 6 moves in a healthy shutter by some 45-60� (1/8th-1/6th of a full turn) causing all other gears to spin several times around.
Pin 8 only switches gears, like the gearbox in a car. When pressed 'in' (towards center of the shutter) it will make some gears shift around and change meshing, but not spin. I'm not sure if I explained it clearly...
Marek |
Donyet
Tinkerer
Username: Donyet
Post Number: 25
Registered: 06-2009
Rating: N/A
Votes: 0 (Vote!) | | Posted on Friday, July 09, 2010 - 08:50 am: |
|
Hi Marek,
I'll soak the retarder in WD40 per your earlier instructions, as something is still binding it.
Is there anything else I should do to the retarder at this point? Is it too risky to take it apart, or at least for a newby like me to take it apart.
I will report on how the shutter itself is doing later.
You've explained everything clearly, and I am learning quite a bit about Copal shutters because of it.
Thanks,
Alex |
Mareklew
Tinkerer
Username: Mareklew
Post Number: 136
Registered: 03-2010
Rating: N/A
Votes: 0 (Vote!) | | Posted on Friday, July 09, 2010 - 10:29 am: |
|
The only thing I'd do to the escapement at this point is to inspect it very close for any foreign objects - hair, piece of wire, etc - that might be tangled between the teeth.
Also, have a look if the pin 8 really moves gears around. I'm not sure, it might be possible to find a middle setting where BOTH gear ratios are engaged at the same time, which would sure jam the shutter. I have no open Copal at hand, I can only talk from memory, but I hardly believe this possibility exists. As far as I remember it's a break-before-make switch, so the first gear unmeshes before the second gear makes contact. Check anyway.
I would avoid taking escapement apart as far as possible. There's the return spring that is rather delicate and needs to be pre-tensioned to a defined point (which I do not know), leave alone that it is most likely crimped in place and would be damage if you took it out.
I would first take a toothpick and try to gently move each wheel separately. There's always a little play between the teeth, so step by step you could figure out which one are stuck themselves, and which can't move because their neighbors don't. I think it is likely, that the lever 6 is stuck to the escapement cover - there's a large area of metal that touches another metal and a drop of dried-up oil can do wonders about gluing these.
If this is the case, you might even try taking acetone to work at it, just be careful - it's very volatile and should never be used in an ultrasonic bath (unless you REALLY know what you are doing). Turpentines, especially citrus-based cleaners can also help against gummed up natural oils, but they are more often corrosive than not, and require thorough cleaning (preferably with disassembly) afterwards, so that's the last resort.
Good luck!
Marek |
Donyet
Tinkerer
Username: Donyet
Post Number: 26
Registered: 06-2009
Rating: N/A
Votes: 0 (Vote!) | | Posted on Saturday, July 10, 2010 - 10:15 pm: |
|
Hello Marek,
Here is the report so far.
The good news is the shutter itself has come back to life after 48 hours in lighter fluid.
I found the problem with the retarder as well. I found the gear that is jammed. Even after 24 hours in acetone this gear refuses to move. I have drawn a crude diagram pointing out the problem gear.
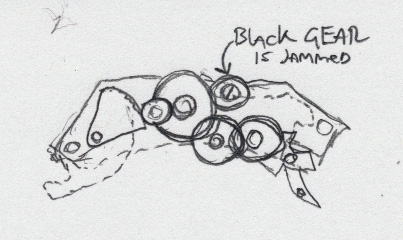
It is a black gear in the "shifter". There is a screw holding it in, which seems hard to reach unless the retarder is dismantled. All the other gears turn except this one. I checked the play up and down to see if there was anything between the teeth and it seems clear. There must be something binding it to the frame of the retarder.
I will wait for your recommendations.
Thanks,
Alex |
Mareklew
Tinkerer
Username: Mareklew
Post Number: 140
Registered: 03-2010
Rating: N/A
Votes: 0 (Vote!) | | Posted on Sunday, July 11, 2010 - 05:11 am: |
|
If I remember correctly, this gear moves on an axle (i.e. it has a hole in the middle), as opposed to other gears, that move with their respective axles set in bushings. If it is so, then I'd say, that's the reason: contact area is much bigger and much harder to reach, so gummed up oil will effectively prevent it from spinning and at the same time be very hard to flush.
Before you start dismantling the escapement, give it still a ay or two in solvent. Even if it doesn't budge still, it will be easier to take apart. When you do, have a look which gear has a spring attached to. Use some tape to secure this gear against spinning off. Take photos of each gear meshing point so, that you can later use it as a reference. Lastly, use some marker pen to number the wheels (at least the bigger ones). Then take it apart...
Marek |
Donyet
Tinkerer
Username: Donyet
Post Number: 27
Registered: 06-2009
Rating: N/A
Votes: 0 (Vote!) | | Posted on Monday, July 12, 2010 - 10:47 am: |
|
Hi Marek,
I'll place the escapement in WD40 for a few days then back into solvent to see if that loosens anything before resorting to disassembly.
Thanks,
Alex |
Mareklew
Tinkerer
Username: Mareklew
Post Number: 142
Registered: 03-2010
Rating: N/A
Votes: 0 (Vote!) | | Posted on Monday, July 12, 2010 - 02:08 pm: |
|
I'd mix some solvent with this WD40, something nasty, go to the next car shop and ask for brake cleaner, ask for something made for workshops and not for ladies, if you have choice opt for the "chlorinated" environmentally unfriendly version (uses tetrachloride). This stuff is vile on old (and fresh) grease. Use in well ventilated area (i.e. deal with it outside or on windowsill with windows open). Lacking brake cleaner get carburetor cleaner. It might just be penetrative enough to get at the gummed grease inside your cogwheels.
Never use any of these on or in a proximity of plastic parts. Never torch-heat parts cleaned with tetrachloride before flushing them with white gas first.
Marek |
Donyet
Tinkerer
Username: Donyet
Post Number: 28
Registered: 06-2009
Rating: N/A
Votes: 0 (Vote!) | | Posted on Monday, July 12, 2010 - 06:42 pm: |
|
Hi Marek,
Tetrachloride is illegal in this part of the country, so I'll be trying something else. I'll take a look at what the local auto repair place has handy.
Thanks,
Alex |
Mareklew
Tinkerer
Username: Mareklew
Post Number: 143
Registered: 03-2010
Rating: N/A
Votes: 0 (Vote!) | | Posted on Tuesday, July 13, 2010 - 02:53 am: |
|
Then get either the revised-formula non-chlorinated brake cleaner, or the carb cleaner, they both are meant to remove stubborn stuff without eating aluminum, brass or steel.
Pity about banning tetrachloride. As with many other chemicals I'd rather see a prohibitively high tax set on it, like 1000%. It would prevent mass usage all the same, but you could get it for things that really need it. At $5 for 15ml bottle nobody would use it to flush brakes, but degreasing a shutter would still be doable.
Marek |
Donyet
Tinkerer
Username: Donyet
Post Number: 29
Registered: 06-2009
Rating: N/A
Votes: 0 (Vote!) | | Posted on Wednesday, July 14, 2010 - 11:20 am: |
|
I disassembled the retarder briefly to see if I could loosen the gear. It is still immovable, you would think it was welded on by how jammed it is. I re-assembled the retarder while I had everything fresh in my mind. At least I know how to do it and I might try again after it has been sitting in carb or brake cleaner for a day or two.
By what I saw, the gear has a large hole that slips onto a tube shaped pin, then it is held there by a screw. This gives the gear a lot of surface area for hardened lubricant to do it's thing.
I may re-assemble the whole camera again even before I fix this gear so I don't forget how everything goes together, then disassemble it and keep working on it. At least this way I'll get plenty of experience fixing Copal shutters and Yashica-Mat cameras.
I have several other cameras that use Copal shutters such as my several Canon Canonets. I think this experience is valuable.
Alex |
Donyet
Tinkerer
Username: Donyet
Post Number: 30
Registered: 06-2009
Rating: N/A
Votes: 0 (Vote!) | | Posted on Thursday, July 15, 2010 - 06:19 pm: |
|
Hi Marek,
It is currently sitting in what is sold here as brake cleaner. Even though it is not chlorinated, it still sounds like pretty nasty stuff. The ingredients include Acetone, Heptane, Methane, Toluene, and Carbon Dioxide.
If the gear does not move after a few day of sitting in this stuff, is there any way I could try to carefully turn the gear with plastic nosed pliers or something, or am I risking damage? Maybe I'll just leave it in the brake cleaner for a week or more and see what happens. That gear is quite stuck.
Thanks for your help. I never would have gotten this far without it.
Thanks,
Alex |
Mareklew
Tinkerer
Username: Mareklew
Post Number: 145
Registered: 03-2010
Rating: N/A
Votes: 0 (Vote!) | | Posted on Friday, July 16, 2010 - 12:04 pm: |
|
You are welcome, glad to see you progress!
If brake cleaner won't get it to move, I'd try getting a pair of rubber gloves and twisting the gear gently there and back, payint attention not to bend the lever and pin the gear is mounted on. If you can, remove the screw that's holding it, then do and take the gear off the shaft - as I said, if you can, screw might be stuck too.
Let's face it: if solvent soup topped with toluene won't bite, it's the point where any respectable gentleman is excused to consider the field of diplomacy exhausted and resort to weapons.
Marek |
Donyet
Tinkerer
Username: Donyet
Post Number: 32
Registered: 06-2009
Rating: N/A
Votes: 0 (Vote!) | | Posted on Friday, July 16, 2010 - 10:30 pm: |
|
Hi Marek,
Here is the latest report. I was successful in loosening the gear. There was some orange colored substance cementing it to the pin, possibly rust or old grease/oil. I put the retarder back together and put it back into the shutter. I also put the timer back into the shutter and closed everything up and put the camera back together for the moment just to make sure I could do it.
There is one problem which is probably something I did and will have to track it down. I'm sure you will probably know what I did wrong or where to look. When I cock the shutter on the camera, set the timer, and trip the shutter everything works perfectly, including shutter speeds in the 1/60 and above (I didn't check the slower speeds yet). The problem comes when I want to trip the shutter without the timer. The shutter gets stuck open when I do this, or waits a while before closing back up. Is this something having to do with the retarder? Or is it possible that when I put the shutter plate back on I didn't slip a pin into a slot somewhere?
I will be taking it apart again of course, but I'm still happy that I got most of it fixed and the shutter seems to be working aside from this problem.
Thanks,
Alex |
Mareklew
Tinkerer
Username: Mareklew
Post Number: 146
Registered: 03-2010
Rating: N/A
Votes: 0 (Vote!) | | Posted on Saturday, July 17, 2010 - 01:37 am: |
|
The problem you are encountering is most likely related to the release mechanism still having gunk in it. When you press the release button you trip the delay timer for magnesium flash (the delay escapement is locked when you set it to X, but the levers are still involved afair), and get the "B" setting lever involved (or it stays out of the way if set so by the cam faceplate).
However, when you use self timer, the part responsible for M-Sync is completely omitted and the main catch is triggered directly. You have to look for problems around the parts #2-3-12-13, or just soak it all in your wonder solvent (take the self timer out of it anyway, there are plastic parts in it, at least in later shutter revisions).
Marek |
Donyet
Tinkerer
Username: Donyet
Post Number: 33
Registered: 06-2009
Rating: N/A
Votes: 0 (Vote!) | | Posted on Sunday, July 18, 2010 - 11:43 am: |
|
Sounds good. I will do that.
Thanks,
Alex |
Donyet
Tinkerer
Username: Donyet
Post Number: 34
Registered: 06-2009
Rating: N/A
Votes: 0 (Vote!) | | Posted on Sunday, July 18, 2010 - 03:27 pm: |
|
Hi Marek,
The shutter is working in all settings now!
Now that everything on the shutter is working, I have yet to lubricate anything. To which points should I add the fine watch oil? Will I need any other oil or dry lubricant?
Thanks,
Alex |
Donyet
Tinkerer
Username: Donyet
Post Number: 35
Registered: 06-2009
Rating: N/A
Votes: 0 (Vote!) | | Posted on Sunday, July 18, 2010 - 03:34 pm: |
|
Hi Marek,
The irony is that while testing out the now working shutter, the cocking lever jammed. I guess that's the risk I take in restoring a camera that hasn't been used for 40 years.
I removed the front of the camera to isolate the cocking mechanism, and sure enough, it is the cocking lever. I wonder if something jarred loose and jammed a gear.
Should I start a new thread for this? How do you feel about helping me solve this new problem? In any case, I have gained some valuable knowledge thanks to you and I have a working shutter to show for it.
Thanks,
Alex |
Mareklew
Tinkerer
Username: Mareklew
Post Number: 150
Registered: 03-2010
Rating: N/A
Votes: 0 (Vote!) | | Posted on Monday, July 19, 2010 - 02:26 am: |
|
Watch it, the double exposure prevention is in the winding ratchet side, so if when putthing shutter back you misaligned the levers it won't release.
Check this first.
Marek |
Donyet
Tinkerer
Username: Donyet
Post Number: 37
Registered: 06-2009
Rating: N/A
Votes: 0 (Vote!) | | Posted on Tuesday, July 20, 2010 - 08:59 am: |
|
That may be the problem. I will take a look. |
Donyet
Tinkerer
Username: Donyet
Post Number: 38
Registered: 06-2009
Rating: N/A
Votes: 0 (Vote!) | | Posted on Wednesday, July 21, 2010 - 05:47 pm: |
|
Hi Marek,
You were right, I must have misaligned the levers. The camera is fine now.
At which points on the shutter should I place minute amounts of lubricant?
Also, do you think I may have future problems since I didn't take the shutter leaf assembly apart. I did give the shutter assembly two potent baths, one in the Naphtha and the other in the brake cleaner.
I hope this thread helped others with Copal shutter problems.
Thanks,
Alex |
Donyet
Tinkerer
Username: Donyet
Post Number: 40
Registered: 06-2009
Rating: N/A
Votes: 0 (Vote!) | | Posted on Thursday, July 22, 2010 - 04:06 pm: |
|
From what I've read, the Copal shutter does not need lubricant of any sort.
I will leave it dry unless I hear otherwise. The shutter seems to be working fine. What a long strange trip it's been...and now I have a working camera again.
Thanks,
Alex |
Mareklew
Tinkerer
Username: Mareklew
Post Number: 153
Registered: 03-2010
Rating: N/A
Votes: 0 (Vote!) | | Posted on Friday, July 23, 2010 - 07:28 am: |
|
Hi, sorry for late answer.
As for lubricating shutters:
It's better to leave it dry than use wrong lubricants, but best is to lubricate it right.
Many suggest (imho wrongly) using different sorts of graphite emulsions - graphite is abrasive and likes to migrate.
Try the shutter dry first. Remember, that it takes time for shutter to open and close. The leaves travel at constant speed. Shutter top speed is no delay, i.e. the leaves travel all the time never pausing. 1/500th (ideal) is 1/250th from first crack of dawn till the light goes out, but since the waveform is a triangle, the effective exposure is 1/500th.
Now, as soon as you close the aperture diaphragm, the shutter will "slow down". Closed diaphragm will 'cut' the top of the said triangle off - although the shutter leaves travel still, the 'hole' dos not enlarge anymore. At f:large-number-small-hole effective shutter speed will be about 1/250s.
Whatever shutter tester you take, make sure you understood the above.
When you diagnose shutter speeds of a leaf shutter like this one (no booster spring, top speed has no retarder action in), you take the reading at top shutter speed first (all readings at fully open aperture). You will get some number. It will 99% have nothing to do with the set shutter speed. now, the discrepancy will be either due to the shutter being dirty and old, or because you can't measure the leaf shutter right (no offence), doesn't matter. What you need is, write down this reading, assume shutter runs right and you measure right and you calculate offset from there. So, say, at your 1/500th you read 1/200th. 1/500th is 0.002s = 2ms. 1/200th is 0.005s = 5ms. So your reading offset is +3ms.
Why you do it, is: this error is systematic. At every speed the leaves open and close take same time to open and close. You can't determine easily whether it takes now 3ms longer tha it should, or you just measure at a wrong position/whatever. Slower speeds are achieved by inserting delay at the point where the shutter is fully open. So you now test 1/250th, 1/125th and so on. This is how:
Say, you test 1/125s:
1/125s is ideally 8ms long. It is 1ms for opening the shutter, 1ms for closing the shutter (effective) and 6ms delay.
you read 1/90s = 11ms.
Now, you know, that when you were to measure 2ms you did measure 5ms. So you take 11ms-3ms = 8ms. So your retarder part is running dead on.
This way you can determine whether the retarder is running dry okay, or not. If it turns slow on 1/250th, 1/125th and 1/60th, but not so on slower speeds, then it has too much friction. Try light watch oil on the gears' bearings. Once the fast speeds are right, check the slower ones too. If the fast ones are good but slow are off, then you may adjust them slightly by bending the single long 'nose' in the retarder's top plate at 3 o'clock.
The last and hard thing to check is to find out if the top speed is right. But at this point I'd say, put film in and compare shots at 1/500, 1/250 and 1/125s. Remember, that changig aperture will anyway drive your effective exposure at fast speeds by even a stop off, so you are not after absolute consistency, rather after finding out if 1/125-1/500th don't overexpose badly.
Marek |
Donyet
Tinkerer
Username: Donyet
Post Number: 41
Registered: 06-2009
Rating: N/A
Votes: 0 (Vote!) | | Posted on Friday, July 23, 2010 - 11:07 am: |
|
Hi Marek,
Thanks for the detailed instructions, I will print this out and use it as reference.
I don't have a shutter speed tester at the moment, but I will take a look at those plans I've heard about for making your own.
So far, the retarder is turning well at 1/250th, 1/125th and 1/60th as far as I can tell without a tester. This goes for the speeds from 1/4th to 1/30th of a second as well, at least from what I could tell. I did get some sticking from 1/2 sec and slower, so I will check the retarder for that. The B setting was fine.
I've run a roll through the camera, but not with testing shutter speeds in mind. I will run another roll through with this test in mind.
I will report back when I get further along.
Thanks,
Alex |
Ron_g
Tinkerer
Username: Ron_g
Post Number: 40
Registered: 07-2009
Rating: N/A
Votes: 0 (Vote!) | | Posted on Friday, July 23, 2010 - 01:46 pm: |
|
Thanks for posting that Marek,that is excellent info,as is most everything else you pass on to us.Ron G |
Denny
Tinkerer
Username: Denny
Post Number: 43
Registered: 08-2009
Rating: N/A
Votes: 0 (Vote!) | | Posted on Friday, July 23, 2010 - 09:45 pm: |
|
I want to echo Ron's comment. Thanks to both of you and especially Marek's patience and never ending help. While this was going on, he also helped me on a Yashica as well.
Both of you should win the tenacity award for staying with this for over three weeks. |
Mareklew
Tinkerer
Username: Mareklew
Post Number: 155
Registered: 03-2010
Rating: N/A
Votes: 0 (Vote!) | | Posted on Saturday, July 24, 2010 - 03:38 pm: |
|
Thanks guys ;0)
@Alex: the simplest shutter tester is a photodiode and a mono microphone plug (connected with a piece of wire of course). Polarity doesn't matter, you just have to think either straight or upside-down when reading results.
You plug that into the microphone socket of your PC and use free program Audacity to record the "sound of light" and analyze the results.
You will see something like this:
http://img249.imageshack.us/img249/3241/soundcardshuttersignal.png
On fast shutter speeds the slopes will be visibly slanted and the wavy center will be missing.
You will need some way of fixing the photodiode on the focal plane and a strong light to shine into the lens. You can use any clear-glass narrow-beam ultra-bright LED as a photodiode too, one from a LED keychain/lighter with a light/other chinese $1 gadget with a bright LED will do. You can salvage a plug from $1 headphones too, microphone signal goes between the tip and the base of the jack, it's where left earphone is connected to.
Sorry, I'm awfully tired now, if you can't figure out what do I mean, do ask, I'll try rephrasing it tomorrow ;)
Marek |
Mareklew
Tinkerer
Username: Mareklew
Post Number: 156
Registered: 03-2010
Rating: N/A
Votes: 0 (Vote!) | | Posted on Saturday, July 24, 2010 - 03:40 pm: |
|
Corrected image: http://img833.imageshack.us/img833/3241/soundcardshuttersignal.png |
Ron_g
Tinkerer
Username: Ron_g
Post Number: 41
Registered: 07-2009
Rating: N/A
Votes: 0 (Vote!) | | Posted on Sunday, July 25, 2010 - 04:43 am: |
|
That is what I have been using to test my shutter speeds.I am using an LED flashlight for a signal and audacity to read the output on my computer monitor.
The combination seems very consistant but I really cannot say how accurate it is but since I can achieve predictable results and since it is all I have it is what I must use.
None of my scopes are digital so I cannot freeze the display to capture the trace.I have thought about video capturing the output and pausing it on playback to calculate the speed of the waveform but have not taken the time to do it yet.
The previous discussion by Marek was targeted right at me.I don't have complete confidence in the faster speeds that I am reading,1/500 seems to struggle to get 1/300 with my test setup and his explanation redeems my observations somewhat.Thanks again for taking the time to post that for us.Ron G |
Donyet
Tinkerer
Username: Donyet
Post Number: 42
Registered: 06-2009
Rating: N/A
Votes: 0 (Vote!) | | Posted on Monday, July 26, 2010 - 03:59 pm: |
|
Hi Marek,
I am having a few technical difficulties with the computer, although re-reading your instructions it may be due to the fact that I was using a stereo plug instead of mono. I will report my findings once I get things working with my computer.
Once again I want to thank you for all the help and information you've given me so far.
Alex |
Mareklew
Tinkerer
Username: Mareklew
Post Number: 157
Registered: 03-2010
Rating: N/A
Votes: 0 (Vote!) | | Posted on Tuesday, July 27, 2010 - 02:50 pm: |
|
Alex,
it doesn't matter if the plug is stereo or mono, just remember to connect one leg of a photodiode to the contact going to the tip of the jack, and the other leg to the base (the middle ring of a stereo jack remains unconnected).
If you have problems getting any signal back, it may be due to three reasons:
1) wrong diode. Although *all* diodes are 'reversible machines' i.e. powered they make light, illuminated they generate power, the efficiency depends on how they are built. An inherently dim diode with a diffuse plastic housing will not amount to much. Best would be high efficiency photodiode without any filters, but I always used some ultrabright LED I usually had lying around.
2) bad contact. Most of phono jacks sold at outfits of the like of RadioShack are junk, the tip is riveted to a soldering tab and that's supposed to guarantee the electric contact. As soon as you actually solder it, the plastic behind the tab softens and the pressure of this rivet is gone, so is any chance of electric contact.
3) Audio gain in the microphone path is too low. Check for any checkboxes like '20dB boost', or like and check them. Go to audio mixer (volume mixer in 7) and check if microphone is selected as audio recording device.
If you start Audacity and click on the bar next to the microphone symbol you should get a bar indicating recording level. It should jump up if you shine some bright light into the diode (it won't react to constant illumination level, even very high, but should react to changes in light like when you point the diode towards a bright window and wave your hand in front of it).
Greets,
Marek |
Mareklew
Tinkerer
Username: Mareklew
Post Number: 158
Registered: 03-2010
Rating: N/A
Votes: 0 (Vote!) | | Posted on Thursday, July 29, 2010 - 03:24 pm: |
|
Alex, I'm off for a week of holiday and will be off-line till about 08.08, so if you make any progress, do post about it - I will check this thread after I'm back.
Good luck!
Marek |
Donyet
Tinkerer
Username: Donyet
Post Number: 43
Registered: 06-2009
Rating: N/A
Votes: 0 (Vote!) | | Posted on Saturday, July 31, 2010 - 12:51 pm: |
|
Thanks Marek,
I did indeed get supplies from Radio Shack, including the diodes. I get no signal. I will look into buying better quality components. I may have to check and see if the mic jack is even working on my computer. It may be a combination of computer and component problems.
Audacity seems like an interesting program, thanks for recommending it.
As soon as I get through these technical dificulties I will post.
In the meantime, I will run some test rolls through the camera and test the shutter the old fashioned way.
Thanks,
Alex |
Ron_g
Tinkerer
Username: Ron_g
Post Number: 42
Registered: 07-2009
Rating: N/A
Votes: 0 (Vote!) | | Posted on Saturday, July 31, 2010 - 03:36 pm: |
|
Alex,here is a simple schematic of a typical soundcard based shutter tester.Mine is similar.
http://www.davidrichert.com/sound_card_shutter_tester.htm
There are a few variations on the net if you Google for them.Make sure that you choose microphone for input in Audacity and be sure that the input volume is at least 50% or higher so that you get a signal for it to display.
I keep my aperature wide open when testing if there is one in your test camera.I remove the lenses in my Bessamatics and that eliminates the aperature as well.Good luck.Ron G |
Mareklew
Tinkerer
Username: Mareklew
Post Number: 162
Registered: 03-2010
Rating: N/A
Votes: 0 (Vote!) | | Posted on Saturday, August 07, 2010 - 04:57 am: |
|
Try the circuit from Ron, it works best albeit requires power.
To check the PC side, just plug a mike jack in, nothing attached, you should get noticeable increase in signal level as soon as you touch middle contact with your bare finger. If you don't -> something is wrong with sound card settings or recording levels. If you do, that part is okay and you need better sensor.
Marek |
Donyet
Tinkerer
Username: Donyet
Post Number: 46
Registered: 06-2009
Rating: N/A
Votes: 0 (Vote!) | | Posted on Tuesday, August 10, 2010 - 11:30 am: |
|
Hi Marek,
I checked the PC at home and there seems to be a problem with the sound board, so I checked the one I use at work and it is fine. I guess I will be using the work computer, maybe during lunch break, to check my shutter speeds.
Ron, Thanks for the schematic.
Alex |
Donyet
Tinkerer
Username: Donyet
Post Number: 49
Registered: 06-2009
Rating: N/A
Votes: 0 (Vote!) | | Posted on Wednesday, February 09, 2011 - 01:16 pm: |
|
I have been busy the last few months and haven't had a chance to get back to the camera. I bought a new computer, so hopefully I will get a chance to try your shutter tester soon.
and thanks again for your help.
Alex |
Ron_g
Tinkerer
Username: Ron_g
Post Number: 69
Registered: 07-2009
Rating: N/A
Votes: 0 (Vote!) | | Posted on Wednesday, February 09, 2011 - 02:50 pm: |
|
Have fun with it.Ron G |
Paul_ron
Tinkerer
Username: Paul_ron
Post Number: 243
Registered: 07-2006
Rating: N/A
Votes: 0 (Vote!) | | Posted on Thursday, February 10, 2011 - 07:43 am: |
|
WOW, Nice write up guys. |
Mareklew
Tinkerer
Username: Mareklew
Post Number: 222
Registered: 03-2010
Rating: N/A
Votes: 0 (Vote!) | | Posted on Friday, February 18, 2011 - 11:13 am: |
|
hope to hear the end of it ;)
Marek |
Donyet
Tinkerer
Username: Donyet
Post Number: 50
Registered: 06-2009
Rating: N/A
Votes: 0 (Vote!) | | Posted on Tuesday, July 19, 2011 - 06:26 pm: |
|
Well, the saga continues unfortunately. I finally got back to the camera and I tried putting a roll of film through it and have found that the winding mechanism is not working. When you wind the crank, the winder inside the camera seems to be dis-engaged. The little winder "nub" turns, but when you touch it it stops turning, therefore it does not wind the film spool. The small rod with the gears that are supposed to move within the film compartment do not move.
Is there something I pressed that needs to be reset? Maybe I should start another topic instead of riding on this old one.
Thanks,
Alex |
Mareklew
Tinkerer
Username: Mareklew
Post Number: 224
Registered: 03-2010
Rating: N/A
Votes: 0 (Vote!) | | Posted on Sunday, July 24, 2011 - 06:04 am: |
|
I will follow the new topic, here:
https://kyp.hauslendale.com/classics/forum/messages/2/22192.html?1311278539
this old one left to the history ;) |
Brownman
Tinkerer
Username: Brownman
Post Number: 1
Registered: 01-2012
Rating: N/A
Votes: 0 (Vote!) | | Posted on Wednesday, February 15, 2012 - 11:59 am: |
|
I know this is a very old thread but i want to put it here that this is so far the most comprehensive, detailed and least intimidating DIY guidance i have seen on camera repair. The flow of question and answer is very easy to follow as each one logically leads to the other. It has given me enough courage to open up a similar Yashica (although i'm stuck with the big four screws that hold the shutter assembly to the body) for the first time. Kudos to both of you! |
|