| Author |
Message |
    
One90guy
Tinkerer
Username: One90guy
Post Number: 20
Registered: 07-2011
Rating: N/A
Votes: 0 (Vote!) | | Posted on Wednesday, March 07, 2012 - 07:17 pm: | 


|
I have been trying to get a MG-1 working. I broke the red wire from battery compartment and I can not find a end or see any solder joints with a piece that broke off. All sugestions or ideas most welcome.
David |
Kerne
Tinkerer
Username: Kerne
Post Number: 19
Registered: 01-2011
Rating: N/A
Votes: 0 (Vote!) | | Posted on Thursday, March 08, 2012 - 11:41 am: |
|
Does this help any?
http://www.yashica-guy.com/document/repair.html |
One90guy
Tinkerer
Username: One90guy
Post Number: 21
Registered: 07-2011
Rating: N/A
Votes: 0 (Vote!) | | Posted on Thursday, March 08, 2012 - 01:51 pm: |
|
I tryed going there but without color and my bad eyes it was no help. But Kerne I thank you for your input. I even took my own photos of the tear down but no good as far wiring:^(
David |
Br1078lum
Tinkerer
Username: Br1078lum
Post Number: 248
Registered: 11-2010
Rating: N/A
Votes: 0 (Vote!) | | Posted on Thursday, March 08, 2012 - 08:29 pm: |
|
David, give me a couple of days, and I'll do a teardown on mine with photos.
PF |
Nickon51
Tinkerer
Username: Nickon51
Post Number: 147
Registered: 05-2008
Rating: N/A
Votes: 0 (Vote!) | | Posted on Friday, March 09, 2012 - 05:47 am: |
|
Hi David, there are a few red wires wandering around. Can you give me a clue as to where are you looking. The most obvious one is at the bottom that attaches to the battery terminal.
I have some good photos of the wiring and still have one in bits.
If Br1078lum doesn't come up with anything I'll can post some. |
Br1078lum
Tinkerer
Username: Br1078lum
Post Number: 249
Registered: 11-2010
Rating: N/A
Votes: 0 (Vote!) | | Posted on Friday, March 09, 2012 - 03:10 pm: |
|
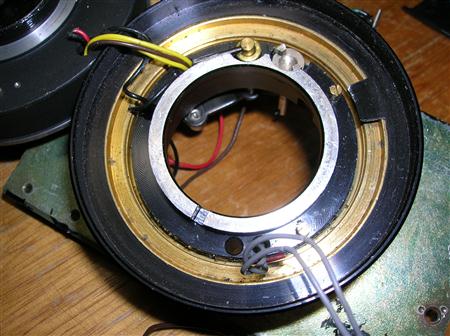
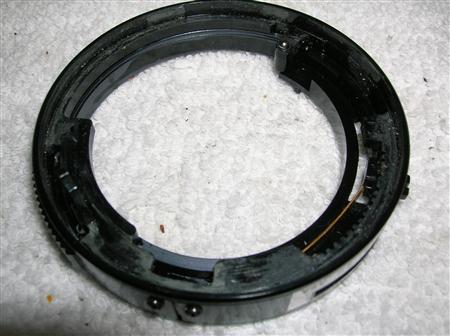
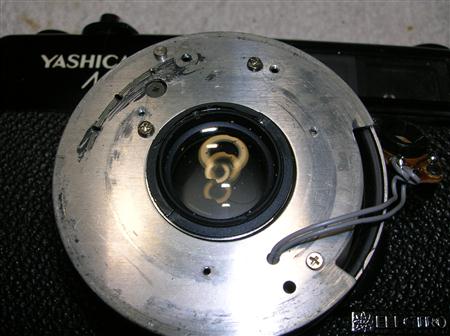
David, here are the battery wire photos. Looks to me that it goes straight to the photo cell in the lens.
The red wire from the battery well

After you get the top and bottom off, carefully pry the coverings loose.
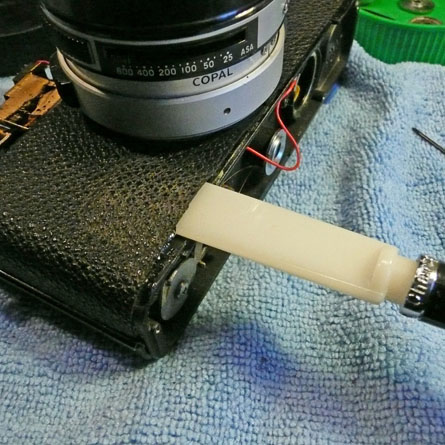
Remove the four screws as shown on the front.

Remove the screw from this post.

Then loosen the front plate, and lift it from the body. This shows the battery wire going into the lens body.
When you put it back together, this swing arm must seat on the post.
Also, set the lens to closest focus, and ensure that the rangefinder follower sits in the cam saddle.

Hope this helps, and that you have enough wire to splice without having to tear down the lens.
PF |
Nickon51
Tinkerer
Username: Nickon51
Post Number: 148
Registered: 05-2008
Rating: N/A
Votes: 0 (Vote!) | | Posted on Friday, March 09, 2012 - 08:25 pm: |
|
PF,
In that port into the shutter, now many wires and what colours go in there?
There's the red one from the battery into the shutter and then there should be a red one out, that goes to the main PCB, also a black one to the bottom of the slider switch.
On the next port up, there should be 2 x yellow wires and 1 black wire. Is that what you have?
Cheers |
One90guy
Tinkerer
Username: One90guy
Post Number: 22
Registered: 07-2011
Rating: N/A
Votes: 0 (Vote!) | | Posted on Friday, March 09, 2012 - 08:53 pm: |
|
Br1078lum wow talk about above and beyond. That is the correct wire but it has broken inside the lens. I think going into the lens is beyond my ability. Sure was hoping that it had been on the small electric board. But then I have nothing to lose. Would you mind if I make copies of your photos for future reference?
Thank you so much for going to this much trouble.
David |
One90guy
Tinkerer
Username: One90guy
Post Number: 23
Registered: 07-2011
Rating: N/A
Votes: 0 (Vote!) | | Posted on Friday, March 09, 2012 - 09:20 pm: |
|
Nickon51 thanks for the great photo. The red wire from bottom of battery compartment is the one. I have the yellow and brown, one red from lens to the switch
board. and a black one to same board. Then two gray wires from lens to elect board. Would you mind if I made a copy of photo for the future? Just have to get up nerve and try opening the lens:^)
David |
Nickon51
Tinkerer
Username: Nickon51
Post Number: 150
Registered: 05-2008
Rating: N/A
Votes: 0 (Vote!) | | Posted on Saturday, March 10, 2012 - 06:59 am: |
|
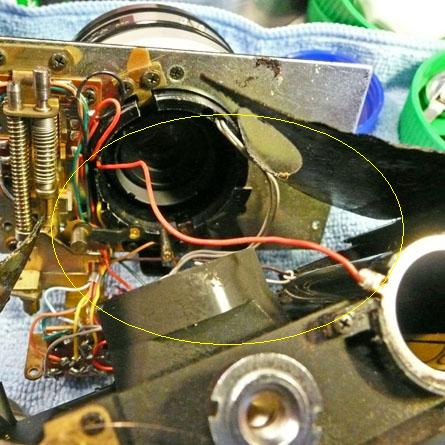
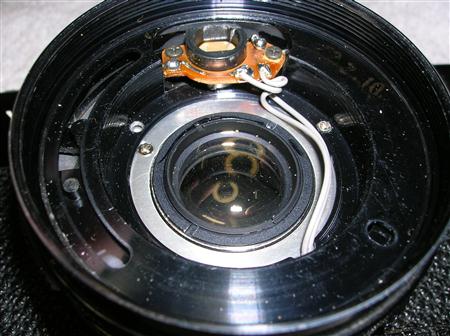
You're welcome to make a copy. The exact same thing has happend to the one I have. The red wire ends up inside the shutter, but at some point has been severed.
You can just see on the top right where the leads go into the top section. (the top section has been removed from the focussing helical and inverted)
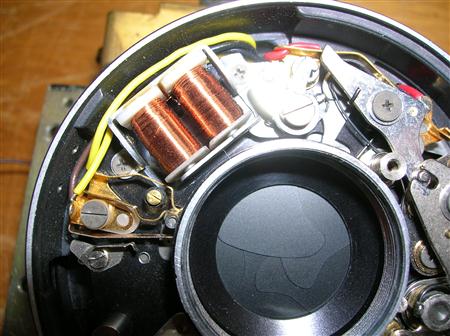
This is a view of the top part of the shutter. Here you can see where they go to. Its the main power switch.
Good luck
Greg |
Br1078lum
Tinkerer
Username: Br1078lum
Post Number: 251
Registered: 11-2010
Rating: N/A
Votes: 0 (Vote!) | | Posted on Saturday, March 10, 2012 - 09:42 am: |
|
Nick, in that port, it is three wires, two red and one black. On the one above it, I have one yellow wire, one black, and one brown (at least, that is what I can see with my magnifying hood and a bright flashlight). The one on the opposite side has two grey wires.
PF |
Br1078lum
Tinkerer
Username: Br1078lum
Post Number: 252
Registered: 11-2010
Rating: N/A
Votes: 0 (Vote!) | | Posted on Saturday, March 10, 2012 - 09:55 am: |
|
David, you're welcome. I've been delaying working on that camera because of all the wires, and lack of a decent spanner. The ones I do have are fairly basic, and prone to slipping, so I didn't want to do any damage. But after doing some fixes on other cameras, I'm learning more about the techniques used, and also how to apply the knowledge I picked up doing repair work on other equipment over the years.
Buying junk cameras for cheap, and practising on them is a good place to start, so that when you have one that is special, you can have confidence that it will work when you are done with it. I also do a lot of research, gleaning the 'net for any info I can find on any particular model I'm going to be working on. Lot's more places besides here to check (like over at YashicaForum.com).
Good luck with it, and if you decide to dive in, we'll be here to help. And you have my permission to copy my photos in this thread. I've also posted other repairs on Flickr that you might want to look at for pointers.
http:[email protected]/sets/
You will probably have to copy and paste the url into your browser, instead on just clicking on it, unless all the characters are blue.
PF |
One90guy
Tinkerer
Username: One90guy
Post Number: 24
Registered: 07-2011
Rating: N/A
Votes: 0 (Vote!) | | Posted on Saturday, March 10, 2012 - 12:17 pm: |
|
Br1078lum and Nickon51 thanks so much. Did not give much for this one, my goal had been to leave it in my truck. That said do not have real lens spanners but I am going to give it a shot, its not going to work as is:^) Up until now I have been lucky with the Yashicas, finding problems with just removing top or bottom plates.
David |
One90guy
Tinkerer
Username: One90guy
Post Number: 25
Registered: 07-2011
Rating: N/A
Votes: 0 (Vote!) | | Posted on Saturday, March 10, 2012 - 12:23 pm: |
|
Oops forgot to ask, it looks like you go into lens from back side? Does the lens have to be removed from the front plate?
Thanks again
David |
Nickon51
Tinkerer
Username: Nickon51
Post Number: 152
Registered: 05-2008
Rating: N/A
Votes: 0 (Vote!) | | Posted on Sunday, March 11, 2012 - 03:11 am: |
|
PH,
Thanks for the verification of the wiring. I really must put this one back together before I forget how.
David
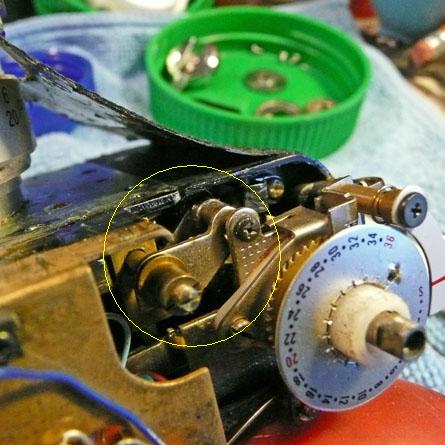
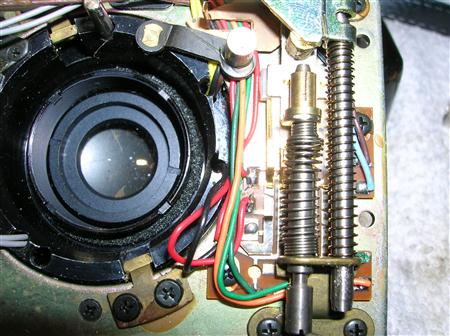
This is not an easy shutter to get into, but with a bit of creativity you can make some tools to do the job.
Remove the shutter plate assy from the camera as PH outlined.
Use a suitable tool and remove the thin chrome ring on the outside of the name plate but inside the barrel. Its screws into the same threads as the filters use. I made up a special tool for this. If you have a dremel or bench grinder its easy to do. Using a piece of thin steel, grind one edge off it just leaving one tang on either side to drop into the slots on the ring. I used a piece of a power hacksaw blade, but almost any scraper blade or putty knife will do.
The wide one on the left is for 55mm thin rings.
After you remove the front ring, these parts should drop out
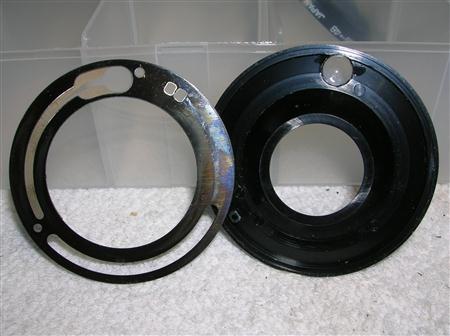
and this
leaving you with here
Unscrew the sensor board, and then the 3 screws that hold the black shroud. Lift that off and you are down to the shutter cover.
Remove the 3 c/s screws and you have the shutter exposed. Leave the sensor dangling on its lead for this one.
Turn the shutter plate over over and you will see a long 4 slotted retaining tube that extends up past the rear lens. Leave the lens and remove that tube. Use a suitable piece of flat steel.

After you unthread that, the shutter should drop clear of the helical mount.
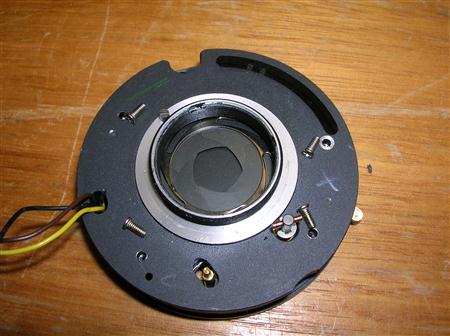
This picture shows some screws removed, you do not to need to do this. You should remove both lenses for safe keeping.
Now thread the replacement wires through, reassemble and enjoy.
Good Luck
Greg |
One90guy
Tinkerer
Username: One90guy
Post Number: 26
Registered: 07-2011
Rating: N/A
Votes: 0 (Vote!) | | Posted on Monday, March 26, 2012 - 02:24 pm: |
|
Just a update on the MG, tryed to open lens back without spanner which did not work. I broke the first putty knife and now working on a more heavy duty one. I am thinking to just bite the bullet and buy the spanner I know it will be used some.
Thanks again for all the help
To be continued:^)
David |