| Author |
Message |
    
Franciswhite
Tinkerer
Username: Franciswhite
Post Number: 1
Registered: 06-2012
Rating: N/A
Votes: 0 (Vote!) | | Posted on Wednesday, June 20, 2012 - 09:58 pm: | 


|
Hello,
I've got a Voigtlander Bessa 1, with a 105/4.5 Vaskar. The camera is in relatively tidy condition, and I've cleaned the viewfinder out, however, the shutter is sticking on the lowers speeds, the self timer doesn't want to go and is sticking(not that I need it, but it is annoying when I've triggered it by accident), and the some of the aperture diaphragm blades are sticking, making the aperture go all over the place, from wider that usual, to completely closed.
I have no trouble taking the front element of the lens off, but I'm not sure about the back element, or how to get to the shutter assembly.
Any advise on the dismantling of the lens, and repair, would be greatly appreciated.
Thanks,
Francis White |
Fedupwithdigital
Tinkerer
Username: Fedupwithdigital
Post Number: 17
Registered: 07-2011
Rating: N/A
Votes: 0 (Vote!) | | Posted on Thursday, June 21, 2012 - 01:21 pm: |
|
Francis
You have my sympathies. I have a Bessa 1 with the same lens (in a Prontor SV shutter). I got it dirt cheap - 10 euros plus postage - as it didn't work. My shutter would cock but wouldn't fire. The self-timer was jammed on.
I tried to fix it myself but only got as far a removing the front element. I was following this Flickr set - http://www.flickr.com/photos/29504544@N08/sets/72157622962172593/ - by Hans Kerensky. But I couldn't remove the middle element. There were no holes or slots for a spanner wrench to grip and nothing I tried worked.
In the end I had to give up and take the shutter to my local camera repair shop. Luckily, Joe of JP Camera Repair here in Edinburgh managed to fix for a very reasonable fee. As well as the timer, there were a couple of broken parts and some bent parts too. Oh, and some fungus on the rear element. So, even if I'd gotten into the shutter it would've been beyond my skills to fix it.
So - not much help I'm afraid. But good luck! |
Hanskerensky
Tinkerer
Username: Hanskerensky
Post Number: 198
Registered: 05-2009
Rating: N/A
Votes: 0 (Vote!) | | Posted on Thursday, June 21, 2012 - 11:55 pm: |
|
Yesterday evening had a look at the rear lens of my Bessa 1 (Color-Skopar). The lens ring has no pinholes or slits so you have to remove it using a rubber tool or a special (clamping) lens spanner. Best is to remove the shutter from the camera before you try this so you can exercise enough force. |
Fedupwithdigital
Tinkerer
Username: Fedupwithdigital
Post Number: 18
Registered: 07-2011
Rating: N/A
Votes: 0 (Vote!) | | Posted on Friday, June 22, 2012 - 05:36 am: |
|
Hans, thanks for your Flickr set by the way. Although I wasn't able to open my shutter, I learned a lot.
The rear element on mine just unscrewed. It was the middle element I couldn't budge. My camera repair guy, Joe, said rather enigmatically that he wouldn't go in through the front. But he didn't say how how would go in. His shop was busy so I wasn't able to ask when I picked up the repaired shutter.
But I recall reading somewhere that you can go in through the back, once you've removed the rear lens. Something about turning the aperture lever one way to expose screws and then turning it another way to expose other screws?
Does any of that make any sense to you? |
Hanskerensky
Tinkerer
Username: Hanskerensky
Post Number: 199
Registered: 05-2009
Rating: N/A
Votes: 0 (Vote!) | | Posted on Friday, June 22, 2012 - 12:52 pm: |
|
Ian, the way you described (after first removing the shutter from the camera) is how to find the screws that fix the shutter baseplate to its housing. I wouldn't advise this to the OP because the shutter blades are then exposed and free to fall of their postings.
You can see were these screws are located on this Flickr image. And indeed, with some cameras you have to move the diaphragma ring to reach them.
Another problem can be (still did not opened up the Prontor-S on my Bessa 1) that the middle element is so wide that it prevents you from removing the (serated) ring that fixes the shutter front coverplate to the housing and this would block any attempt in getting the baseplate out (even from the back). |
Franciswhite
Tinkerer
Username: Franciswhite
Post Number: 2
Registered: 06-2012
Rating: N/A
Votes: 0 (Vote!) | | Posted on Friday, June 22, 2012 - 02:52 pm: |
|
Thanks for the advice, it looks very good. I'll have another look shortly, and get back to you with results (more likely problems...) |
Hanskerensky
Tinkerer
Username: Hanskerensky
Post Number: 201
Registered: 05-2009
Rating: N/A
Votes: 0 (Vote!) | | Posted on Saturday, June 23, 2012 - 02:29 am: |
|
Well Francis, just had a go at the Prontor-S / Color-Skopar 3,5 of my Bessa I. Shutter and lens are not the same as on yours but guess that there is not that much difference.
I took the shutter from the camera by removing the ring, inside the camera, from the back. It has 4 slits so you can use a normal lensspanner there.
Next i removed the frontlens and then pushed the barrel of the middle lens firmly against a rubber mat on my workbench and at the same time started turning the housing counterclockwise. The barrel luckily came loose and the middle element could be removed. If it doesn't you might think about heating up the frontend of the shutter for some minutes with a hairdryer and try again while still hot.
 |
Hanskerensky
Tinkerer
Username: Hanskerensky
Post Number: 202
Registered: 05-2009
Rating: N/A
Votes: 0 (Vote!) | | Posted on Saturday, June 23, 2012 - 02:36 am: |
|
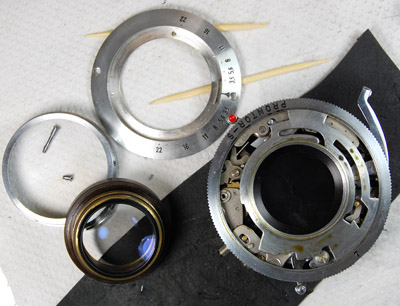
Here an image just after the removal of the middle element. The lens barrel has no slits or pinholes so you really have to remove it by using a rubber tool (like i did) or using a special type of clamping lensspanner. I strongly recommend using a rubber tool as using a clamping lensspanner might cause damage to the barrel or even the glass element when there is too much tightening force.
 |
Hanskerensky
Tinkerer
Username: Hanskerensky
Post Number: 203
Registered: 05-2009
Rating: N/A
Votes: 0 (Vote!) | | Posted on Saturday, June 23, 2012 - 02:41 am: |
|
As you saw on the image of my former posting there is no serated ring to fix the coverplate to the housing. Instead of that 2 screws are used. Observe that these screws are different in length.
Here an image of the exposed shutter front.
 |
Fedupwithdigital
Tinkerer
Username: Fedupwithdigital
Post Number: 23
Registered: 07-2011
Rating: N/A
Votes: 0 (Vote!) | | Posted on Thursday, June 28, 2012 - 06:30 am: |
|
Great pictures, Hans.
A quick question. When you removed the shutter from the camera body, were there any metal or paper shims?
There were none on my Bessa 1 but my camera repair guy was pretty skeptical and thought there should have been.
I've reassembled my camera now and checked the focus with a (home made) ground glass. It appears to be spot on, despite the lack of shims. |
Hanskerensky
Tinkerer
Username: Hanskerensky
Post Number: 206
Registered: 05-2009
Rating: N/A
Votes: 0 (Vote!) | | Posted on Thursday, June 28, 2012 - 09:29 am: |
|
Francis, on my Bessa 1 there were no shims. I didn't check the focus yet as this shutter is dripping from oil and has to be cleaned first. |
Franciswhite
Tinkerer
Username: Franciswhite
Post Number: 3
Registered: 06-2012
Rating: N/A
Votes: 0 (Vote!) | | Posted on Sunday, July 01, 2012 - 09:02 am: |
|
Thanks for the pictures, they're really helpful.
I haven't got the middle element out yet, it is still being stubborn, but I'll have another go tomorrow, when I sort a better rubber pad out. |
Franciswhite
Tinkerer
Username: Franciswhite
Post Number: 4
Registered: 06-2012
Rating: N/A
Votes: 0 (Vote!) | | Posted on Wednesday, July 04, 2012 - 04:32 pm: |
|
I managed to get the middle element out, thanks to your advice and pictures, Hans.
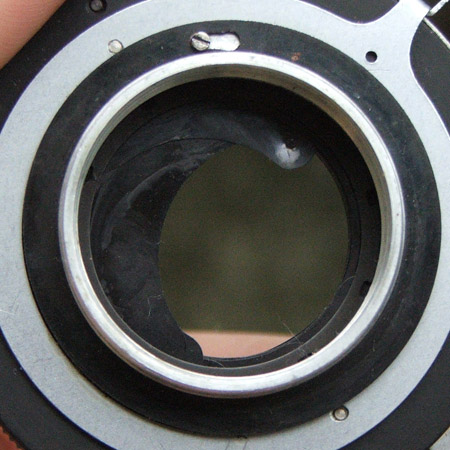
Now I've got the real problem, that of the diaphragm. Have you got any advice for this? I've attached a front and rear view of the problem. I imagine it will involve something more of a disassembly. Thanks,
Francis
  |
Franciswhite
Tinkerer
Username: Franciswhite
Post Number: 5
Registered: 06-2012
Rating: N/A
Votes: 0 (Vote!) | | Posted on Monday, July 09, 2012 - 07:38 am: |
|
Well, I took the shutter apart, to find that, unsurprisingly the diaphragm blades were clumped together into little groups of twos and threes. I unstuck them, individually cleaned them, and put them all together, with the help of this page:
http://www.daniel.mitchell.name/cameras/index.php?page=diaphragm
It was a little fiddly, and rather frustrating, but well worth it, it's going really well now. I'll adjust the focus, and then put a film in it.
Thanks for your help and advice, it really helped.
Francis |
Hanskerensky
Tinkerer
Username: Hanskerensky
Post Number: 207
Registered: 05-2009
Rating: N/A
Votes: 0 (Vote!) | | Posted on Monday, July 09, 2012 - 01:18 pm: |
|
Hi Francis,
Just had a busy week and had a businnes trip abroad so missed your last postings but see that you managed anyway. Good job !
I allways try to avoid taking the diaphragma blades out as it can a bit tricky getting them back again as you no doubt know by now ;-) |
Franciswhite
Tinkerer
Username: Franciswhite
Post Number: 6
Registered: 06-2012
Rating: N/A
Votes: 0 (Vote!) | | Posted on Monday, July 09, 2012 - 07:20 pm: |
|
I've just been trying to set the infinity focus, but I can't get it quite right, as the stop only has one setting, and I can only find two places to thread the front element on. I'm wondering if I've not got the middle element in correctly. I didn't make any markings when I took either element off, so I've got no reference either.
Any suggestions? |
Hanskerensky
Tinkerer
Username: Hanskerensky
Post Number: 208
Registered: 05-2009
Rating: N/A
Votes: 0 (Vote!) | | Posted on Monday, July 09, 2012 - 11:55 pm: |
|
Francis, you first have to focus the lens at infinity and then carefully install the distance ring against the infinity endstop. Then fasten the little setscrews. |
Franciswhite
Tinkerer
Username: Franciswhite
Post Number: 7
Registered: 06-2012
Rating: N/A
Votes: 0 (Vote!) | | Posted on Wednesday, July 11, 2012 - 01:44 am: |
|
Got it. Now I've just to glue a new bit of leather on the bottom, and it'll be ready to go. I'm quite looking forward to it. Next, I think I'll have a go at an Isolette rangefinder, which I found not to be functioning only when I put a film in it. The negatives don't look too bad, so fingers crossed the bellows are all right. I'm sure your Flickr set will come in handy, Hans.
Thanks again for all your assistance.
Francis |
John_shriver
Tinkerer
Username: John_shriver
Post Number: 90
Registered: 12-2006
Rating: N/A
Votes: 0 (Vote!) | | Posted on Saturday, July 14, 2012 - 05:45 pm: |
|
On a stuck middle element like that in a Kodak Vigilant Six-20, I used a jeweler's saw to cut a pair of slots in the brass barrel of the front element. That gave me someplace to apply torque with my lens spanner, and it came out. (It foiled me for about 40 years before I thought of that. I'd tried mauling it with Channel-Locks before that.) |
Fedupwithdigital
Tinkerer
Username: Fedupwithdigital
Post Number: 24
Registered: 07-2011
Rating: N/A
Votes: 0 (Vote!) | | Posted on Friday, July 27, 2012 - 08:24 am: |
|
Just a quick bit of info on the Bessa 1. And one question.
As I mentioned in an earlier post, my camera repair guy thought there should have been shims between the shutter assembly and the body but there were none when I took it off. Hans confirmed his Bessa had no shims either.
So I reassembled the camera and used a home made ground glass (make out of a piece of CD case cut to size and sanded) and the infinity focus seemed to be spot on.
After that, I ran a 120 slide film through and, on getting it developed, the shots were all in perfect focus.
Either I got lucky or the Bessa doesn't need any shims.
As for getting the front element in the right place, I'd marked where it came off the threads when trying to fix it myself. My camera repairman used that mark when re-threading the front element. So it looks like I made the mark in the right place after all!
One final question then.
Before I reassembled the Bessa, the double exposure prevention mechanism was working fine. Until I wound on, the arrow was pointing to the wind on knob. After winding on, the arrow was pointing to the shutter button. After firing the shutter, the arrow swung back to point at the wind on.
After reinstalling the shutter assembly, however, this no longer works. The arrow stays pointing at the shutter button.
Why?
I noticed that the backplate on the camera body where the shutter assembly attaches has 3 small notches. These seem to match the small screw on the back of the shutter assembly (seen in Hans's third post above). Does it matter in which of the three notches the screw ends up?
It seems to me that changing which notch the screw rests in will alter how close the shutter trigger on the camera body is to the shutter trigger on the shutter assembly. Have I reassembled my camera in such a way that the gap is too small (or too big?). And does this somehow stop the double exposure prevention from operating? |
Hanskerensky
Tinkerer
Username: Hanskerensky
Post Number: 209
Registered: 05-2009
Rating: N/A
Votes: 0 (Vote!) | | Posted on Wednesday, August 01, 2012 - 11:44 am: |
|
Francis, your problem with the DEP could be caused by a changed orientation of the lens/shutter on its mounting plate. This could cause the shutter to fire too early in the release button stroke and (maybe) hindering the release button to be far enough depressed to reset the DEP mechanism. |
Franciswhite
Tinkerer
Username: Franciswhite
Post Number: 9
Registered: 06-2012
Rating: N/A
Votes: 0 (Vote!) | | Posted on Wednesday, August 01, 2012 - 11:33 pm: |
|
Developed my first roll today, in coffee(thought I'd give it a whirl), and it looks like everything is pretty good (forgetting for a moment the roll came undone in my pocket, and the last few frames have more than a little fog). Thanks again for your advise, it was terrifically helpful.
Francis |
Fedupwithdigital
Tinkerer
Username: Fedupwithdigital
Post Number: 25
Registered: 07-2011
Rating: N/A
Votes: 0 (Vote!) | | Posted on Monday, August 20, 2012 - 03:24 am: |
|
Just a follow up on my earlier post about the double exposure prevention mechanism.
I removed the shutter assemby and the small screw on the rear was in the notch nearest the shutter release side. Moving it into any of the other notches meant the shutter release was even closer. So it was in the right notch after all.
While I had the shutter off, I cleaned the shutter release levers in the body and then added a bit of lubricant. That seems to have been what was needed as, on reassembling the camera, the DEP now works as it should.
So I think it was just a little sticky and, with the shutter attached, it wasn't moving far enough to engage the DEP mechanism. |