| Author |
Message |
    
Bigbeark
Tinkerer
Username: Bigbeark
Post Number: 1
Registered: 06-2013
Rating: N/A
Votes: 0 (Vote!) | | Posted on Sunday, June 09, 2013 - 06:43 pm: | 


|
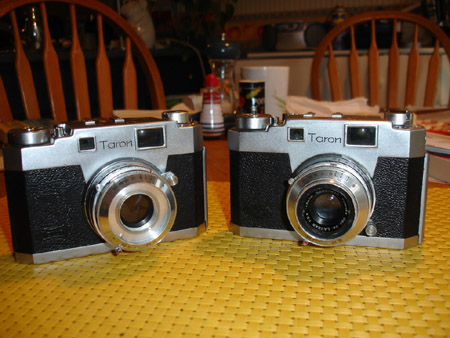
Hi everyone, I'm new here. I have this very nice Taron 35 rangefinder with the Tomioka Lauser lens and NKS shutter from the mid 50s.
Everything works and looks good on this one but the helicoid is really seized tight at the 3 feet mark.
I tried to remove the lens using my pointed lens spanner and some WD40 but no go. It looks like the lens is retained by a drum.
I am considering removing the lens elements and using a heat gun but this seems extreme.
You can't actually see the helical threads from
inside or outside the camera.
Suggestions? I have a small butane torch as well. |
Br1078lum
Tinkerer
Username: Br1078lum
Post Number: 571
Registered: 11-2010
Rating: N/A
Votes: 0 (Vote!) | | Posted on Sunday, June 09, 2013 - 08:28 pm: |
|
Bad enough you spritzed it with WD-40, but now you want to flambe it with a torch?
First lesson: WD-40 is a no-no, unless the camera is nothing but a pile of rust, and you are dismantling it for the recyclables.
Lesson two: Heat is okay, but not open flame. You'd catch that WD-40 on fire, and then who knows what else. Start with the low setting on the heat gun after letting some alcohol (91% or better) soak in first.
Lesson three: Photos are nice to have when you are asking for help, especially since you have partially dismantled the lens assembly. It will make it easier for someone to coach you through the job.
Lesson four: There are many posts here on various subjects, and you might find something about your particular camera, or a close variant. Use the Search feature in the upper right corner of the screen. Just type in "Taron 35", and see where that takes you.
I've got a Taron, but don't remember what model it is, as it sits in my junk box. I'm pretty busy right now with some personal matters, so I won't have the time to dig it out and dismantle to see what you are talking about. Someone else pretty much wrecked it trying to do repairs before I got it.
PF |
Br1078lum
Tinkerer
Username: Br1078lum
Post Number: 572
Registered: 11-2010
Rating: N/A
Votes: 0 (Vote!) | | Posted on Sunday, June 09, 2013 - 09:08 pm: |
|
Well, a search here didn't turn up much, nor did a Web search. I did find out what version I have (VR), as it turned up in my search here. From what I've heard from other owners of Taron cameras, they either love them, or hate them, with the majority running towards the latter class. Which explains the paucity of information.
It doesn't look like a well built camera to me, but then that's a good one to start learning camera repair on, as it's no great loss to the photographic world if it winds up in the junk bin.
But you can get a lot of satisfaction out of bringing such a camera back to life. The funny thing about camera repair is, there are so many similarities and parallels that once you learn how one type of lens or shutter is put together and operates, you can put that knowledge to good use on the next camera (the NKS is known as a close copy of the Prontor shutter).
Just know that as you work your way through different cameras, there will be various levels of complexity, hidden screws, and just plain difficult-to-put-back-together parts to vex you. It's all fun though.
PF |
Bigbeark
Tinkerer
Username: Bigbeark
Post Number: 2
Registered: 06-2013
Rating: N/A
Votes: 0 (Vote!) | | Posted on Monday, June 10, 2013 - 08:01 am: |
|
Well I think I solved it, my other working Taron provided the answer.
The "drum" is actually the part that moves back and forth when operating the focus lever. the two holes in the drum are probably locating holes for the shutter body.
It looks like you have to disassemble the shutter from the front to remove it from the focus helicoid.
By removing the grubscrews in the focus ring I can see the join of the brass helicod to the alumimnum body flange.
The old brass seizes in aluminum problem.
I think the shutter will have to be removed in order to apply heat to the helicoid.
pictures will follow |
Bigbeark
Tinkerer
Username: Bigbeark
Post Number: 3
Registered: 06-2013
Rating: N/A
Votes: 0 (Vote!) | | Posted on Monday, June 10, 2013 - 08:15 am: |
|
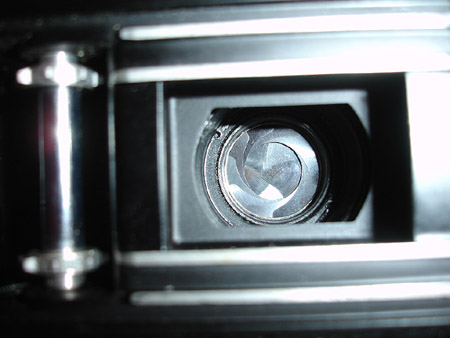
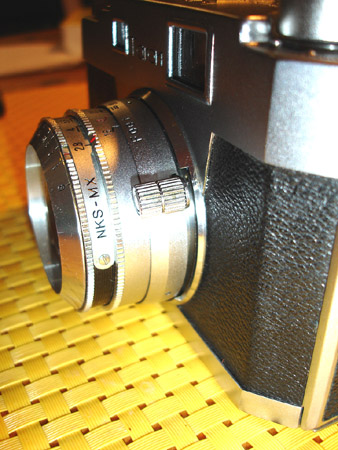
Here are the Taron 35 pictures
 |
Scott
Tinkerer
Username: Scott
Post Number: 190
Registered: 07-2006
Rating: N/A
Votes: 0 (Vote!) | | Posted on Monday, June 10, 2013 - 09:56 am: |
|
Your 2nd photo (of the back of the shutter blades) also shows the ring nut which has to come off in order to dismantle the helical enough to properly remedy the focus issues. That ring has two round holes where the prongs of an adjustable spanner should fit. Those are normal ("right-hand") threads, and those ring nuts are usually on quite tight.
On your camera, you can't solve the focus issues by removing rings from the front to the shutter. First take the top and bottom covers off, then peel the covering back far enough to find how the shutter body is attached to the camera. There are probably four screws.
These late 1950s RFs usually have the shutter/lens assembly mounted on a square-ish plate with the ring nut (which you can see), and that plate is attached to the front of the body casting with four machine screws.
Find and remove those four screws, take off the plate, then you can see the helical and remove the ring nut if you have a spanner. If you don't have a proper spanner, you can find a pretty good substitute at a well-stocked auto parts shop. |
Br1078lum
Tinkerer
Username: Br1078lum
Post Number: 574
Registered: 11-2010
Rating: N/A
Votes: 0 (Vote!) | | Posted on Monday, June 10, 2013 - 08:04 pm: |
|
You can also make a spanner out of copper tubing. Get a piece that matches the diameter of the ring, and trim it so that you have two nubs to fit into the slots of the ring. Drill a couple of holes in the other end so that you can insert a screwdriver for a torque handle. That way, you won't have to remove the front plate from the camera.
When you put it all back together, try to find some Super Lube at your local hardware store. It's a very good synthetic that won't migrate onto the aperture or shutter blades, and has a wide temperature operating range, so you can take your camera out in the desert, or on a glacier.
PF |
|