| Author |
Message |
    
Jeffk
Tinkerer
Username: Jeffk
Post Number: 44
Registered: 10-2011
Rating: N/A
Votes: 0 (Vote!) | | Posted on Sunday, December 11, 2011 - 09:32 pm: | 


|
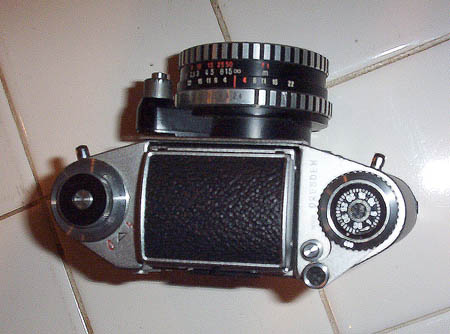
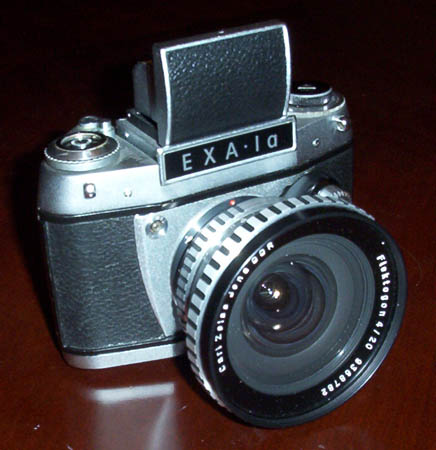
Tried posting this earlier but it never appeared... I picked up an Exa 1a in the former DDR years ago, and it's a very interesting and totally functional camera that I even have a couple good lenses and a leather case for, but the advance lever is loose to the point that I'm afraid to run another roll of film through it. I can't see how to get at the mechanism below and tighten/fix whatever is causing it to be lose - there's no screw or anything under the leather circle in the middle, I checked. Any ideas?
 |
Aford
Tinkerer
Username: Aford
Post Number: 91
Registered: 03-2007
Rating: N/A
Votes: 0 (Vote!) | | Posted on Monday, December 12, 2011 - 04:35 pm: |
|
Exa-500 Advance lever removal - under the leather circle you will find a screw with one hole in it, this requires a special tool to unscrew it but if you drill another hole opposite it then it can be unscrewed using needle nosed pliers. Under the screw head there is sometimes adhesive (Loctite).
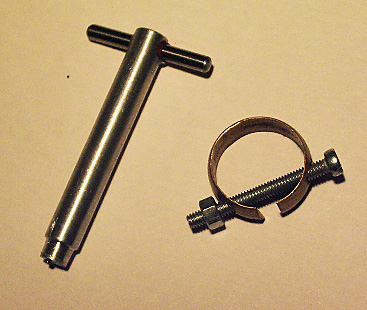
Another special tool is used to remove the counter dial without damaging it. I made one using a 15mm brass olive that I used to clamp it. Make a cut in the olive with a hacksaw then use a long thin screw and nut to squeeze the olive around the dial.
This problem was posted a year or more ago. |
Aford
Tinkerer
Username: Aford
Post Number: 92
Registered: 03-2007
Rating: N/A
Votes: 0 (Vote!) | | Posted on Monday, December 12, 2011 - 04:56 pm: |
|
Jeffk
I searched and found my earlier posting, here it is.
https://kyp.hauslendale.com/classics/forum/messages/15681/11330.html
I see now that the olive clamp is used to hold the counter dial firmly while the screw is removed. |
Jeffk
Tinkerer
Username: Jeffk
Post Number: 46
Registered: 10-2011
Rating: N/A
Votes: 0 (Vote!) | | Posted on Monday, December 12, 2011 - 06:55 pm: |
|
Excellent, thank you for the tips and link! I'll dig into this as I have time and report back. |
Jeffk
Tinkerer
Username: Jeffk
Post Number: 47
Registered: 10-2011
Rating: N/A
Votes: 0 (Vote!) | | Posted on Monday, December 12, 2011 - 07:49 pm: |
|
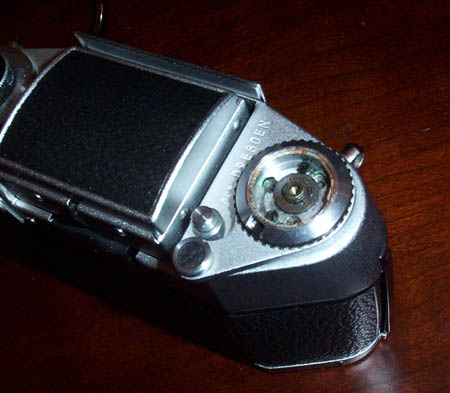
O.K., dove into it a bit. The black ring with the exposure count indicator is lightly glued in place, and pops out easily. Under that I can see two small screws floating around under the black exposure counter dial, which is obviously suspect. However rotating the central hub counterclockwise, as I would do to unscrew it unless it is reverse-threaded, just ratchets the entire dial. Do I need to hold the black dial somehow while rotating the central hub? Is there a photo of this "olive clamp" you mention? I'm not understanding what you are describing. |
Steve_s
Tinkerer
Username: Steve_s
Post Number: 192
Registered: 07-2006
Rating: N/A
Votes: 0 (Vote!) | | Posted on Tuesday, December 13, 2011 - 03:38 am: |
|
As you've discovered you need to hold the outer edge of the frame-counter disc while you undo the centre screw. Aford's method sounds a good one. The method I've used is to find a piece of rigid plastic tube a suitable diameter and file or turn a taper on the inside so it will grip when you push it down onto the disc.
There are 3 little screws holding the lever on (or only one in your case as 2 seem to have escaped!). They were originally locked in with lacquer, and they inevitably work loose if they are assembled without. I use a tiny bit of Loctite under the heads, or you could use 'Superglue' (cyanoacrylate), but you do NOT want to get any on the threads or the screw will shear if you ever need to take it off again! |
Aford
Tinkerer
Username: Aford
Post Number: 93
Registered: 03-2007
Rating: N/A
Votes: 0 (Vote!) | | Posted on Tuesday, December 13, 2011 - 03:58 pm: |
|
Jeffk
Here is the picture of the tools I made.
 |
Jeffk
Tinkerer
Username: Jeffk
Post Number: 49
Registered: 10-2011
Rating: N/A
Votes: 0 (Vote!) | | Posted on Wednesday, December 14, 2011 - 08:07 pm: |
|
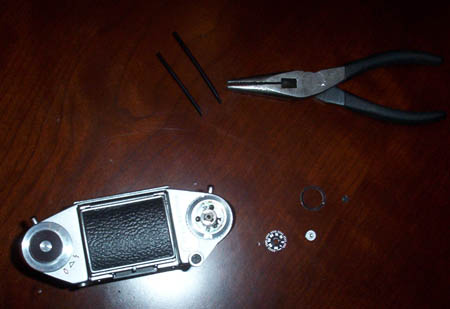
Thanks for the tips, and excellent tool Aford! I however am more lazy, and wound up doing the following, which I wouldn't do with someone else's camera or with a particularly precious camera of any kind, but it did work fine:
1) Pry off the black annular ring with the white-dot exposure count indicator.
2) Cut two plastic cylinders from a plastic model kit frame, and shave off one end of each piece into a wedge.
3) Wedge the cylinders between the black dial and the inside rim of the advance lever to hold the dial in place.
4) Loosen center screw using a careful nudge from needlenose pliers, in the usual counterclockwise direction. I first tried putting shrink-wrap around the jaws but this did not work very well, so I simply carefully clamped and turned.
5) Remove black dial, it is now just sitting on a land.
6) Remove the last of the three little screws (two were already floating around), put a tiny drop of blue locktite on the threads of all three, and replace and tighten the screws.
7)Put it all back together, using a drop of blue locktite on the central hub screw and tightening it finger-tight with my thumb, and a tiny bit of rubber cement under the black ring and under the leather circle (which I did not actually need to remove).
Works great now! Hopefully this is the only time I will ever need to tear into this camera, it otherwise works fine and is pretty unique and interesting in an unusual sort of way.
 |